Protein Packed Chia Acorns

I do a lot of working out and a lot of lifting weights, and when you do that, you have to give your body protein when you’re done or else you’ll actually burn muscle instead of fat. Most of the time after I workout, I have a Juice Plus shake or smoothie, but sometimes I just want a quick little snack. I’ve also been researching and eating more chia seeds lately, in smoothies, juices, baking, etc.

Chia (yes, the same chia that is subjected to clay likenesses of Duck Dynasty characters’ live beards) is a tiny, edible seed that is derived from the desert plant Salvia hispanica. It grows in Mexico and is dated back to the Mayan and Aztec cultures who ate the tiny black or white seeds as an energy booster. Today, people eat them for the same reason and many others that we now know. The seeds are packed with Omega-3 fatty acids, protein, fiber, antioxidants and even calcium. Unlike flax seeds, chia seeds are a whole grain food that can be absorbed by the body in its seed form (flaxseeds can only be absorbed if ground – otherwise they pass through your system untouched). One ounce (about 2 tablespoons) contains 139 calories, 4 grams of protein, 9 grams fat, 12 grams carbohydrates and 11 grams of fiber, plus vitamins and minerals.

So it’s a great item to add into your diet whenever possible since they are so nutrient dense. There are also claims that because of their high fiber content, they can help you stay fuller for longer, and so for some people, perhaps, help them to lose weight. That’s a harder claim to prove, but it’s there.

So yesterday, after my workout, I decided to create a protein-rich post-workout snack that’s also just a tiny bit indulgent. You can find chia seeds at your local health food store and nowadays probably in your grocery store’s organic or health section. White or black chia are fine – I’m not aware of any particular taste difference, although there may be some. The chia doesn’t really affect the taste all that much in this recipe.

Protein Packed Chia Acorns

chia acorns

Ingredients:

  • 5 Medjool dates, pitted (yes, they have pits as my food processor discovered for me!)
  • 4 tbs of organic, low-sugar or no sugar peanut butter or other nut butter including almond, cashew – even tahini (sesame seed butter). PB can be creamy or crunchy.
  • 2 tsp chia seeds, ground (I grind flax and chia in my coffee grinder)
  • 1 scoop of Juice Plus chocolate shake mix or any other protein powder – I prefer chocolate flavored, but vanilla or unflavored is also OK. 1 scoop of Juice Plus is 38 grams – usually protein powders are measured by weight, not volume….soooo, you’re just going to have to sort of estimate there. I’d say the scooper that comes with it is around 1/4 cup?
  • 1/4 cup of dark chocolate chips or pieces
  • 1 tsp vegan butter (or real butter, if you’re lucky enough to have a body that can process dairy)

Method:

  1. Process the dates, nut butter, chia seeds and protein powder in a food processor until crumbly and mixed well.
  2. Using a cookie scoop, scoop out 10-12 balls and roll in your hands until they’re round and packed firmly. Place on a parchment lined baking sheet.
  3. Microwave the chocolate and vegan butter in a heat proof glass dish for about a minute, on low, stirring with a silicon spatula about halfway through. If not completely melted after one minute, microwave for 10 second increments, checking each time to see if the chocolate is smooth.
  4. Once smooth, dip each ball halfway into the chocolate (or use a small spatula to spread the chocolate onto the protein balls) and place back onto the parchment.
  5. Freeze for half an hour, then put into an airtight container and store in the refrigerator.

chia acorns bitten

These are really yummy, just a little indulgent, and packed with protein. However, I think if I make them again, I might try a different method. I was thinking it might be easier to take the processed mixture, pack it into a parchment lined brownie pan, melt the chocolate, then spread the chocolate over the top of the mixture, freeze, then cut into squares and wrap individually in the fridge. Probably not as cute as these little acorns, but maybe a tiny bit easier to make and store?

Anyways, give chia a chance. It’s not just for white elephant gift exchanges anymore.

Snow Day Soup

If you live pretty much anywhere on the east coast of the country above South Carolina, you are probably experiencing some snow today. In southeastern Virginia, we started getting snow yesterday afternoon and through the night. And if there’s anything that below freezing temperatures and a few inches of snow makes you want, it’s soup. A certain soup company has made like a zillion dollar or something on this concept. Ehhh?

Please don't sue me for the unauthorized use of this picture, soup company!

Please don’t sue me for the unauthorized use of this picture, soup company!

So last night I got the soup pot fired up, but unlike this creepy snowman kid, I did not turn to the standard snow day soup . . .

Move over, Chicken Noodle – there’s a new soup in town!

Ham & Cabbage Soup

ham and cabbage soup

Ingredients:

  • 6 cups of chicken broth (I used my homemade crockpot chicken broth)
  • 1 onion, diced
  • 5-6 medium carrots, diced
  • 1 small head of cabbage, chopped
  • 1/2 cup of pearled barley
  • 1/2 – 1 lb ham, diced
  • 1 tsp garlic powder
  • 1 tbs dried parsley
  • salt and pepper to taste

Method:

  1. Add all the ingredients to a large, heavy stockpot, bring it to a boil, then reduce to low and simmer for 1.5 hours. Soup is ready when carrots and cabbage are tender and barley has fluffed and cooked through.

A quick note about the ham. You can use any kind of ham you want here – I made this soup because I had a little less than a pound of Honeybaked Ham (on the bone) left over from a brunch. I usually make this soup with a salted, country style ham to give the soup the saltiness I like. But if you prefer sweet ham and don’t need or want your soup to be salty, then use that. Another note that the cabbage, carrots and onions came from our Winter CSA that we are getting from Cullipher Farm. Yes, there is fresh, local produce available in the winter! In addition to those ingredients we also got potatoes, kale, turnips and collards in our box last week.

This soup is very filling thanks to the barley. Barley is a whole grain that is high in fiber, which means it helps with digestion, can lower cholesterol, keep blood pressure low and reduce the risk of type 2 diabetes. Barley is more effective at all of these things than whole oats, so it’s a good substitute every once in awhile. For those with diabetes, pearled barley has the lowest glycemic index of all the common cereal grains (such as wheat, rye, oats, etc). This means that even though it is a carbohydrate, it won’t raise your blood sugar as much as other carbs. It’s glycemic index (when boiled) is 35.

Additionally, carrots, cabbage and onions provide a wide variety of nutrients from Vitamins K and C to powerful antioxidants that protect our bodies against a host of things, including cancer. So while chicken noodle soup might ward off a cold, this soup is fighting cancer. And with high fiber barley rather than high-glycemic noodles, to boot. So make a bowl and sit back and enjoy the snow.

The Drunken Clam

What is this? A second post this week?? I maintain that you shouldn’t get your hopes up, but for now – here’s some food.

The Drunken Clam

clams

Ingredients:

  • 2 tbs butter (or Vegan butter, which is what I use and works great)
  • 1 tbs olive oil
  • one large shallot, chopped
  • two large garlic gloves, chopped fine
  • one large heirloom tomato, diced
  • 1/2 – 1 cup white wine (I suggest Pinot Grigio)
  • fresh lemon
  • one bag of Littleneck clams – usually around 50 or so clams – scrubbed and rinsed well
  • handful of parsley, chopped

Method:

  1. Heat the olive oil and butter in a large skillet with a lid over medium heat. Once the butter begins to bubble, add the garlic and shallot and saute 2-3 minutes until shallot starts to become translucent, then add in the diced tomatoes, salt and pepper to taste and stir for two more minutes.
  2. Pour in the wine, stir to combine, and bring to a light boil, then reduce heat back to medium and add the clams and the juice of half a lemon, and stir gently to incorporate the sauce, then put the lid on the skillet and let sit for 7-8 minutes.
  3. Take the lid off, pour in a little bit more wine and a tablespoon more butter, a squeeze of a lemon wedge as well as the parsley. Stir to combine, then with a slotted spoon, divide the clams between the bowls then pour the remaining sauce in the pan over each of the bowls of clams.
  4. Serve with hot, toasted French bread, a lemon wedge and the rest of that Pinot Grigio. This serves four normal people or two of us.

The Littleneck clams I purchased were from Cherrystone Aqua Farms which farms and harvests clams and oysters on the Eastern Shore of Virginia. Yes, Cherrystone is also a type of clam, but did you know Littlenecks and Cherrystone clams are the same clams? These as well as Topnecks are all just Quahogs – their different names simply refer to their size, with Littlenecks being the smallest, then Cherrystones , then Topnecks are big boys and the clams that are just called Quahogs are the largest. Smaller clams will do better in this recipe as the larger a clam gets, the tougher it gets. Quick steams with light sauces like this are best done with young, tender clams. Chowders and stuffed clams can be done with your Topnecks and Quahogs. So you see – bigger is not always better.

Clams are low in fat and high in protein and they offer higher than average amounts of necessary minerals like selenium, zinc, iron and magnesium as well as B vitamins and niacin. They’re also painfully easy to make, as you can see from above. People get freaked out by seafood and even more freaked out by bivalves. There’s really nothing to be afraid of, but there are some things you need to make sure of when dealing with clams and other bivalves such as mussels or oysters:

  • Buy them fresh from a reputable fish monger or seafood market
  • Keep them cold until you cook them (in a bowl of ice in the fridge is best)
  • Rinse them well before cooking – they dig around in the dirt for a living….
  • Once you have cooked them, check for shells that did not open. Any shells that didn’t open during cooking should be disposed of as this is indicative that the clam may have been dead prior to cooking and therefore not of the freshest variety. If you got a batch where several clams didn’t open, that means they weren’t fresh and you might want to purchase from a different seafood market next time. Having one or two that don’t open, though, is pretty normal.

So don’t freak out. Just split a bottle of wine with those clams and relax.

Summer Recipe Roundup

A few weeks ago, a friend of mine asked if I could post some fun, summer recipes. The problem is that because summer has just begun (or not even, officially), I can’t really start experimenting or playing around with summer recipes yet until the produce is available. I did get a pretty good haul this past weekend and hopefully will have some recipes to share with you at the end of the week, but for now, what I thought might be nice is to round up several recipes from previous summers, with links, so you can dive into the archives and go with something tried and true. So here ya go, Janessa.

Summer Recipe Roundup

Creamy Avocado Linguine with Meyer Lemon and Arugula
shrimp avocado pasta

Although avocados are technically in season all the time, this dish is decidedly summer. The addition of shrimp make it seasonal for the Eastern Seaboard, and it’s just so damn refreshing.


Dried Strawberries

Dried Strawberries

There are still some strawberries in the fields around here – if they’re still available where you are, a great way to save them is to dry and freeze them. Great on salads, in cereal, oatmeal, yogurt, etc.

Eggplant Rotini with Roasted Veggies

eggplant Rotini

This is one of my favorite summer recipes. Quick, fresh, easy and adaptable to whatever veggies you have on hand. Don’t go through the summer without making this.

Local Yokel Mojito
20130415-183149.jpg

Of course I had to add a beverage in, but mojitos, with fresh mint from your garden, are the epitome of summer sipping. My mint is already coming up like crazy, and if yours is too, then don’t let another Happy Hour go by without making this.

Roasted Beet Salad with Vinaigrette
Beets in vinaigrette

I just got a bunch of beets from the farmers market this past weekend, so beet salad with vinaigrette is not far away. This is by far my favorite beet recipe out there and a summer staple at our house.

Shrimp Ceviche
20130316-202832.jpg

Shrimp Ceviche is so fresh, light and healthy that it screams summer. Dish it out into martini glasses for a classy, but super easy app.

Summer Beef and Rice Skillet Casserole
beef skillet

This recipe was great and I’m furious at myself for not making it this past summer between our epic move and living in two different states. This is a great way to use up all that squash and zucchini that presents itself mid to late summer. It’s also great for a family or for a small crowd. This summer, I’ll be making it as much as is reasonable and/or until my husband starts complaining.


OK! There are so many more recipes, many of which are summer seasonable, over on the RECIPES PAGE, but hopefully this gave you a good start. This is such an exciting time of year when things start to pop up and the options are endless, so don’t let it pass you by – get out to your local farmers market, farm stand or local grocery and BUY LOCAL and EAT FRESH!

Open Season

For locavores, June marks the beginning of open season. Markets open back up, farm stands are on every corner and fresh produce is back at last. This morning I woke up, threw some clothes on and told the husband to make my coffee to-go and hold off on frying the bacon. Half an hour later we were back home with new potatoes, kale, beets, green beans and fresh baked tomato basil rolls. And all for $15. But eating fresh and local? That’s priceless.

20140607-103632-38192149.jpg

Happy produce hunting, friends!!

Like Father, Like Daughter

My dad makes this outrageous clam chowder that people will literally put in requests for. Sometimes in the winter my mom and dad will host an oyster roast at their house and my dad will steam oysters under a wet towel on the grill outside and we’ll stand around shucking them over plywood laid out on saw horses with big steaming bowls of this chowder. It is really culinary perfection – exactly the way I love to eat and experience food.

The chowder that he makes isn’t thick and creamy like up north, this is what we call “Hatteras Style” clam chowder and it’s really more of a soup than a chowder. It’s brothy, chunky and extremely peppery. For the longest time I assumed it was some sort of complicated recipe that I didn’t want to take on, until one night when I was pining for it, he said nonchalantly,  “all you need is a can of clams and some potatoes.” What?? Seriously??

Anyways, the simplicity of this recipe doesn’t make it any less amazing. Much like me, my dad doesn’t cook to a precise recipe, so these amounts were estimated by me until it looked and tasted similar to his. I will say, just when you think you’ve added enough pepper, add some more.

Bob’s Clam Chowder, Hatteras Style

Hatteras Style Clam Chowder

Ingredients:

  • 3 stalks of celery, diced
  • 1 medium onion, diced
  • 2 tbs butter
  • 4 medium red potatoes, diced
  • 2 small cans of chopped clams or 1 large can (depends on where you go – most grocery stores just carry the small, tuna can sized ones)
  • salt, pepper and parsley to taste

Method:

  1. Melt the butter in a large stock pot and add the onions and celery and saute until soft
  2. Add the potatoes, add salt and pepper and stir well
  3. Add both cans of clams – WITH juice, stir well
  4. Add 3 cups of water (or more depending on how brothy you want it)
  5. Bring to a boil, then down to a simmer for 15 minutes or until potatoes are easily pierced with a fork.
  6. Add more salt and pepper to taste. Serve steaming hot with oyster crackers

Hatteras Style Clam Chowder

This recipe makes about four hearty bowls. Double for more or triple for a crowd. At some stores you’ll be able to find the huge cans of chopped clams, which is probably worthwhile if you’re cooking for a small army.


Green Goddess

The winter gets me down. I’m not a cold weather, snow loving kind of gal. I exist in a tiny percentage of people who actually don’t mind the swamp-like humidity of the south. I thrive in that. When the air gets dry and cold, my sinuses dry up, my nose starts bleeding and I get never-ending headaches. I also can’t sleep at night (or during the day) and, without exaggerating all that much, pretty much lose all of my ability to function. I also, believe this or not, lose my appetite. While most people seem to go into hibernate, stuff-your-face mode in the winter, I can barely think about food without just getting exhausted. These are dark times.

But. I have a solution.

Green Goddess Juice at I Heart Beets

Green Goddess Juice

Ingredients:

  • 1/2 cup of fresh pineapple, chopped
  • 1/2 cup mango (fresh or frozen)
  • 1 scoop of protein powder – vanilla flavored
  • 3 large kale leaves, stems removed
  • 1 tsp fish oil (flavored is best here)
  • 3/4 cup orange juice
  • 3/4-1 cup water

Method:

  1. Add all the ingredients to a blender. Use as much or as little water as you need to make it blend properly. This takes some experience and knowledge of your blender. I use a Breville Hemisphere blender – it’s on par with the Vitamix and is less than 1/2 of the cost. (you can watch an excellent review of it via America’s Test Kitchen on YouTube) It has a smoothie and a “liquify” option. I blend on the smoothie setting for 30 seconds, then on the liquify option for one minute. And there you have it – juice.

What’s great about this juice is that it’s covering a lot of bases for those of us who can’t seem to stomach the idea of solid food. It’s got iron, potassium, protein, complex carbs, vitamin C, Vitamin D (via the fish oil, which is what we are all lacking in the winter and need so desperately) and a whole host of other nutritious stuff. When I make this in the morning, I don’t even need coffee. *gasp* right??

Now, I’m a firm believer in equipping your kitchen with the right tools. I don’t believe in unitaskers or novelty kitchen items, ie, the “butter cutter” – because……you can’t just cut butter with a knife???

butter cutter

So what I’m saying is, if you don’t have a quality blender, buy one. I suffered through too many years of trying to make smoothies and juices in a sub-par blender. My mom and dad got me the Breville this year for my birthday when my rinky-dink “blender” finally offed itself by wrapping its rubber stopper around its own blades in the middle of blending a protein shake (it knew its time was coming to an end one way or another – for this, I respect it for going out on its own terms).

I would never shell out the $450 or $700 for a Vitamix and I would never recommend anyone else do it either, so whenever I’m looking for a good, quality, long-lasting piece of equipment for my kitchen, I always reference America’s Test Kitchen first – they have dozens of chefs who are doing the testing, breaking, and upfront buying for you.  Although the Breville was still a $200 investment (thanks, mom and dad!), I firmly believe it’s worth it in the long run to avoid the hassle, frustration, breaking, replacing and everything else that comes with an inferior product. Plus, it’s winter – I can barely remember what day of the week it is and whether or not I fed my dogs yet today, let alone deal with a crappy blender.

EDIT AND UPDATE: It should be noted that the kale here came from a US Certified Organic Farm on the Eastern Shore of Virginia, Mattawoman Creek Farms. Kale is one of the “dirty dozen” – 12+ fresh produce items that contain the highest amounts of chemical pesticide and herbicide residue. Buying these 12 items as certified organic from the grocery store is a good idea. Or if you buy your produce locally, just ask your farmer what their growing methods are to ensure you’re not reversing the good effects of the produce with the negative effects of chemicals. For those who don’t want to splurge on local or  organic produce, get your priorities straight, then take a look at the “clean 15” list of traditionally grown produce that suffers the least chemical compromise.

The Secret to Life is Soup

Soup is the secret to life because it’s simple, hearty, enjoyable, shareable, saveable, warming, nurturing. Nobody ever wrote Chicken Satay for the Soul and nobody ever will. The secret to life is something that is easy to make, something that can be done while you live your actual life, something that can bring people together and then when enjoyed later can bring them right back to that same place.

Soup is particularly great this time of year because it can be a breeze to make for a big crowd, then you save your left overs for when you’re too busy to cook one night (you know, like, every night until January). This soup is one of my favorites that I’ve been making for years because it is SO SO simple, low-cal/fat and stores really well. You could even make big batches, freeze, then thaw as needed.

So make this soup so you can stop standing over the stove, worrying about what you’re making/missing/buying/gifting/planning/doing and just go sit by the fire or the tree or someone you love and share some soup.

Stupid Simple Salsa and Black Bean Soup

black bean soup 1

Ingredients:

  • 1 can of black beans, drained and rinsed
  • 1 cup of salsa
  • 1 cup of vegetable or chicken broth
  • 1 tsp cumin
  • 1 tsp chili powder
  • salt, pepper and cayenne pepper, to taste
  • Optional toppings: plain Greek yogurt, cilantro, chopped onions, sliced green onions or chives

Method:

  1. Combine the beans, salsa and broth in a blender and pulse until smooth, or put all the ingredients it a stock pot and blend with an immersion blender.
  2. Add the spices to taste and allow soup to warm to a simmer.
  3. Reduce heat and let warm on the stove top for 20-30 minutes to let the flavors combine.
  4. Serve warm with optional toppings.

black bean soup 2

Lunch

One of the best things about working from home is being able to make myself lunch every day. Like, really make something, not just a sandwich. Today I made a curried carrot and lentil soup. I picked up some carrots at Bergey’s Breadbasket Produce in Chesapeake yesterday and I also had some left over lentils from dinner last night that were already cooked. I sautéed some onion, garlic and three medium carrots in olive oil, curry powder, salt, pepper, oregano, fresh parsley and a dash of coriander. When they were tender I threw in a dash of red wine and balsamic vinegar and let that reduce, then added a can of stewed tomatoes with their juice – roughly chopped and let that simmer for 20 minutes. Then I added a cup of homemade chicken broth and let simmer another ten minutes and finally added about a cup and a half of cooked lentils, stirring to combine well. Let this simmer until warmed through and the carrots are tender but not mushy. Serve with more fresh parsley and cayenne pepper (if you’re a heat freak like me). Now that’s lunch!

20131203-132312.jpg

The resourceful cook

Jeremy once told me that I was the most resourceful cook he knows. This is because I never start a meal plan for the week by deciding what I want to make, then writing down ingredients. Instead, I go to the pantry, freezer or fridge, see what random left overs or items we have, then plan our meals around that. Because most of what I cook is done without recipes, this works for me. And that’s the beauty of learning techniques versus recipes. If you know how to make a basic cream sauce, or the components of a risotto or the technique of braising meats, then you don’t need recipes. What I find to be most important is the concept of ratio. So if you know that a basic risotto calls for 1 part rice to 4 parts liquid, then you’re fine, and you can experiment to your hearts’ content without worrying about if the rice is going to dry up or if it’s going to be too soupy.

So this past week we had some kind of random things sitting around. First off, my sage plant has exploded this fall, so I wanted to use some fresh sage. I also had a huge bag of pistachios left over from camping and a half of a container of Parmesan….some of you know where this is going already: pesto! Pistachio-Sage pesto. Because, once again, if you know the basic components of pesto (basil, Parmesan, pine nuts, olive oil) you can swap each of those ingredients out for something similar (sage, Parmesan, pistachios, olive oil). I also had a huge FIVE POUND bag of quinoa that I got at Costco the other day, as well as a side of salmon that I had cut down into fillets and frozen. Finally there was a random butternut squash that I had picked up at a farm and sort of neglected.

fall dinner

I wanted to experiment with the idea of quinoa risotto. Normally risotto is made with Arborio rice, a super short-grain rice that cooks almost like a pasta. It’s cooked slowly, adding small amounts of liquid, which are then absorbed before adding more, and of course – stirring the entire time. Quinoa is also a grain and is …. not “short” but small, let’s say. I wasn’t sure if it would cream up like Arborio, which slowly releases its starch as it cooks, creating its own creamy sauce when combined with water, broth, wine, etc. But I figured it was worth a try.

The whole meal came together like this:

Step 1: fall dinner squash
Pre-head the oven to 375 F. Peel and cut the butternut squash into 1/2″ thick slices, brush with olive oil, salt, pepper and thyme, then lay out on a baking sheet and roast while putting together the rest of the meal. I only used about 1/4 of the squash (I made the rest of it into soup – resourceful!)

Step 2: 
Make the pesto by combining 1/4 cup of pistachios (shelled) with a palm full of Parmesan, a hearty bunch of sage (chopped), the juice of half a lemon, salt and pepper in a food processor. Pulse the ingredients while drizzing olive oil through the top until a nice thick paste forms.

Step 3:
Make the risotto. Start with a tablespoon of olive oil in a large skillet. Add a few cloves of minced garlic and half of an onion, diced small; cook until soft. Add one cup of diced mushrooms and a

fall dinner quinoa
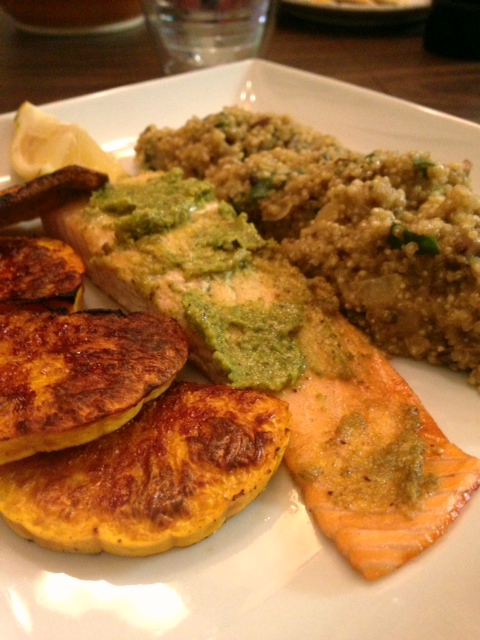
little lemon zest and saute until soft. Add in one cup of quinoa (or Arborio rice) and toast the quinoa until it starts to brown. Pour in half a cup of chicken broth and use this to deglaze the pan, and stir until it is absorbed. Continue to add half a cup of broth at a time, stirring until absorbed until you’ve reached the consistency you want. You’ll likely use less liquid than you would with a true risotto. I used about two cups of broth to one cup of quinoa. It will take about 15-20 minutes to get the quinoa cooked through. You know when quinoa is cooked because the grain sort of pops open. It’s impossible to describe, but immediately obvious when it happens. When the risotto is close to being done, within the last few minutes, add the juice of half a lemon and a large spoonful of the pesto and stir in.

Step 4:
About 10 minutes before the risotto is done, coat some salmon fillets with your pesto and put on a baking sheet in the oven with your squash. Bake the salmon for 10 minutes of until it flakes easily with a fork.

Step 5:
Serve it up! Top the risotto with a little more Parmesan and top your salmon with a bit more pesto. Your squash should be a little crispy on the outside and cooked through on the inside from roasting. Serve with a lemon wedge to brighten up the salmon and risotto.
fall dinner plate

Step 6:
Enjoy. And use these steps to make something completely different – based on whatever you have on hand.

fall dinner fork