Crock pot chicken

I am about to share with you one of my favorite recipes of all time. Why is it one of my favorites? There are a few reasons:

1. It is easy

2. It cooks in the crock pot

3. It uses lots of fresh, local ingredients

4. You do not have to remember to THAW the food in advance, which I am terrible at

5. It saves you MONEY

I can’t take credit for this recipe – it came from a local farmer who raises chickens and was interviewed in the local paper last year about how she likes to prepare her own local, pasture-raised poultry. This recipe is a very slight variation on her original, but I give all the credit to Alison Wilson of Full Quiver Farms. I knew I had to make this recipe when Julia Child’s 100th birthday came around a few weeks ago, and the infamous taping of her roasting a chicken was inescapable. She was a completely lovable spaz, and I feel certain, based on that footage, that she got salmonella more times than she could remember. But, despite all that, I wanted to make a chicken.

First, you SLAP the chicken!

This is a basic crock-pot chicken. But when done right, it is flavorful, can be used for several meals, and will provide you with nearly 10 cups of fresh, delicious chicken stock. Let’s get started.

As I mentioned above, you do not have to thaw your chicken first, which is possibly my favorite thing about this recipe. It’s so hard to remember to take something out of the freezer in the first place, and then when you get into the realm of poultry, trying to figure out how many hours it needs to thaw based on the pounds….well, that’s called Math, my friends, and I don’t ride that train. But because you can put the chicken into the pot frozen, it will take a full 8-10 hours to cook to completion, so keep that in mind – get up a little early to get this one in the pot, OR do it overnight and wake up to a house that smells like the inside of your grandmother’s kitchen on Sunday afternoon – both good options.

I used a 5lb pasture-raised chicken from G-square farms in Isle of Wight County, VA. I bought and received this chicken within a week of it being processed. It does come to me frozen, but it is still tender and delicious when cooked. I paid $16 for a 5lb chicken, which I realize is more expensive than a chicken from the grocery store, but I feel like I shouldn’t have to explain to you all at this point why it is better to pay a little more for a quality, ethically raised chicken. Plus, you’ll see how $16 is going to make 2-3 meals.

In the bottom of your pot, dump your mirepoix (a combination of sliced and diced celery, carrots and onions). I use one onion, two carrots and two stalks of celery. Cover the bottom with this mixture and season with salt/pepper and then toss in a few cloves of garlic (or if you’re me – an entire head of garlic), crushed.

On top of that mixture, place your frozen chicken. Make sure, if it has gizzards, that those are removed. Then, this is where my recipe varies – I top the chicken with as many fresh herbs as I have on hand from my garden. In this case, a tiny bit of oregano, sage, rosemary, thyme and chives. I also season the chicken with poultry seasoning, more salt and pepper. Then cover the whole things with water. Ideally, you want the water to come up over the top of the chicken, but just put in as much as you can without overflowing. Finally, the secret ingredient – add 1/4 cup of apple cider vinegar. According to Wilson, the vinegar helps draw out the flavor and nutrients from the chicken bones.

Mirepoix, pasture-raised poultry, fresh herbs, crock pot chicken!

Then….walk away. Just walk away. 8-10 hours later you’ll have something that looks like this:

Your final product(s).

Remove the chicken from the pot carefully with tongs – it will fall apart a bit, so just go fishing for the drumstick, which inevitably is the first thing to go. Set the chicken out on a rimmed baking dish and let it cool. While it’s cooling you can deal with the broth, but for the sake of explaining this picture – once it’s cooled, debone the chicken (this is the most time consuming part of this recipe). I separate out the dark and white meat, but do whatever you like here. Then I take out what I need for whatever I’m making that night and refrigerate or freeze the rest. I only needed about one breast and a bit of dark meat for that evening, the rest went in to tupperware and supplied TWO more dinners!

When you’ve removed your chicken from the crock pot, you’ll have broth and a whole lot of bits and pieces left. To separate the broth from the solids, place a sieve over a large measuring cup or container and use a ladle to strain the broth:

Look at you with your homemade broth!

Once the broth has cooled, I store it in different sized containers. I feel like recipes are always calling for just a 1/4 cup or a few tablespoons of broth, so I freeze an ice cube tray of broth, which I then pop out and store in a zip lop bag once they are completely solid – each cube is about 1 oz of liquid, so just pull out a cube at a time as needed for recipes. I also freeze 1 cup servings and then a large 4 cup container. The broth is naturally pretty low fat since we didn’t add any oil and pasture-raised animals are pretty lean, but if you’d like you can use a fat separator OR just store the broth in the fridge for several hours and skim the fat off the top once it’s congealed.

SO, now you have 10 cups of broth and an entire deboned chicken (I had about 8 cups of meat, but that will depend on the size of your chicken). What to do next? Well, I’m sort of a sucker for chicken wings, but let’s face it those deep fried, smothered in sauce, then dipped in another sauce appetizers are not doing anyone any favors. So here is my health(ier) take on buffalo wings.

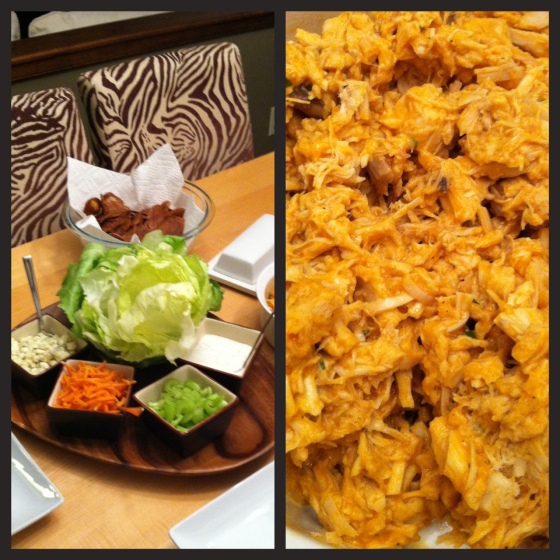
Take one breast and tender and 1/2 cup of your dark meat and chop it up or shred it. Place it in a bowl and add 1/4-1/2 cup of buffalo wing sauce (depending on how saucy you want it). I use the Texas Pete brand because I think it’s spicier than others, and I’m not playing around when I want buffalo, but you can buy a milder brand. Then add 1/2 packet of dry ranch dressing mix. Mix well. From here, you can do whatever you want with this – put it on sandwiches, make a salad, whatever. I did lettuce wraps with iceberg lettuce, home made ranch dressing, shredded carrots, diced celery and crumbled blue cheese.

Buffalo chicken and accouterments.

Served along side some local corn on the cob and home made potato chips made from local potatoes, oh and of course a Corona with lime . . . whoa.

There isn’t a bar in town with buffalo chicken this good.

This recipe used about 1/3 of the whole chicken and served two people for dinner and then two people for lunch the next day. Another 1/3 got used in a chicken pot pie, which three very hungry people consumed in one meal, and then the other 1/3 is in my freezer – just waiting to become something else delicious. I use the chicken stock in everything, and barely ever have to buy it from the grocery store because I make a crock pot chicken once or twice a month, keeping me stocked with . . . stock.

Recipes like this just make me happy – they are a breeze to do, they work on so many different levels, they give you two products for the price of one and will feed you for a week.

What are your favorite dual purpose recipes? 

Herb Jelly

A few weeks ago my mom, myself and a friend of ours went to an herb preservation workshop where we learned how to make herb vinegar as well as herb infused oils and jams and jellies. I have a jar of herb vinegar stewing away in the back of a cabinet, which I will blog about soon, but it’s so easy to do it’s almost pitiful. In the meantime, our friend Theresa took on the more complicated process of making herb jellies and at a dinner this past week she presented us each with a jar of basil and rosemary jelly. I was so excited to try this flavor combination with anything I could find: fruit, bread, meats, cheese, an old flip flop – whatever!
The whole thing was made even more appealing by just how adorable the jelly was to begin with:

Rosemary and Basil Jelly

So this morning for breakfast, I decided to try it with a slice of multi-grain bread and some fresh, local peaches I got from the farmers market this past week. I know, peaches with rosemary and basil may not be the first thing that comes to your mind, but it should be! This combo was amazing. The heartiness of the bread, the sweet but herbal flavors of the jam and the tart but subtly sweet peaches were perfection. It doesn’t look like much and I realize you can hardly see my bread for all the peach, but seriously – amazing.

Multi-grain bread with herb jelly and peaches.

If you are already making jams and jellies, then add this recipe to your repertoire:

Herb-Apple Jelly

  • 4-5 fresh basil sprigs
  • 1 fresh rosemary branch (not too large or flavor will overpower the jelly)
  • 3 cups unsweetened apple juice
  • 4 ½ cups sugar
  • 3 oz. liquid Pectin (1 pkg.)

Make this jelly with different fresh herb combinations, either basil with rosemary or
thyme with mint. It’s good on toast, and excellent on pork and chicken.

You will need 6 clean (8-oz.) jelly jars and two-part lids (seal and screw-on band). Fill a
large stockpot or canner with water and bring to a boil over high heat. Sterilize jars and
lids. Keep at a simmer while you prepare the jelly.

Tie basil and rosemary sprigs in cheese-cloth. Place in a 5-quart pot along with apple
juice and sugar. Bring to a full boil and continue boiling for 1 minute.

Add pectin, stir well, and boil for 3 minutes. Remove and discard cheesecloth with
herbs; skim foam if needed. (you may also add a teaspoon of butter to reduce foaming)

Pour hot jelly into sterilized jars. Wipe jar rim if necessary, press on lid, and screw on
band. (If there’s any extra jelly, you can enjoy it right away and it will last in your fridge
for a while.) Work quickly but carefully, as the jelly will be very hot. Place jars in
simmering water and raise heat to bring water to a boil. Boil jars for 5-10 minutes, then
remove and allow to cool to room temperature. Leave for 24 hours.

You should hear the jars pop shortly after removing them from the canner. This
indicates that it’s sealed. When cool, the lids should be smooth and flat. Store for up to
a year in a cool, dark area out of direct sunlight.

This recipe and the others we received in the workshop are courtesy of local personal chef and herb-master, Elizabeth Meska. 


I can’t wait to try this jelly with so many other things. Anybody have any suggestions?

Try, try again

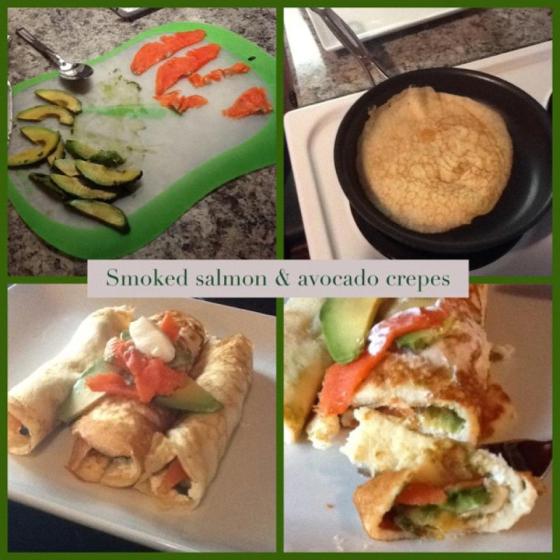
One of my favorite cooking traditions is on the weekends when Jeremy and I get up and make breakfast together, side by side at the stove – him frying bacon and me scrambling eggs. But this past weekend he was out of town and to console myself, and to keep from eating obscene amounts of bacon, I decided to get a little inventive with breakfast. I had dropped by Trader Joe’s late last week after dropping Jeremy off at the airport and scored (among many, many other things) some great smoked salmon and a bag of ripe avocados. Somewhere in the back of my mind a light bulb flickered: salmon and avocado crepes. OK, so I don’t exactly bake, and making crepes feels like baking – there is flour sifting involved. So I made some pancake mix work for my purposes and here’s what I came up with:

I used the pancake mix, with a little more almond milk than it called for and a plop (yes, a plop is a technical cooking measurement) of Greek yogurt, lemon zest and a squirt of fresh lemon juice. I poured that into a non-stick skillet very thinly and swirled the pan to cover the bottom, flipping after only a minute or so. Then I smeared a cream cheese/herbed goat cheese mixture on the crepe, laid out some smoked salmon and avocado slices, then rolled up and topped with another plop of yogurt.

Verdict? Meh. Yeah, I admit, they look amazing. You would easily pay $12-15 for this plate at a restaurant, and maybe if I had I would have thought more highly of them, but something about the mouth feel of so many “creamy” things wasn’t doing it for me. Salmon, avocados, creamy cheese and the soft cake was all just a little too much. I was hoping the yogurt would tang it up a little, but it was too little, too late. Probably plenty of people would love this, if that flavor profile works for you, but it just doesn’t for me.

But I refused to be defeated. When Jeremy came back I decided to reinvent this dish into dinner and I knew exactly how to solve the problem. The answer was in the yogurt and the lemon all along. Instead of making crepes, I opted for two big pieces of naan. Then I made a tzatziki sauce with greek yogurt, cucumbers, lemon zest and juice, garlic, salt, pepper and dill. I toasted the naan, rubbed in some olive oil, covered with a layer of tzatziki, then topped that with a mashed avocado mixed with salt, pepper and a squirt of lemon juice. Then I quick “cured” the salmon by laying it flat on a plate topped with cucumbers and dill, then squeezed an entire lemon over top of it all and let it sit while I put the salad together. Then I put the salmon, cucumbers and dill on top of the avocado and voila – perfection.

The problem with the first dish was the similarity of textures and, to a degree, taste. This dish solves that problem by adding in the crunch of the cucumbers, the tanginess of the yogurt and the bright, fresh flavor that the lemon gives to everything.

Redemption: it’s what’s for dinner.

So the lesson is: if at first your recipe is gross, try try again. Seriously. Every chef or cook who has ever invented a recipe has taken it through various tests and many of those tests are bound to fail. You can’t get it right the first time, every time. Although sometimes you do, and it’s amazing, but those times are rare.

Do you have a unique recipe that you created? If so, share it with me! Post it in a comment and maybe I’ll give it a try on the blog! 

Saucy

Remember how I mentioned that I’m not exactly into measuring and precision? Principles that are important in things like baking, rocket science and canning. Can something without following all the right steps and BAM, everyone has botulism. That is why when I want to preserve something, I usually freeze it. I wish I could can, I really do. But I know how that science experiment would end up and it is with a trip to the hospital.

So every year, near the end of the summer (*weep*) I freeze a big batch of tomato sauce that I make from local tomatoes. This year a large basket of tomatoes was donated to me via my great uncle and aunt, Joe and Carol, who are pretty amazing gardeners. Free food is the best food, just ask the freegans! (I’m kidding. That movement is gross. Talk about botulism. . .)

Making tomato sauce is kind of an ordeal, but worth it in the long run. I usually have to block out several hours of my day to get this done. This tomato sauce is a little looser than pasta sauce and can be used in place of canned tomato sauce. Basically, it can become the building blocks of spaghetti, marinara, pizza sauce, tomato soups – whatever you want.

So let’s get started. First, you wash and dry your tomatoes. I was working with 3 1/2 lbs here. I usually do a batch twice this large, but this is what I had to work with in this case. On the bottom of each tomato, cut a small ‘x’ with a paring knife.

cut a small ‘x’ into the bottom of each tomato

Then get a large pot of boiling water going. You are going to blanch the tomatoes, which means they will bathe in boiling water for just 2 minutes or so, until you start to see the skin around the X peel back. When you see that start to happen, get the tomatoes out of the water with a slotted spoon and deposit into a colander where they can drain and cool. There is a serious system to this and you need to get your “mise en place!” (A fancy French term meaning ‘get your $h*t together before you start working’)

Mise en place!!


blanch and peel the tomatoes

Once you’ve done this in small batches to all of your tomatoes (don’t put more than 4 or 5 small tomatoes into your water at once), and once they’ve cooled to the touch, peel the tomatoes starting at the X in the bottom, pulling the skin away up to the top. Do this to all of your tomatoes. Once they are all peeled, start chopping and you’ll want to remove the hard area of the tomato where the stem was. Everything else gets chopped and thrown into your pot.

dump chopped tomatoes into your pot

Then you add your other ingredients (these measurements are based on using 3 1/2lbs of tomatoes):

  • 1/4 cup of olive oil
  • 3/4 tbs black pepper
  • 1/2 tsp chili powder
  • 1/2 tsp salt
  • 1/2 tbs minced onion
  • 1/2 tbs dried oregano
  • 1/2 tbs garlic powder
  • 1/2 tsp dried parsley
  • 1/2 tsp sugar
  • 2 tbs tomato paste
  • a few dashes of crushed red pepper flakes

You can use fresh herbs rather than dried herbs, but you don’t need too much. Remember, this is tomato sauce – a base, not your finished product that goes on your spaghetti. Also, if you don’t care for spice AT ALL, omit the chili powder and red pepper, but those two ingredients don’t really make this that spicy, so if you’re OK with a little spice, no worries.

Then the fun part. You probably don’t want your tomato sauce this chunky. If you do, awesome, move on to the next step, but if you’re like most people, you want a smooth sauce and you can accomplish this one of two ways: with a stick blender right in the pot, or with a regular blender in batches. I use a stick blender, because I feel bad ass when I open this thing up.

The 007 theme music starts playing

Seriously, it looks like a weapon custom designed for James Bond. But if you don’t have one of these, then just use your standard blender, blending in batches and returning the mixture to your pot. Do this before the sauce gets hot so nobody gets hurt.

After it’s been blended, simmer your sauce for at least an hour, or longer. It should look something like this:

droooool

If you’re using it right away, then do whatever you need to do, but if you’re freezing it, let it cool, off the heat for 15 minutes or so. Then dole out 1 cup portions into tupperware containers that are freezer-safe. Make sure you leave enough head room in each container – this stuff will expand, according to the laws of science. I buy tupperwares that have measurements right on the side of the container so I don’t actually have to measure, because we all know how I feel about that. I just ladle it in until it hits the mark.

Ready to chill out

Stash them in your freezer and pull them out whenever needed. To thaw, either put in the fridge overnight or let them float around in some cool water in the sink for an hour or so. Or if you’re super impatient like me, just dump the frozen sauce right into your pan and heat it up until it’s thawed. Look guys, I just need my tomato sauce RIGHT NOW.

You may be thinking that this is a lot of work, and so be it. It is. But the taste is amazing, you’re preserving a little piece of summer and perhaps you are not aware of the health implications of most canned food? Did you know that Bisphenol A (BPA) is widely used as a lining for cans holding canned food? BPA is thought to be harmful because it mimics human hormones and has been classified as an endocrine disruptor. BPA has been associated with a variety of health problems in laboratory animals, including cancers, early puberty, and developmental problems. Canned products are also laden with sodium (hello high blood pressure, blood clots, heart disease, etc etc etc) and other preservation chemicals. So avoiding canned products could be a life saver. There are a few small organic companies making canned beans and some veggies that are in BPA-free cans, but they are difficult to find and can be expensive. In the meantime, spend a little extra time to know and make what you’re eating. And if you’re NOT like me, and you are capable of following intense directions, start thinking about canning – which of course, is actually “jarring” and so avoids the BPA, sodium and chemicals in store-bought products. The Ball Jar website has great recipes and tutorials on how to do this. If I can ever get my brain to function on a linear plane, I may just try it myself.