Pantry Raid – Part II

One of the things that had created an abundance of random odds and ends in my cabinets was the detox diet I did back in the late summer/early fall. My diet was extremely restricted and so I purchased a lot of things that were on the “OK” list that I would otherwise not eat like raw nuts, strange beans and wild rice. I had two boxes of wild rice and a can of Aduki beans that I just had no idea what to do with, but I found a recipe for wild rice and aduki bean stuffed acorn squash on Pinterest. Seriously, if you look long and hard enough, you will find the exact recipe you need. The recipe was from a vegan site, so I made a few changes to it to fit with what I had on hand, and it turned out pretty good. With a side of raw kale salad marinated in a home-made vinaigrette, this little vegetarian meal packed a serious healthy punch. Plus, it’s so protein packed, I could only eat half of it.

Wild Rice and Aduki Bean Stuffed Acorn Squash

Wild rice stuffed acorn squash

Ingredients:

  • 2 acorn squash, sliced lengthwise, seeds scooped out
  • Olive Oil
  • Wild Rice
  • 1 cup chopped onion
  • 1 can Aduki beans, rinsed and drained
  • 1 tbs Soy Sauce
  • 2 tbs honey (or Agave)
  • Pepper and Salt to taste
  • Cranberry sauce (canned or homemade)

Method:

  1. Rub the acorn squash down, inside and out, with olive oil, season with salt and pepper. Place an a baking sheet and cover with foil. Bake at 375 degrees for an hour, or until tender. 
  2. Meanwhile, cook the wild rice according to its directions, enough to make two cups.
  3. Heat the oil over medium heat in a large skillet. Add onions and sautee until soft. Add in Aduki beans, soy sauce, honey and season with salt and pepper. Combine and keep warm over medium low heat.
  4. Remove squash from oven when done, and scoop out the squash, leaving about 1/2” of squash in the shell. Chop the squash and mix it into the bean mixture and add the rice. Combine well over low heat until warmed through.
  5. Load each squash half with the mixture and top with cranberry sauce. Serve immediately.


I still have one box of wild rice left that I’m not sure what to do with, but at least those beans aren’t staring at me anymore.

What random item do you have in your cabinet that you’re just not sure what to do with?

The root of it all

I just gave myself an award for the most clever blog title ever.

i ❤ beets

It is a shame, I realized, that this blog’s namesake has never really been examined thoroughly. I think in my very first blog post I may have posted a picture of a beet dish I had done, but I’ve never really delved into this amazing little root that inspired me to make this blog. There are a few reasons that beets are the thing I happen to heart. They are available locally, they are available at several times throughout the year and many people don’t like them. Why is that a reason to make beets the central theme of a blog? Because I think I can change people’s minds. I think a lot of foods out there that deserve our attention but suffer general distaste have just been presented wrong all this time. Like the poor Brussels sprout, which I will post about later . . .

Take, for instance, my husband who insisted he hated beets. So I asked in what format he had experienced beets in the past and he said either canned, pickled or boiled to death. Well, no wonder. He also hated Brussels sprouts for similar reasons. But there is a simple answer to both of these food fears and it is this: roasting. Roasting, which uses dry, indirect and diffused heat (such as an oven) increases flavor by caramelization and the Maillard browning reaction. Essentially, roasting enhances the sugars in foods through a process called pyrolysis, which I will not get into, because I barely passed chemistry. But here is what I do know: it makes food delicious. Especially foods like beets, which already have a high natural sugar content, just waiting to be released.

Beets are also so nutritious. Here are some facts from Nutrition and You about beets:

  • Beets are a rich source of phytochemical compound, glycine betaine. Betaine has the  property of lowering homocysteine levels within the blood. Homocysteine, a highly toxic metabolite, promotes platelet clot as well as atherosclerotic-plaque formation, which, otherwise, can be harmful to blood vessels. High levels of homocysteine in the blood result in the development of coronary heart disease (CHD), stroke and peripheral vascular diseases.
  • They are also a rich source of B-complex vitamins such as niacin (B-3), pantothenic acid (B-5), pyridoxine (B-6) and minerals such as iron, manganese, copper, and magnesium.
  • The root has very good levels of potassium. 100 g fresh root has 325 mg of potassium or 7% of daily requirements. Potassium lowers heart rate and regulates metabolism inside the cells by countering detrimental effects of sodium.

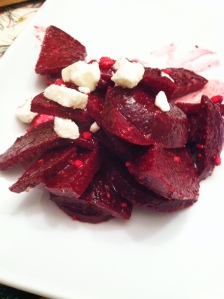
And while us die-hard beet fans can eat a beet canned, pickled, boiled, grilled or anything else, for those skeptics out here, this is my GO-TO beet recipe. I’m not sure where it originated from…I think a friend may have suggested this method and I’ve just sort of made it my own over time, I’m not really sure. My hope is that you will love it enough to make it your own, adding, subtracting and substituting to your liking.

Roasted Beet Salad with Vinaigrette

Ingredients: Beets in vinaigrette

  • One bunch beets (as seen above)
  • 3 tbs olive oil
  • 1 tbs vinegar of your choice (balsamiq, red wine, champagne, whatever you like)
  • 1 shallot, finely diced
  • 1 tbs dried herbs (Italian, Herbs de Provence, fresh or powdered garlic or whatever else you’d like)
  • Salt and Pepper to taste
  • 1 cup crumbled feta cheese

Method:

  1. Pre-heat oven to 375 Fahrenheit. Cut the beets off their stems and trim off the tops and the “tails” of each beet. Clean each beet so they are free of dirt. Wrap each beet in individually in tin foil and place in the pre-heated oven, directly on the center rack. Roast for 30-40 minutes, or until each beet is easily pierced with a knife. 
  2. While the beets are roasting, create your vinaigrette. The most important thing to remember here is the a vinaigrette dressing always 3 parts oil to 1 part vinegar. You can use any combination or any measurement (tsp, tbs, cup, etc), as long as you keep that ratio the same. Pour your oil, vinegar, shallots, herbs, salt and pepper into a medium sized bowl and whisk until they are emulsified. Set aside until beets have finished roasting.
  3. When beets are easily pierced with a knife, unwrap from tinfoil and allow to cool. Take an old dishtowel and peel the beet’s skin off with the towel – if it’s roasted to completion, the skin should slide off easily. Do this with each beet.
  4. Cut each beet in half or in quarters, if large, and cut into thin slices. Re-whisk your vinaigrette so it is well blended, then add your beets to the bowl and toss to coat. Plate, then top each serving with a spoonful of feta cheese.
Trim and wash beets

Trim and wash beets

A well emulsified vinaigrette

A well emulsified vinaigrette

Beets

After roasting, remove skin with a dish towel

Served with Greek salad, crusty French bread a Pinot Grigio.

Served with Greek salad, crusty French bread a Pinot Grigio.

If you don’t like beets like this, then I grant you the right to dislike beets. But before you file them away in things that are gross and that you refuse to eat, please try this recipe. Please. Give beets a chance.

Note: these beets were purchased from Westside Produce and Provisions where they were sourced from New Earth Farms in the Pungo area of Virginia Beach, where they use sustainable and organic growing methods. 

Eggy Eggy Parm Parm

For you Tom Haverford fans out there . . .


ANYways. I’m a horrible blogger. Two weeks in between posts? Blogging suicide. But I have an excuse. The days/weeks/months have been FLYING by lately, have they not? I’m not sure if it’s because of the election and how much of the past several months I’ve had to just tune out and hum songs in my head while I consider moving out of a swing state to Texas before the next major election, or if it’s about daylight savings time and so the days just seem shorter, or if it’s just that ramp up to the holidays where we all sort of run around like chickens about to get their heads cut off, but in any case, the time between my blogs feels like hours. The last one was right before Halloween, which was like, yesterday, right?

In any case, I present to you: eggy eggy parm parm (aka Eggplant Parmesan):

Eggy Eggy Parm Parm

This is a super fun joke for you Parks and Rec fans. For everyone else I just sound a little spastic.

This meal came together in some fun ways. The sauce is my tomato sauce I’ve posted about twice, and now thrice, cause I’m obviously obsessed with it. And the eggplant came from Mattawoman Creek Farms on the Eastern Shore of Virginia. Last weekend the organization that I direct, Buy Fresh Buy Local  Hampton Roads, helped organize a local food tour on the Eastern Shore. Several farms, restaurants and wineries participated and opened their doors to the public, gave free wine tastings and specials, etc. I’ve been up the shore a few times in my life, but never to spend any real, good quality time, so I was excited to spend the day up there. We took the dogs with us, and they even got a behind-the-scenes tour of Mattawoman Creek Farms, a beautiful and incredibly well run Organic Farm that produces what I think is probably world-famous lettuce, among lots of other things. They have an incredibly long season because they use green and hoop houses very efficiently. I’m really sorry I didn’t take any pictures there, but I was wrangling two dogs in a muddy field just a few days after hurricane Sandy blew through.

We also visited two wineries, Holly Grove Vineyard and Chatham Vineyard. They are both really great and we bought a bottle of Petit Verdot at Holly Grove and the Church Creek Chardonnay at Chatham. Also, they have winery dogs, so you can’t hate that:

Anyways, back to the parm. We didn’t get a chance to go grocery shopping yesterday, so when I went to put dinner together a box of spaghetti, an eggplant and my frozen tomato sauce just made sense. As per usual, I do not really have a recipe for this, but I can tell you my process.

First, I peel the eggplant and cut it into 1” thick rounds. This was a huge eggplant, so I took two of the rounds and diced those pretty small to add to the sauce.

I took the rounds and dredged them in egg, then a breadcrumb/flour mixture and put them on a baking sheet. They went into a 350 degree oven for 20 -30 minutes or until they were easily pierced with a fork. Tender, but not mushy. About 2 minutes before they were ready to come out, I topped them with shredded mozzarella.

The diced eggplant pieces went into olive oil in a large pot and were sauteed with garlic and Italian seasoning until they were tender. Then the thawed tomato sauce went into the pot, maybe two cups? But use however much you need for however many people are eating. To this I add tomato paste to thicken the sauce. Remember, the sauce I make is more like tomato sauce in a can than pasta sauce in a jar, it’s the base for sauces, so it needs to be thickened in some way before putting on pasta. I let this simmer while the eggplant baked.

Cook your pasta according to the directions, drain, then mix into the tomato sauce to keep warm while the eggplant finishes up. Serve the eggplant over the pasta, top with Parmesan and parsley or a little more mozzarella. Do not eat this without wine. Preferably a cab sav, shiraz or chianti.

Yes, those are Halloween napkins. See, I really think Halloween was just yesterday.

I know this is not the traditional way to make eggplant parm, where you bake it with the sauce and big slices of mozzarella right on top and then served without pasta, but I’m not Italian, so there ya go. I also know I have posted a lot of eggplant related dishes. I just love it. People are scared of it, I’ve realized lately. They think it needs to be salted and rinsed and fussed over and that if you don’t do it just right it’s bitter or tough. I have never found any of this to be true. I don’t salt or sweat mine, I peel it, roast, bake or saute it, and I’ve never had one that tasted anything but delicious. And because I like to eliminate meat where I can in our diet, eggplant is the perfect substitution for chicken in this dish, or for sausage or ground beef in the sauce. It just makes the meal heartier while also making it healthier. I also like to use my method above of peeling, cutting and then breading the eggplant slices, then I put them on a baking sheet and freeze them. Then you can take out individual slices of eggplant straight from the freezer to the oven and bake them whenever you want them throughout the winter. I use them in this dish, or baked and put on a sub roll with marinara and provolone in place of meatballs or just as eggplant “filets” topped with bruchetta, cheese, olive tapenade – whatever you want!

How do you like to prepare eggplant? Are you scared of cooking with eggplant? What eggplant myths have you been told?

Detox Lessons Learned

I am back to a pseudo-regular diet and the good news is that wine does not seem to affect me at all. (Huzzah! And just in time for Virginia Wine Month!) However, beer is probably off the menu for good. And anything that combines dairy, cheese and wheat, although separately, they seem to be OK.

So here are some lessons I’ve learned and things I’ll continue to practice now that my detox is done:

  • You don’t need nearly as much food as you think you do. Hunger is a state of mind, not of body.
  • Fast (with juice and smoothies) one day a month, or once a week if you can. This gives your digestive system a break, particularly after a long weekend or the holidays, etc.
  • I do not NEED coffee every morning. Substitute herbal tea a few times a week and only have one cup of coffee on the days I chose to. Drinking 2-3 cups of coffee on an empty stomach was clearly one of my primary irritants. (yes, I figured that out by myself; I’m a genius)
  • Detox isn’t just about food. Get rid of other toxic things in your life like negative thoughts, actions, judgments, relationships, jobs, etc. We have one life, and it can end at any time. Don’t waste any of it on things that don’t serve you well or contribute to your overall improvement. This is not to say get rid of everything you dislike. Sometimes things we dislike are good for us and can and will improve us.
  • Stretch every single day. I like to do this right before I go to bed, it seems to help me sleep. I particularly like twisting stretches, as they are good for your internal organs and can help them detox. Gaiam has a few great suggestions on yoga for detox.
  • Fast 12 hours every day. This means that once you finish dinner, you do not eat anything for 12 hours. So if you finish dinner at 7, eat breakfast at 7 the next morning, with nothing in between. This is a great detox and weight loss principle. Your system needs the rest – food consumed late at night and right before bed doesn’t do you any favors at all.
  • Treat your body well. Not just in what you eat, but in what you do for it on a daily basis. I’ve started going back to a chiropractor since I started my detox and it’s doing amazing things for how I feel over all. Get a massage, get your spine adjusted, do some yoga, or just take a walk (they’re free!).
  • Take probiotics every day. They can do no harm, and can only help balance your digestive system.
  • Focus on “clean” foods whenever possible. Eliminate processed foods, eat your veggies raw every once in a while and I’ll say it – just get rid of sugar. Period.
  • Drink SO MUCH more water than you are. I’ve always been a big water drinker, but during the detox I was drinking a gallon or more a day. My skin, hair and eyes looked better. It’s amazing. Just drink it.

There are so many more things I learned while I did this, but those are just a few that I think are fairly easy to implement.

Has anyone else out there ever done a detox or similar program? What are your lessons learned? 

Sweet Meat

I promised I wasn’t a vegetarian and I’m here to deliver. Also, my friend Robyn threatened to stop reading the blog unless I posted a meat recipe she could make for her seriously carnivorous husband. Fine.

But before we get into that, I want to talk a little bit about meat, the consumption and environmental effects of it, and healthy options and portions. Wait….where are you going? No, really – it’s important! Fine, I won’t TALK about it, I’ll just show you this:

Get the point? Meat should be a SMALL percentage of your daily food intake. It should be used as a side dish, not a main course, and should be chosen wisely. I can’t say that this particular recipe was the “wisest” one, but it did serve up about 8 small servings over the course of three days, so it had that going for it.

This recipe was adapted from one I found via Pinterest, and was originally posted here. I changed it up a little, but all in all it’s pretty similar.

Brown Sugar and Balsamic Glazed Pork Loin

Ingredients:
1 (2 pound) boneless pork tenderloin (or regular pork loin)
1 bunch of fresh sage
1/2 teaspoon salt
1/4 teaspoon pepper
1/4 teaspoon granulated garlic
3 clove garlic, crushed
1 small onion, sliced
1/2 cup water
Glaze
1/2 cup brown sugar
1 tablespoon cornstarch
1/4 cup balsamic vinegar
1/2 cup water
2 tablespoons soy sauce
Directions:
Rub roast with salt, pepper and granulated garlic. Place in slow cooker with 1/2 cup water, sage, crushed garlic and onion slices. Cook on low for 6-8 hours. About 1 hour before roast is done, combine ingredients for glaze in small sauce pan. Heat and stir until mixture thickens. Brush roast with glaze 2 or 3 times during the last hour of cooking. Serve with remaining glaze on the side.
I sort of sliced, sort of shredded the pork loin when it came out of the pot, removing the fat as I cut. I used a regular pork loin, not a tenderloin, so there’s some different meat textures going on in there. Once I had sliced/shredded it onto a platter, I drizzled the glaze over top of it.

I served it with a squash and corn casserole and a light tomato and cucumber salad. You’ll notice the portions here look similar to the diagram at the beginning of the post:

The meat only takes up 1/4 of the plate.

So, see – I DO eat meat. I just think we have to start thinking about it and preparing it and eating it a little different. Meat can be a great source of protein, but it can also be a great source of saturated fats, unnecessary hormones and antibiotics. Not to even mention or get into the kind of cruelty that goes in to most mass-bred cattle, pork and chicken. Under normal circumstances I purchase all of our meat through local farms who use ethical animal raising and slaughtering methods. This was a rare exception, although the meat is still technically local (Smithfield, VA).  Yes, locally raised meats are more expensive, but when you eat less of it, the cost works itself out. Not to mention the long-term health benefits of eating less meat and more sustainable meat are a huge cost savings (would you rather spend money on healthier food or on blood pressure, heart disease and diabetes medications and treatments?). Pasture raised meats have less saturated fats, are generally not fed antibiotics (because they are outside eating grass, not shoved in a cage with 1,000 heads, chowing on grain which inherently makes cows sick), and are leaner because of the natural exercise they get. The same is true of pigs and chickens. If you’d like to learn more about the environmental and health effects that meat has in America, I would encourage you to read The Omnivore’s Dilemma by Michael Pollan. This is the book that the documentary, Food Inc. was based on, but if you’re like me and can’t stomach movies like that, try the book instead. He traces the steps of three meals from beginning to end: a fast food meal, a “locally sourced” meal, and a meal that was 100% hunted and gathered by him. It’s fascinating and you will never look at the food the same way again, I promise.

Ok, so I ended up talking about it anyways. I’ll get off my meat soapbox now. Honestly, I do love it and I do eat it, and when the summer ends and we get into fall and winter, you will see me use it as an ingredient in a lot more dishes.

What is your favorite meat? Where do you get your meat from and what is important to you when purchasing it? What kind of questions do you ask your farmer, butcher or grocer when purchasing meat?

To meat or not to meat

I realize that all my posts so far have probably given the impression that I am a vegetarian, which I’m not.  I was for several years in college and then I got married and this is how that story goes: We got back from our honeymoon and the next morning Jeremy fried bacon in our newly-shared apartment. End of story. If you can resist the smell of bacon after 7 days of eating Jamaican food, you should probably see a doctor, cause something is wrong with your olfactory system.

Although I do eat meat now, I still try to reduce my meat consumption as much as possible for several reasons including health, cost and the impact meat has on the environment. This is nothing new – there’s a whole “Meatless Monday” movement, in fact.
Most of the meat we do eat is locally raised – Hampton Roads has several wonderful farms producing high-quality, ethically-raised, pastured and free-range, hormone and antibiotic-free meats including beef, pork, chicken, lamb, goat, rabbit, and turkeys. Seriously. Although none of that matters much for this post, which is yet another vegetarian meal. One day, I promise, I will share a meat recipe.

This recipe came from a Rachael Ray inspiration. I don’t generally watch her show (or any daytime television) and I have a huge grudge against her for making the whole world think that ALL RACHELS spell their name RACHAEL – which just isn’t true. But I was at the dentist one day, confined to a chair with a TV in front of it and her show was on. She was making a pasta dish where instead of a traditional sauce, she roasted an eggplant and used the eggplant-meat as a sauce. Then she slapped some real meat on top of it, but that seemed unnecessary, so a few nights ago with an over-abundance of vegetables from my co-op, including a beautiful eggplant, I decided to riff on this idea.

eggplant Rotini

roasted vegetable rotini with eggplant sauce

There is one thing I share in common with Rachael Ray, and that is a tendency to not really have a “recipe” but instead to use kind of general directions and measurements. I once saw her instruct in a recipe to use a “palm-full” of something, and that is definitely how I cook. Measuring and following directions takes precision and patience – two things that I do not possess. It’s why you’ll never see a baking recipe on this blog.
So below is my best re-construction of what I did here.

Eggplant Rotini with Roasted Vegetables

Serves: 2 hungry people. Double for your fam.

Ingredients:

  • 1 Medium Eggplant
  • 1 small/medium zucchini
  • 1 smell/medium yellow squash
  • 1 large portobello cap
  • 1 small onion – red, yellow or white is fine
  • a handful of snap beans
  • 2 large cloves of garlic, minced
  • a handful of fresh basil
  • olive oil
  • 8 oz (half a box) of whole wheat rotini or other curly pasta
  • Parmesan cheese

Directions:

  1. Cut the eggplant in half, lengthwise, brush the cut sides with olive oil, then sprinkle with salt and pepper. Lay, cut side down, on a rimmed baking sheet and put in the oven at 375 F for about 30 mins.
  2. Take all of your veggies that you are putting in the pasta (I listed what I used above, but feel free to improvise or substitute here with whatever you have on hand), cut into pieces, mince one clove of garlic and dump it all into a bowl and coat with olive oil, salt, pepper and a little Italian seasoning, if you’d like. Pour onto a rimmed baking sheet. Stick in the oven with the eggplant for 25-30 mins of until they are done to your liking (I like mine to still have some bite, without tasting raw)
  3. When the veggies only have a few minutes left, start the pasta – cook according to package directions. Save half a cup of pasta water before draining.
  4. Take the eggplant out of the oven and let cool for a few minutes. The halves should look “deflated” and the inside should be runny and almost liquefied. Once they are cool enough to handle, scrape the insides of the eggplants out into a medium sized bowl and with the flat end of a wooden spoon, mash the eggplant. Stir in the other minced garlic clove, salt and pepper to taste, and Parmesan (a palm-full??), then stir in freshly torn or cut basil, stir until you have a nice paste going. (You can see a picture of this in the collage above, upper left-hand corner).
  5. Add the drained pasta to your eggplant paste and stir – adding in the reserved pasta water until the noodles are coated in a starchy sauce (you probably won’t need the whole half cup). Take the roasted veggies out of the oven and toss them into the pasta as well. Grate in some more Parmesan and mix. Top with fresh basil and little extra Parmesan.

We had this with some locally made hummus and whole wheat pita chips. This roasting and mixing method really takes the bitterness out of the eggplant that keeps a lot of people from eating this super-nutritious veggie. Eggplants are low in Saturated Fat and Cholesterol; they’re also a good source of Vitamin K, Thiamin, Vitamin B6, Folate, Potassium and Manganese, and a very good source of Dietary Fiber. The fiber in the eggplant, the other veggies and also in the whole-wheat pasta (about 6 grams per cup) make this a super filling meal. Fiber is known for keeping you full for longer, so you don’t have to eat as much of it in the first place, and then you’ll be less tempted to have a midnight snack later.

So don’t get me wrong – meat is great. But when it’s mid-July and I’m looking at all those beautiful vegetables, I can’t help but go back to those pre-bacon days and let the produce steal the show.

What is your favorite meatless meal? Are you reducing your meat consumption or are you a vegetarian? If so, what are your tricks for making filling meatless meals? 

Confessions, Exceptions, and Admissions

Eating locally can sometimes be a challenge. Especially depending on where you live. I’m really blessed to live in an area that makes an awful lot of amazing things, but I know that’s not everywhere. Then there are those brats who live in California where everything is available locally pretty much all the time and everyone gets it and does it and even the “fast food” joints serve local grass-fed beef. It’s really just infuriating. Or great. Or whatever – you know what I mean.

But being a “locavore” doesn’t mean that you have to give up everything that isn’t grown around you. It just means that whenever possible, you support your local food system. There are a few things I have accepted that I will never be able to acquire locally but that I will never, ever consider giving up. Here’s my short list:

  1. Coffee (duh)
  2. Olive oil (double duh – although, there is an olive farm in Georgia making some amazing oil, maybe that trend can move up to VA??)
  3. Lemons and Lime (I make a lot of mixed drinks and these are essential)
  4. last but not least – AVOCADOS  

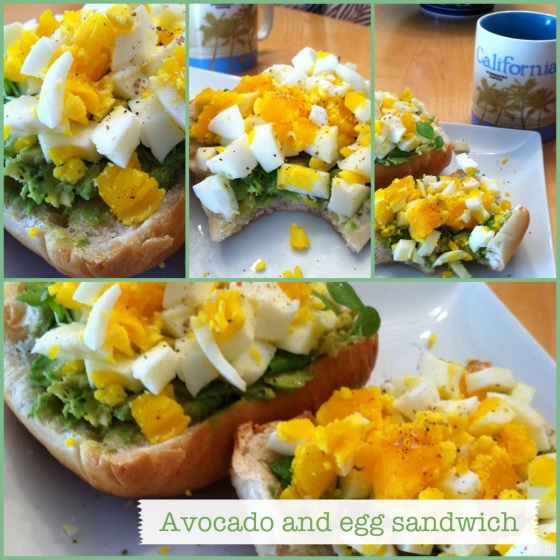
Avocados are kind of an obsession for me….they are this perfect combination of fresh, creamy, protein-laden, good-for-you-fats that just makes me happy. There will probably never be an avocado farm in Virginia, but I continue to buy these California imports on a weekly basis. This morning I was feeling an avocado craving coming on and I had one of these flashes of food inspiration that I get sometimes and I saw this sandwich in my mind before I even made it. It was a snap and was (obviously) delicious. Also, huge. It was huge. I ate about 60% of it and gave up. Which is sad. I hate leaving good food behind . . . 

Avocado and Egg Sandwich

Ciabatta bread topped with mashed avocados, watercress, chopped hard-boiled eggs, salt & pepper.

The app I use for these collages, by the way, is called “Pic Frame” and is available FOR FREE in the app store. The latest update now allows you to add labels, which makes the app complete perfection. Notice my shout out to California in the background 😉

The watercress and egg are both local, so see – it’s possible to combine the two without being a total traitor. The watercress just gave the sandwich the right amount of crunch and fresh green needed between those two heavy layers of protein. I only used half of an avocado spread on both halves of the ciabatta roll, so there’s still another half in the fridge waiting to be something yummy. I hard boiled two eggs, but I really only needed one. And if you don’t know – this is the absolute perfect method for making hard boiled eggs with yolks that are still chewy and flavorful instead of dry and chalky:

  • Put your room temp eggs into a sauce pan and pour room temp water over them until they are submerged.
  • Put the sauce pan (covered) over high heat and bring the water up to a boil.
  • When the water has reached a rolling boil, remove the saucepan from the burner, leave the lid on the pan and let the eggs sit for 6 minutes.
  • Using the lid as a strainer, strain the hot water from the pan, dump a few handfuls of ice into the pan on top of the eggs and let sit for 2 minutes.
  • Remove the eggs from the ice, roll across the counter until the shell is cracked all over, then peel. Cut as you’d like.

Avocados are widely regarded as one of the healthiest foods you can eat and particularly some of the best fat you can eat as it is primarily mono and poly-unsaturated fat, which makes it a great protein and fat supplement for vegetarians and vegans or just people like me who try to reduce their meat consumption. And we all know that eggs are a great source of protein. But not all eggs are created equal. In fact, several studies show that farm-fresh pasture raised chickens (which you will pretty much only find from local sources) are nearly 5 times higher in Vitamin D, have 1/3 less cholesterol, 2 times more omega-3 fatty acids, 3 times more vitamin E and the list goes on. And anybody who’s ever eaten a locally raised egg will tell you that the taste is the biggest difference. Eggs that you buy from the grocery store are “factory raised” eggs and even though they may be labeled “organic” “free-range” or “vegetarian-fed” it doesn’t mean what you might think. Thanks to the blog “Simple Bites” for explaining this quickly and easily:

“In order for eggs to be labeled “free-range” a chicken needs to have access to the outdoors.  This usually means hundreds of chicken confined to an industrial chicken house with a small slab of concrete to walk outdoors if they’d like. Your “free-range egg” chickens are really spending their lives indoors in a ventilated area and will not have the nutrient levels as described above.  If you’re buying “vegetarian-fed eggs”, this is a sure sign that they do not have access to pasture as real chickens are not vegetarians.”

And that’s that. Locally raised eggs are available all over and while their natural season is spring, they are usually available year-round thanks to heating lamps and modern amenities. Find out where to get yours at http://www.localharvest.org or several of the other links on the right-hand side bar on my home page.

Getting back to the sandwich: it was delicious, it was easy, it melded my favorite import with some of my very favorite local ingredients and just one roll, half an avocado, two eggs and a few sprigs of watercress probably could have fed me and Jeremy for dinner.

What are some imported foods that you can’t live without? What is your favorite thing to do with avocados? Are you eating locally raised eggs and can you taste the difference?
Leave me a comment and let’s chat!

Hello. Is it beets you’re looking for?

For the past two years I have worked with a local nonprofit organization focused on promoting local food and supporting small, family farms. For the past twenty-ish years I have been obsessed with food. Not like the people you see on Discovery Health who have to be lifted via crane out of their living rooms, but like an eight year old girl with a subscription to Martha Stewart and a dream to be a food stylist before that was even a thing and there were horrible reality shows about it. The dream of Culinary School turned into an English degree, and then another English degree, and while food is my primary passion, I’ve learned that cooking it is better kept as a passion, rather than a job. This blog was just a matter of time.

I think it’s important that chefs (and cooks!) have a philosophy, or at least an end-goal in mind when they’re creating and cooking (besides ‘I’m hungry. I think this box of mac ‘n’ cheese will do it’). For me, it’s always local. I’ve learned through the years that local food is more nutritious, tastes better, supports small farms in my community and offers heirloom and heritage varieties that you can’t find in the grocery store. When I cook, I always like to look to the local ingredient first, and then build around that. This blog will be a glimpse into some of the dishes I create, try, maul, derange, re-try and finally share with you. They will not all be good, but we’ll learn some lessons, techniques and things you may not have known about the local food system. I encourage you to comment, make suggestions and share your own experiences with me. And most of all, I encourage you to seek out local food in your own area. Once you start to look for it, you will be amazed at what is out there.

To get us started and whet our appetite, I offer up my most recent “Friday Foodie Freestyling” – which is what I do on Friday nights when the husband and I stay in and I have nothing to do except open a bottle of wine, peruse my box of fresh produce, and create a three or four course meal made primarily from whatever I picked up from my Thursday afternoon co-op, Coastal Farms.

Friday Foodie Freestyling

Zucchini poppers with tzatziki, tempura fried snap beans, broccoli, and spring onions with ponzu, golden beet and white bean salad topped with VA goat feta.

Our first course was zucchini poppers or zucchini hush puppies. I made them with shredded zucchini (local, of course) and mixed that with a local egg, hushpuppy mix from Wade’s Mill in Raphine, VA where they still stone grind their wheat, some home-made pesto from my garden and a bit of Parmesan. I fried them in my deep fryer (my best friend and worst enemy) and served them over a bed of string-cut cucumbers and with tzatziki dipping sauce which I made from Greek yogurt, local cucumbers, dill from my garden and lemon zest.  They were OK. The Huz liked them more than I did, but despite my Southern roots, I’m not a huge hush puppy fan. I do love the tzatziki and consider anything that serves as a vehicle for it a bonus. (read: I can, and will, eat that stuff with a spoon and no shame).

Second course was golden beet (you know I ❤ them!) and white bean salad. My favorite method for cooking beets is to cut them off their stems, wash them, leave the skin on, wrap them individually in tin foil and then throw them in the oven – right on the rack – at 375 for about 45 mins. When they can be pierced all the way through easily with a knife, they are ready to roll. Take them out, let them cool a bit and then take a hand towel or paper towel and just rub the skin right off of them – it should slide off easily at this point. I diced the beets, mixed with the beans (canned) and heated it all up together along with an Italian vinaigrette, some fresh herbs from my garden then topped with VA made goat feta and cracked red and black peppercorns. This was yum and definitely worth repeating.

Finally the last course was tempura battered and fried fresh veggies. Tempura batter is literally one of the easiest things to make. There are four ingredients: flour, baking powder, water and egg. That’s it. Do NOT buy the pre-made tempura mixes at the grocery store for $4.50, it’s a total rip off. Once I made the batter, I dipped broccoli, snap beans and spring onion rings into it and then into the deep fryer (you see how I keep going back for more abuse…) and then out after a few minutes, served with ponzu dipping sauce (lighter and more citrusy than soy sauce – buy it pre-made in the International aisle at the grocery store). This is always good. I make tempura several times a year and it never disappoints.

So there you have it – that’s what I do and that’s how I do it. Keep checking back for more food pictures, recipes, tips and absurd failures. Thanks for reading!