The Drunken Clam

What is this? A second post this week?? I maintain that you shouldn’t get your hopes up, but for now – here’s some food.

The Drunken Clam

clams

Ingredients:

  • 2 tbs butter (or Vegan butter, which is what I use and works great)
  • 1 tbs olive oil
  • one large shallot, chopped
  • two large garlic gloves, chopped fine
  • one large heirloom tomato, diced
  • 1/2 – 1 cup white wine (I suggest Pinot Grigio)
  • fresh lemon
  • one bag of Littleneck clams – usually around 50 or so clams – scrubbed and rinsed well
  • handful of parsley, chopped

Method:

  1. Heat the olive oil and butter in a large skillet with a lid over medium heat. Once the butter begins to bubble, add the garlic and shallot and saute 2-3 minutes until shallot starts to become translucent, then add in the diced tomatoes, salt and pepper to taste and stir for two more minutes.
  2. Pour in the wine, stir to combine, and bring to a light boil, then reduce heat back to medium and add the clams and the juice of half a lemon, and stir gently to incorporate the sauce, then put the lid on the skillet and let sit for 7-8 minutes.
  3. Take the lid off, pour in a little bit more wine and a tablespoon more butter, a squeeze of a lemon wedge as well as the parsley. Stir to combine, then with a slotted spoon, divide the clams between the bowls then pour the remaining sauce in the pan over each of the bowls of clams.
  4. Serve with hot, toasted French bread, a lemon wedge and the rest of that Pinot Grigio. This serves four normal people or two of us.

The Littleneck clams I purchased were from Cherrystone Aqua Farms which farms and harvests clams and oysters on the Eastern Shore of Virginia. Yes, Cherrystone is also a type of clam, but did you know Littlenecks and Cherrystone clams are the same clams? These as well as Topnecks are all just Quahogs – their different names simply refer to their size, with Littlenecks being the smallest, then Cherrystones , then Topnecks are big boys and the clams that are just called Quahogs are the largest. Smaller clams will do better in this recipe as the larger a clam gets, the tougher it gets. Quick steams with light sauces like this are best done with young, tender clams. Chowders and stuffed clams can be done with your Topnecks and Quahogs. So you see – bigger is not always better.

Clams are low in fat and high in protein and they offer higher than average amounts of necessary minerals like selenium, zinc, iron and magnesium as well as B vitamins and niacin. They’re also painfully easy to make, as you can see from above. People get freaked out by seafood and even more freaked out by bivalves. There’s really nothing to be afraid of, but there are some things you need to make sure of when dealing with clams and other bivalves such as mussels or oysters:

  • Buy them fresh from a reputable fish monger or seafood market
  • Keep them cold until you cook them (in a bowl of ice in the fridge is best)
  • Rinse them well before cooking – they dig around in the dirt for a living….
  • Once you have cooked them, check for shells that did not open. Any shells that didn’t open during cooking should be disposed of as this is indicative that the clam may have been dead prior to cooking and therefore not of the freshest variety. If you got a batch where several clams didn’t open, that means they weren’t fresh and you might want to purchase from a different seafood market next time. Having one or two that don’t open, though, is pretty normal.

So don’t freak out. Just split a bottle of wine with those clams and relax.

Pantry Raid

I’ve been on a kick since around the new year to de-clutter the house. We are considering putting our house on the market within the year….or next few months. Not sure yet. In any case, just the thought of it has pushed me into this torrential cleaning-organizing-decluttering-nagging task whirlwind. Incidentally, about a month after I put together the list of things we needed to do, I started reading The Happiness Project, the author of which is just WAY too much like myself, and so reading about all the stuff she did and took on and organized and tackled is just sending me over the edge. Anyways, how that is related to a blog about food is that I realized my pantry and cabinets had become stuffed with items that were not being used, were half-gone, bought for one crazy recipe then never looked at again, etc etc. OR, there were duplicates of stupid things that I always assume I never have, so I always buy at the grocery store, just to come home, open up the spice cabinet to see that I already have two unopened containers of coriander. Great.
We have also recently had two good friends move out of state, and in doing so, they have done meat/liquor/canned food drafts with their friends to get rid of most of their food in their cabinets, because nobody wants to spend time trying to move some jars of peanut butter and a half empty box of crackers. No offense to my friends, but when I move I don’t want to have to get rid of all my food. I just want to eat it.

So I have started a pantry raid project to try and use up all the items in my cabinets. Of which there are many:

pantry raid cabinet 2

SO MUCH DRIED FRUIT


First, I created an inventory of all the food I had in my cabinets, refrigerator, freezer, pantry, etc etc. I did this on paper and also digitally through an app on my iPad. Second, I started researching recipes that used random things or things I had too much of like how I had three containers of oatmeal. Really? Or poppy seeds. Why do I have poppy seeds? Or bags of dried Arbol chilis. It’s all a mystery. Finally, I started implementing the recipes into our weekly meals or other items. My first foray into this was using up some of the oatmeal by making oatmeal breakfast cookies. These are an awesome way to use up odds and ends in your cabinets. They are also super healthy, are dairy, flour and sugar free.

breakfast oatmeal cookies

breakfast oatmeal cookies

Breakfast Oatmeal Cookies

Ingredients:

  • 2 whole Ripe Bananas, Mashed Until Creamy
  • â…“ cups Peanut Butter, Creamy Or Chunky
  • 1/4 cup honey or Agave
  • â…” cups Unsweetened Applesauce
  • ÂĽ cups Vanilla Whey Protein Powder
  • 1 teaspoon Vanilla Extract
  • 1 teaspoon Butter Extract, Optional
  • 1-½ cup Quick Oatmeal, Uncooked
  • ÂĽ cups Chopped nuts or seed, Peanuts, cashews, almonds, etc.
  • ÂĽ cups Chocolate Chips, white chocolate morsels, chopped dried fruit, etc

Method

  1. Preheat heat oven to 350ÂşF.
  2. In a large bowl, mix mashed banana, peanut butter and honey until completely combined. Then add in the applesauce, vanilla protein powder and vanilla and butter extracts. Mix again until completely combined.
  3. Add in the oatmeal and nuts, morsels or dried fruit to the banana mixture and combine.
  4. Let dough rest for 10 minutes.
  5. Drop cookie dough, by spoonfuls, onto a parchment paper lined cookie sheet and flatten cookies into circles, about a 1/3″ thick.
  6. Bake cookies approximately 30 minutes, or until golden brown and done. Remove from oven and let rest on cookie sheet for 5 minutes, then move to cooling rack.
  7. When cookies are completely cool, store in a covered container.

I split the batter in half and in half I put diced dried plums, white chocolate morsels and walnuts. In the other half I put chocolate chip and peanut butter morsels, cashews and sunflower seeds. Almost everything in the recipe I had on hand except apple sauce, because I don’t have a four year old in the house . . .

It was a great way for me to use up some half-empty packages of nuts and dried fruit – two things that just seem to multiply in our cabinets. These cookies were great – Jeremy and I had them for breakfast everyday for over a week – the batter makes a pretty good amount. In fact, I think I’ll keep making them every few weeks just to have on hand, especially since it’s really hard to find granola bars at the grocery store that aren’t as bad for you as anything else on the aisle.

Next up: tackling dried chilis, frozen unidentified sausage and wild rice. Stay tuned!

the other green

I was reading a story in Edible Piedmont this morning about a kale recipe, which could also be made with collards. The author made this substitution because she said she knew how popular collards are in eastern North Carolina, so much so that the region has been referred to as “The Collard Belt.” I’ll take it. But I’ll also take kale. Any day of the week. I think it’s actually a bit more palatable to the general population than collards and is usually cooked in more various ways.

I know it’s sort of cliche to have a food blog and regale the benefits of kale. Everyone gets it, I know. Kale is great, it’s good for you, it’s a super food, put it in your smoothies, bake it into cookies, blah blah blah. But seriously. It’s great. So great that I highlighted one of my favorite kale recipes in my January column in Tidewater Women. The column this month is about resolving to “Live Locally” and what that means, how it benefits not only you personally, but your community as a whole. I also put it in there to remind people that local food isn’t in hibernation during the winter months. It’s readily available, if you’re willing to look for it, and to try something you might not otherwise try (ie – kale. or chard. or other things that are green and look like dinosaur food.) Not wanting to be a hypocrite, I went out yesterday, tracked down some kale and made this recipe, which I share with you below. It really is a great recipe, especially for the new year, if (like me) you are trying to drop a few “party pounds” from the holidays….this meal is so packed with protein that after only half a bowl you’ll feel completely full. It’s also so lo-cal and healthy that even if you down all four servings in one night, there’s really nothing to feel guilty about. Except for the amount of flatulence you will inevitably plague your family with if you decide to do that. ANYWAYS.

I found this kale at a little roadside stand out in front of somebody’s house. These are my favorite places to shop because it’s fresh, you’re helping support someone’s backyard gardening habit, and the produce is usually dirt cheap. I got a pound of kale and a dozen fresh, free-range eggs for $4. I could also have scored 4 lbs of sweet potatoes for a dollar if I’d liked. Keep an eye out for these stands in your neighborhood or town. And don’t feel shy or weird about driving up to them. The people who set them out are usually so nice and happy to have a customer. The chicken came from a Crock Pot Chicken I’d made earlier in the week. This was one of three meals I got out of one five pound chicken. The only change I make in this recipe is that I use dried lentils that I cook and season myself. I’ve never been able to find canned lentils in my grocery stores, but if your store has them – more power to you. If you go this route, use half the bag (1/2 lb) – not two whole cups of dried beans, as they will expand as they cook. 1/2 lb will give you just over two cups once cooked.

Shredded Chicken with Kale and Lentils

kale cooking

CAST IRON LOVE.

Ingredients:

  • 2 tablespoons extra-virgin olive oil
  • 1 small onion, finely chopped
  • 1 teaspoon fresh thyme leaves
  • Coarse salt and ground pepper
  • 2 bunches kale, tough stems removed, torn into bite-size pieces
  • 2 cups lentils (from a 15.5-ounce can), drained and rinsed
  • 2 cups shredded cooked skinless chicken breasts
  • Lemon wedges, for serving

Method:

  1. In a large skillet, heat 1 tablespoon oil over medium heat. Add onion and thyme; season with salt and pepper. Cook, stirring occasionally, until onion is softened, about 5 minutes.
  2. Add kale and cook, stirring occasionally, until kale is wilted and tender, 4 to 6 minutes. Transfer to a medium bowl.
  3. Add 1 tablespoon oil and lentils to skillet; season with salt and pepper. Cook, stirring, until warmed through, about 20 seconds. Transfer to bowl with kale, toss to combine, and divide among four bowls. Top with chicken and squeeze lemon over top. Serves 4.
Shredded chicken with kale and lentils

Shredded chicken with kale and lentils

I agree with what you’re thinking – this looks like a recipe you see in those magazines all about getting fit with advertisements for muscle milk supplements. But honestly, it doesn’t taste like that. It tastes yummy AND healthy, which is possible, I promise. Jeremy even got seconds. Flatulence be damned!


Pinterest Perfection

I’m sure many, if not most, of you have heard of Pinterest. I first heard about this little site where you could “curate” your own visual boards over two years ago when the site was still in Beta testing. I did some quick researchpinterest-logo on the trusty interwebs and lo and behold, I was able to track down the Pinterest CEO to his person twitter page, where I began a barrage of direct messages begging for a beta tester invite. I got it. His name is Ben, by the way, and he’s super nice. I was one of the first few thousand people to use the site, and use it I did. I currently have over 30 boards, 981 pins and 125 followers. When Pinterest first started it was much more of an art and design crowd. The cool kids who were developing the site had no doubt invited their other cool kid friends who I’m sure were all interior designers, graphic artists, and web developers in San Francisco (that’s where the company is based, not the valley, which is why the site and its people are so cool) to give it a whirl. As Beta opened up to user invites, and the site became a real, live thing, it became much, much, much more crafty, crock potty and crap to do with your kidsy. But you know what? I still love it. Despite the fact that I have to sift through hundreds of pins of maternity photo sessions to get to the thing I’m looking for, despite the fact that when I search the food category I have to ignore a million recipes that suggest throwing four different kinds of canned Campbell’s crap into your slow cooker and feeding it to your family of 10 for less than .30  cents a serving, I still think it is an awesome, amazing thing. And every once in awhile, you run across some real gems.

On Wednesday of this past week, I made THREE recipes for one meal that I found on Pinterest: A Roasted Garlic salad dressing, a rosemary and Parmesan overnight bread, and an Italian style beef and butternut squash stew. They were all the kind of things that keep me obsessed with the site. Diamonds in the rough.

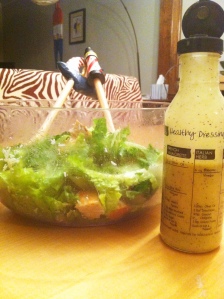
The Roasted Garlic Vinaigrette is a MUST try to anyone who loves garlic on the level that I do. Two heads of garlic go into this dressing. And while you do have to roast the garlic for a good half hour, the dressing itself is really easy to make, and you probably have most of the ingredients on hand. I’m currently obsessed with making my own salad dressings and have tried several I’ve found on Pinterest, but this one is my favorite.

From Fat Girl Trapped in a Skinny Body:

Roasted Garlic Vinaigrette

pinterest meal salad dressing

Ingredients:

  • 2 heads of garlic, roasted and peeled
  • 1/2 cup extra virgin olive oil
  • 1/4 cup apple cider vinegar
  • 2 tbsp lemon juice
  • 1/2 tsp kosher salt
  • 1 tsp black pepper
  • 1 tbsp honey

Method:

  1. Cut the pointy top off of the garlic. Brush them with olive oil and roast them in a pan in the oven at 400 degrees for about 25 minutes, until it is starting to turn golden brown and soft. Remove from the oven, allow to cool. Once the garlic is cool, peel the skin off. Discard the skins, save the garlic. *Skin peels off really easily after they are roasted.
  2. Add all the ingredients to the food processor and process until smooth. Refrigerate until ready to serve.*If some of the skin get processed with the rest of the dressing, no big deal, it won’t change the flavor.

The salad dressing can be vegan if you sub the honey for agave. And it is dairy free, with no substitutions!

This dressing is tangy, but has that deep, rich caramelized taste from the roasted garlic. It’s a vinaigrette, but it’s creamy because of the garlic being processed right into it. Keep this for a week or so in your fridge in a covered container.

The bread recipe I comes from Simply So Good. I used her basic bread recipe, and put in my own additions. This bread is baked in your cast-iron enameled Dutch Oven (you have one of those, right??). I have a big, blue Le Creuset that is the Pride and Joy of my kitchen. Jeremy gave it to me for Christmas a few years ago. They are usually in the $300-$400 range, but sometimes you can score them at T.J. Maxx for half the price, which I believe is what he did (smartly). Other cast-iron enameled pots are fine for this recipe also, but when you have a Le Creuset, you tend to brag about it. Here is a view down on mine to give you an idea of the size of the vessel you might want to use:

I ❤ Le Creuset

OK, enough about my awesome piece of iron. Here’s the recipe.

Crusty Bread

Crusty Overnight Bread

Crusty Overnight Bread

Ingredients:

  • 3 cups unbleached all purpose flour
  • 1 3/4 teaspoons salt
  • 1/2 teaspoon yeast
  • 1 1/2 cups water

 Method:

  1. In a large mixing bowl, whisk together flour, salt and yeast.  Add water and mix until a shaggy mixture forms.  Cover bowl with plastic wrap and set aside for 12 – 18 hours.  Overnight works great.
  2. Heat oven to 450 degrees.  When the oven has reached 450 degrees place a cast iron pot with a lid in the oven and heat the pot for 30 minutes.  Meanwhile, pour dough onto a heavily floured surface and shape into a ball.  Cover with plastic wrap and let set while the pot is heating.
  3. Remove hot pot from the oven and drop in the dough.  Cover and return to oven for 30 minutes.  After 30 minutes remove the lid and bake an additional 15 minutes.  Remove bread from oven and place on a cooling rack to cool.

To this recipe, I added 1/4 cup of fresh grated Parmesan Cheese, 1/8 cup of fresh rosemary (from my garden), and several cloves of smashed and roughly chopped garlic. I added that in to the dough at the very beginning and then proceeded as normal through the recipe.

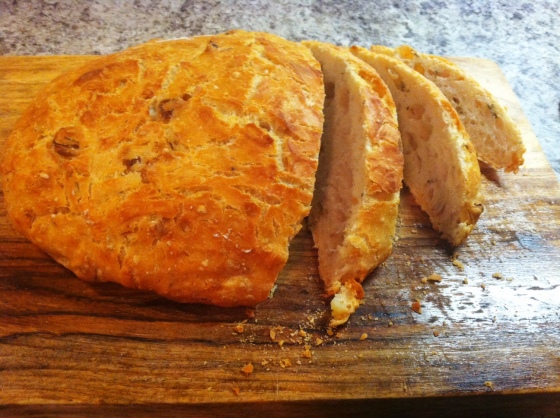
pinterest meal bread cut

This thing turned out beautiful. There is nothing quite like making your own bread from scratch and this is really a pretty easy way to do it.

Finally, the main course – Beef and Butternut Squash Stew from Closet Cooking. I’ll be honest and say there are a few things wrong with the way this original recipe is written, so the recipe below has a few very minor changes from myself, just to make things more clear.

Italian Style Beef and Butternut Squash Stew

pinterest meal stew 2


Ingredients:

  • 2 ounces pancetta (diced)
  • 1 pound beef (cut into 1 inch cubes) (My Note: he doesn’t specify what kind of beef to use here. My suggestion is to get a sirloin roast, if you can find one – that’s what I used. Otherwise a small round roast is fine or chuck if nothing else is available)
  • 1 onion (chopped)
  • 3 cloves garlic (chopped)
  • 1/2 teaspoon red pepper flakes (optional, to taste)
  • 1 tablespoon rosemary (chopped)
  • 1 tablespoon thyme (chopped)
  • 1 cup Italian red wine (My Note: I used a Zinfandel. It doesn’t have to be Italian, don’t stress out, just use a decent red wine that’s not sweet)
  • 3 cups beef broth
  • 1 splash balsamic vinegar
  • 1/4 cup sundried tomatoes (chopped)
  • 1 (28 ounce) can diced tomatoes (My Note: He doesn’t specify drained vs. undrained. Because he does not, I put them in without draining them. It gave my stew a more “soupy” consistency, which I was OK with. If you want this to be more like a traditional stew, then drain the tomatoes before adding).
  • * parmigiano reggiano rind (optional)
  • 1 teaspoon oregano
  • salt and pepper to taste
  • 1 pound butternut squash (peeled, seeded and cut into 1 inch cubes)
  • parsley (chopped) (My Note: optional for garnish. I used a bit of grated Parmesan instead).

Method:

  1. Cook the pancetta in a large pan on medium heat. (My Note: or Dutch Oven. Again, with my Creuset)
  2. Add the beef and brown on all sides in the grease from the pancetta and set aside. (My Note: I coated the beef cubes in flour first. I’ve always done this when searing beef that is basically going to be braised later. It also helps to thicken the sauce a bit, but it’s up to you).
  3. Add the onion and saute in the pancetta grease until tender, about 5-7 minutes.
  4. Add the garlic, red pepper flakes, rosemary and thyme and saute until fragrant, about a minute.
  5. Add the wine and deglaze the pan. (My Note: deglazing means you add a liquid to absorb the browned bits from the pancetta, beef and aromatics. When you add the wine to the hot pan, it will steam up. Take a wooden spoon and use that moment to scrape up all the bits in the bottom of the pan, stirring them into the liquid to create a flavorful base).
  6. Add the beef, broth, balsamic vinegar, sun-dried tomatoes, diced tomatoes, parmigiano reggiano rind, oregano, salt and pepper and bring to a boil.
  7. Reduce the heat, cover and simmer until the beef is nice and tender, about 1-2 hours.
  8. Add the squash and simmer until it is tender, about 15-20 minutes. (My Note: more like half an hour, at best).

This stew was filling, hearty and really quite healthy. Serve it with a glass of the same wine you used in the soup – superb! Always cook with wine that is good enough to drink. When you cook with wine, you are cooking off the alcohol, but intensifying the flavor. If you intensify a crappy wine, you will just get really intense crap. No Bueno.

Pinterest Perfection

Pinterest Perfection

The dressing, served over a bed of Organic romaine lettuce, the garlic, rosemary and Parmesan bread and this stew altogether? Perfection. Pinterest Perfection.


The root of it all

I just gave myself an award for the most clever blog title ever.

i ❤ beets

It is a shame, I realized, that this blog’s namesake has never really been examined thoroughly. I think in my very first blog post I may have posted a picture of a beet dish I had done, but I’ve never really delved into this amazing little root that inspired me to make this blog. There are a few reasons that beets are the thing I happen to heart. They are available locally, they are available at several times throughout the year and many people don’t like them. Why is that a reason to make beets the central theme of a blog? Because I think I can change people’s minds. I think a lot of foods out there that deserve our attention but suffer general distaste have just been presented wrong all this time. Like the poor Brussels sprout, which I will post about later . . .

Take, for instance, my husband who insisted he hated beets. So I asked in what format he had experienced beets in the past and he said either canned, pickled or boiled to death. Well, no wonder. He also hated Brussels sprouts for similar reasons. But there is a simple answer to both of these food fears and it is this: roasting. Roasting, which uses dry, indirect and diffused heat (such as an oven) increases flavor by caramelization and the Maillard browning reaction. Essentially, roasting enhances the sugars in foods through a process called pyrolysis, which I will not get into, because I barely passed chemistry. But here is what I do know: it makes food delicious. Especially foods like beets, which already have a high natural sugar content, just waiting to be released.

Beets are also so nutritious. Here are some facts from Nutrition and You about beets:

  • Beets are a rich source of phytochemical compound, glycine betaine. Betaine has the  property of lowering homocysteine levels within the blood. Homocysteine, a highly toxic metabolite, promotes platelet clot as well as atherosclerotic-plaque formation, which, otherwise, can be harmful to blood vessels. High levels of homocysteine in the blood result in the development of coronary heart disease (CHD), stroke and peripheral vascular diseases.
  • They are also a rich source of B-complex vitamins such as niacin (B-3), pantothenic acid (B-5), pyridoxine (B-6) and minerals such as iron, manganese, copper, and magnesium.
  • The root has very good levels of potassium. 100 g fresh root has 325 mg of potassium or 7% of daily requirements. Potassium lowers heart rate and regulates metabolism inside the cells by countering detrimental effects of sodium.

And while us die-hard beet fans can eat a beet canned, pickled, boiled, grilled or anything else, for those skeptics out here, this is my GO-TO beet recipe. I’m not sure where it originated from…I think a friend may have suggested this method and I’ve just sort of made it my own over time, I’m not really sure. My hope is that you will love it enough to make it your own, adding, subtracting and substituting to your liking.

Roasted Beet Salad with Vinaigrette

Ingredients: Beets in vinaigrette

  • One bunch beets (as seen above)
  • 3 tbs olive oil
  • 1 tbs vinegar of your choice (balsamiq, red wine, champagne, whatever you like)
  • 1 shallot, finely diced
  • 1 tbs dried herbs (Italian, Herbs de Provence, fresh or powdered garlic or whatever else you’d like)
  • Salt and Pepper to taste
  • 1 cup crumbled feta cheese

Method:

  1. Pre-heat oven to 375 Fahrenheit. Cut the beets off their stems and trim off the tops and the “tails” of each beet. Clean each beet so they are free of dirt. Wrap each beet in individually in tin foil and place in the pre-heated oven, directly on the center rack. Roast for 30-40 minutes, or until each beet is easily pierced with a knife. 
  2. While the beets are roasting, create your vinaigrette. The most important thing to remember here is the a vinaigrette dressing always 3 parts oil to 1 part vinegar. You can use any combination or any measurement (tsp, tbs, cup, etc), as long as you keep that ratio the same. Pour your oil, vinegar, shallots, herbs, salt and pepper into a medium sized bowl and whisk until they are emulsified. Set aside until beets have finished roasting.
  3. When beets are easily pierced with a knife, unwrap from tinfoil and allow to cool. Take an old dishtowel and peel the beet’s skin off with the towel – if it’s roasted to completion, the skin should slide off easily. Do this with each beet.
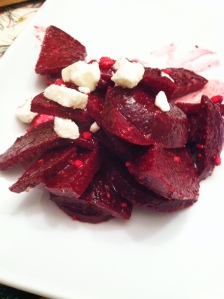
  4. Cut each beet in half or in quarters, if large, and cut into thin slices. Re-whisk your vinaigrette so it is well blended, then add your beets to the bowl and toss to coat. Plate, then top each serving with a spoonful of feta cheese.
Trim and wash beets

Trim and wash beets

A well emulsified vinaigrette

A well emulsified vinaigrette

Beets

After roasting, remove skin with a dish towel

Served with Greek salad, crusty French bread a Pinot Grigio.

Served with Greek salad, crusty French bread a Pinot Grigio.

If you don’t like beets like this, then I grant you the right to dislike beets. But before you file them away in things that are gross and that you refuse to eat, please try this recipe. Please. Give beets a chance.

Note: these beets were purchased from Westside Produce and Provisions where they were sourced from New Earth Farms in the Pungo area of Virginia Beach, where they use sustainable and organic growing methods. 

Slow Cooker BBQ

I’m from North Carolina so naturally I am a huge fan of Barbecue. And while you can’t beat hardwood smoked whole hog, for most of us that is not an option in our own kitchens (although I am still trying to convince Jeremy that there is room beside the hot tub in the backyard for a full-hog sized smoker).  But there is another option and it comes in the somewhat unexpected form of a slow cooker. Yea, there are some hard-core BBQ fans out there that will tell you that if it’s not cooked over a real hard wood fire then it’s not technically barbecue, and on some historical points I will agree with them, but for all intents and purposes this recipe gets the job done. But make no mistake – while you don’t have to cook a whole hog in a split metal garbage pail over a hickory fire, you do have to commit yourself to two days of cooking, although most of it is pretty hands-off. You also have to commit yourself to your house smelling like pork for two days. Something I do not mind at all, but which some of you may find displeasing.

Step 1: Purchase a pork shoulder. These are also often called pork picnics, or pork butts. I usually go for a 3-4 pounder because I’m not looking to cook for a huge crowd. Go bigger if you need to, just make sure it will still fit inside your slow cooker.

Step 2: The night before you want to eat the Q, put the shoulder into the crock pot with at least a liter of cola or as much as you need to just about cover it. You can use any kind of cola. I used Dr. Pepper, but I’ve also used R C Cola, Coke, Pepsi, whatever. Turn the cooker on low and let it sit overnight.

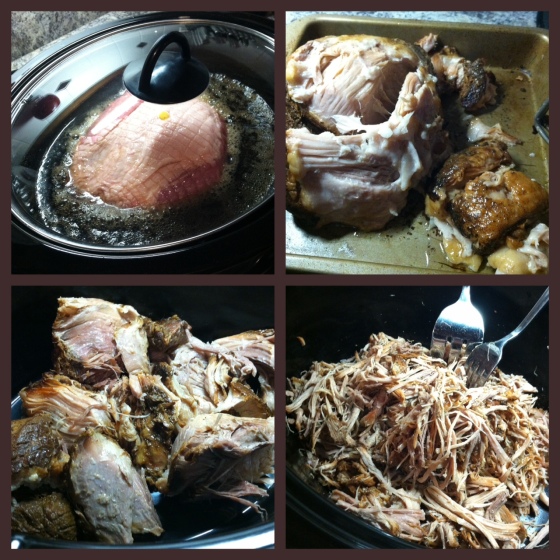
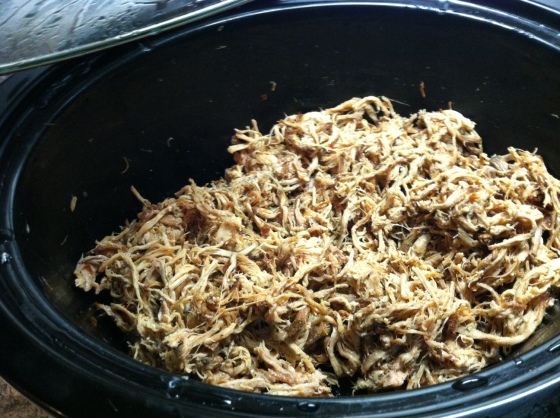
Step 3: In the morning, remove the pork from the cola, pour the cola out and wipe out your slow cooker crock. The pork will be falling apart, so make sure you get all the meat out before you toss the cola (IE- don’t throw the pork baby out with the bath water). Let the pork cool for a bit, then begin to remove as much of the fat as you can from the meat. This will require tearing the meat into large chunks. (See photo collage, upper right hand corner). Once you’ve gotten as much fat off as possible (and bones if you’ve purchased a bone-in shoulder), put the meat back into the crock pot and shred with two forks until you’ve reached the consistency and chunkiness you like. You can also chop the meat after it’s shredded if you like that texture better. Chopped vs. Pulled is a completely personal preference; the value of one over the other I will not weigh in on although many people have strong opinions here.

BBQ Collage

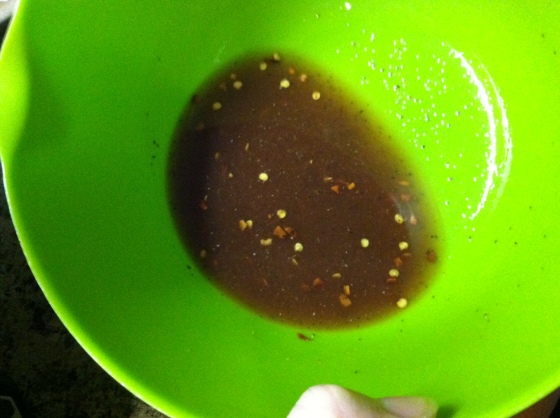
Step 4: Make your sauce. This is where personal preferences turn into regional BBQ wars. You are certainly welcome to go to the store, buy a pre-made jar of BBQ sauce and dump it onto your meat at this point. That is totally fine if you have a particular brand that you really enjoy. However, I have never ever ever purchased a sauce from the store that adequately represented real Eastern Carolina BBQ Sauce, so I make my own. I cannot even begin to give you real measurements of anything, but I will tell you it includes a little to a lot of the following things: apple cider vinegar, molasses, red pepper, black pepper, hot sauce, salt, garlic and onion powder, ketchup, and (secret ingredient alert!) liquid smoke. Yup. If you can’t cook it over real smoke and enjoy that hard-charred meat bark, liquid smoke will at least give you a hint of that flavor. The sauce I make looks something like this when I’m done:

Eastern Carolina BBQ Sauce

Secret Sauce

Possibly not at all like the BBQ sauce you know and love. Again, this is very regional. If you love some KC Masterpiece, I’m not judging (yes I am), just use that instead and sauce it to your liking. It should look something like this, or like something completely different if you’re using a different kind of sauce:

NC Style BBQ

This is what Eastern NC sauced BBQ looks like.

Step 5: Leave the meat in the crock pot with the sauce on low during the day. When you’re ready for dinner, check the meat, see if it needs any more sauce, then serve how you like. Again, this could be a multitude of ways, but I see no reason why you wouldn’t want it on a soft bun with home made coleslaw and a good dose of hot sauce:

BBQ Sandwich

Heaven.

I’ve taken this BBQ to several events and never get less than a dozen compliments on it. Even though it takes a good 20 hours, it’s worth it, and really is very very easy when you break it down. And the more you make it, the better you’ll learn how you like your sauce, or you’ll come up with other fun combinations. I’ve seen a recipe done like this but instead of BBQ sauce, a Cuban marinade was used, then the pork was made into Cuban sandwiches with ham and pickles and oh jeez, that’s going to have to be another blog . . .

What is your favorite kind of BBQ? Tennessee? Texas? Arkansas? Western NC? Let’s fight about it!

Eggy Eggy Parm Parm

For you Tom Haverford fans out there . . .


ANYways. I’m a horrible blogger. Two weeks in between posts? Blogging suicide. But I have an excuse. The days/weeks/months have been FLYING by lately, have they not? I’m not sure if it’s because of the election and how much of the past several months I’ve had to just tune out and hum songs in my head while I consider moving out of a swing state to Texas before the next major election, or if it’s about daylight savings time and so the days just seem shorter, or if it’s just that ramp up to the holidays where we all sort of run around like chickens about to get their heads cut off, but in any case, the time between my blogs feels like hours. The last one was right before Halloween, which was like, yesterday, right?

In any case, I present to you: eggy eggy parm parm (aka Eggplant Parmesan):

Eggy Eggy Parm Parm

This is a super fun joke for you Parks and Rec fans. For everyone else I just sound a little spastic.

This meal came together in some fun ways. The sauce is my tomato sauce I’ve posted about twice, and now thrice, cause I’m obviously obsessed with it. And the eggplant came from Mattawoman Creek Farms on the Eastern Shore of Virginia. Last weekend the organization that I direct, Buy Fresh Buy Local  Hampton Roads, helped organize a local food tour on the Eastern Shore. Several farms, restaurants and wineries participated and opened their doors to the public, gave free wine tastings and specials, etc. I’ve been up the shore a few times in my life, but never to spend any real, good quality time, so I was excited to spend the day up there. We took the dogs with us, and they even got a behind-the-scenes tour of Mattawoman Creek Farms, a beautiful and incredibly well run Organic Farm that produces what I think is probably world-famous lettuce, among lots of other things. They have an incredibly long season because they use green and hoop houses very efficiently. I’m really sorry I didn’t take any pictures there, but I was wrangling two dogs in a muddy field just a few days after hurricane Sandy blew through.

We also visited two wineries, Holly Grove Vineyard and Chatham Vineyard. They are both really great and we bought a bottle of Petit Verdot at Holly Grove and the Church Creek Chardonnay at Chatham. Also, they have winery dogs, so you can’t hate that:

Anyways, back to the parm. We didn’t get a chance to go grocery shopping yesterday, so when I went to put dinner together a box of spaghetti, an eggplant and my frozen tomato sauce just made sense. As per usual, I do not really have a recipe for this, but I can tell you my process.

First, I peel the eggplant and cut it into 1” thick rounds. This was a huge eggplant, so I took two of the rounds and diced those pretty small to add to the sauce.

I took the rounds and dredged them in egg, then a breadcrumb/flour mixture and put them on a baking sheet. They went into a 350 degree oven for 20 -30 minutes or until they were easily pierced with a fork. Tender, but not mushy. About 2 minutes before they were ready to come out, I topped them with shredded mozzarella.

The diced eggplant pieces went into olive oil in a large pot and were sauteed with garlic and Italian seasoning until they were tender. Then the thawed tomato sauce went into the pot, maybe two cups? But use however much you need for however many people are eating. To this I add tomato paste to thicken the sauce. Remember, the sauce I make is more like tomato sauce in a can than pasta sauce in a jar, it’s the base for sauces, so it needs to be thickened in some way before putting on pasta. I let this simmer while the eggplant baked.

Cook your pasta according to the directions, drain, then mix into the tomato sauce to keep warm while the eggplant finishes up. Serve the eggplant over the pasta, top with Parmesan and parsley or a little more mozzarella. Do not eat this without wine. Preferably a cab sav, shiraz or chianti.

Yes, those are Halloween napkins. See, I really think Halloween was just yesterday.

I know this is not the traditional way to make eggplant parm, where you bake it with the sauce and big slices of mozzarella right on top and then served without pasta, but I’m not Italian, so there ya go. I also know I have posted a lot of eggplant related dishes. I just love it. People are scared of it, I’ve realized lately. They think it needs to be salted and rinsed and fussed over and that if you don’t do it just right it’s bitter or tough. I have never found any of this to be true. I don’t salt or sweat mine, I peel it, roast, bake or saute it, and I’ve never had one that tasted anything but delicious. And because I like to eliminate meat where I can in our diet, eggplant is the perfect substitution for chicken in this dish, or for sausage or ground beef in the sauce. It just makes the meal heartier while also making it healthier. I also like to use my method above of peeling, cutting and then breading the eggplant slices, then I put them on a baking sheet and freeze them. Then you can take out individual slices of eggplant straight from the freezer to the oven and bake them whenever you want them throughout the winter. I use them in this dish, or baked and put on a sub roll with marinara and provolone in place of meatballs or just as eggplant “filets” topped with bruchetta, cheese, olive tapenade – whatever you want!

How do you like to prepare eggplant? Are you scared of cooking with eggplant? What eggplant myths have you been told?

Impulse Buy

For most people, an impulse buy at the grocery store is a pack of gum, or maybe if you’re feeling really wild, a Milky Way (tm?) or something. Or if you’re at the farmers market, maybe you grab a little pint of blueberries, because you just can’t pass them up. But not for me. Oh no. When I impulse buy, I go big.

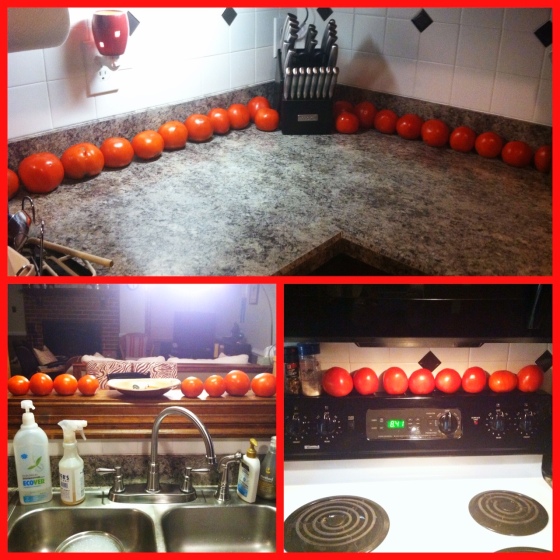
Take, for example, this past week when I went by Stoney’s Produce in Virginia Beach to see if they had kale or cabbage for a soup I was making. They did not. But you know what they did have? 25 pound boxes of canning tomatoes. That’s right. Instead of buying one bunch of kale for a soup, I came home with a toddler sized box of tomatoes. And they were on their last leg, which is why they were being sold in bulk. 25 pounds of tomatoes, over-ripe, bruised and needing to be turned into SOMETHING within a day or two. It was like buying a ticking time bomb. For $12.

For the tomato novices, you cannot leave tomatoes, especially tomatoes in this state, in a box all stacked on top of each other. They need to be laid out, stem side down, on a flat surface to keep from bruising any more. So you can imagine what 25 pounds of tomatoes, laid out in single rows looks like in my tiny kitchen. Well, you don’t have to imagine, actually, because I made a collage of the tomato invasion:

OH GOD THEY’RE EVERYWHERE!!

(that is only about half of them). I knew I wanted to eat some of them fresh and preserve some of them, so here’s what I did:


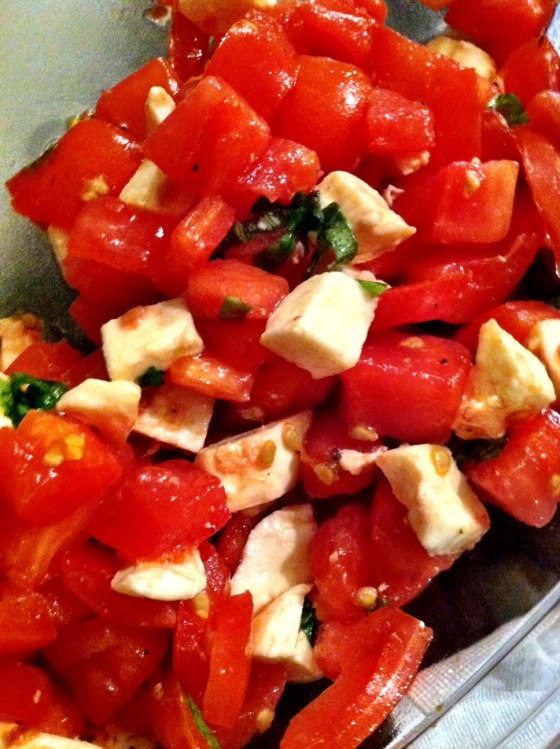
1. Caprese Salad

Some friends of ours invited us over for dinner this week, so I cut several tomatoes up, mixed them with diced fresh mozzarella, olive oil and fresh basil, salt and pepper and had it alongside some delicious chicken kebabs they made. Caprese is one of my very favorite tomato dishes, because it lets their freshness shine and creamy, slightly salty mozzarella is the perfect foil for them.

2. Salsa

I had not made and preserved any salsa yet this year, so this was the perfect opportunity. Some of this we ate fresh, the rest I will freeze and then thaw as needed throughout the winter. Recipe is super simple:

6 small tomatoes, blanched, peeled, diced
1 onion, diced small
2 jalapenos, seeded and diced (or keep some seeds in if you like the spice)
1 red pepper, roasted, peeled, seeded and diced
2 cloves of garlic, minced
1 tbs lime juice
salt and pepper to taste

Combine all your ingredients and let sit overnight for flavors to meld. Serve fresh with tortilla chips or freeze in zip top bags or tupperware containers. When you’re ready to use, let thaw in the refrigerator overnight. When you’re ready to eat the salsa, throw in some chopped cilantro, but I wouldn’t put the cilantro in with the batch you’re freezing. I think that sort of destroys the real fresh, bright scent and taste of cilantro. If you’re not sure how to roast a pepper, there are two ways to do it depending on what you’ve got going on. If you have a gas stove, then put a small burner on low, and sit the pepper directly on the metal over the flame, rotating every minute or so until every side of the pepper is black or bubbly. If you don’t have a gas stove, place the pepper directly on your oven rack right below your broiler. Again, rotate every minute or so until each side is burnt and bubbly. Then take the pepper (regardless of roasting method) and place in a heat proof dish with a lid. Steam will build up inside the container and after 10 minutes or so, you should be able to remove the skin from the pepper with your hands – it should just slide right off. Then cut the pepper open and remove the seeds, stem and pith, then dice into salsa-sized chunks. Easy Peasy – no reason to buy roasted red peppers for like $9 a jar at the grocery store.

3. Tomato Sauce

I’ve given this recipe before on the blog, but when I made this sauce this summer, it lasted for all of about 2 weeks, so it was definitely time to make a double batch and freeze it up again.

I also froze 9 tomatoes whole. Seriously – you can take an entire tomato – skin on and everything – and just stick it inside a freezer bag and throw it in the chill chest. Then take them out individually as you need them to make sauces. This only works for applications where the tomato texture doesn’t matter much (like the sauce above). It wouldn’t be great for salsas and things like that. I just had several tomatoes that really could not even wait the one day it took me to do these recipes, so I went ahead and froze them straight away to save them.

I still have about 6-7 tomatoes left, just waiting….to be something. Any suggestions??

How do you like them apples?

Apples are the iconic suggestion of autumn, there is no doubt. On a teacher’s desk on the first day of school, in an orchard, just waiting to be picked while leaves wisp around in the background, or baked into a warm brownie, topped with ice cream and homemade caramel…yeah, they’re pretty good.

As I’ve said 6,903 times, I hate to bake. But recently, my sister and her boyfriend Bryan (with a Y!) got engaged (!!), and so to celebrate, I invited them over for dinner, and of course – dessert. There is one thing in the world that will get me in the kitchen baking, and that is celebration. Cakes, brownies, pies – they all seem celebratory. Certainly nothing I would eat on an average Wednesday, anyways.

A quick trip to the farmers market yesterday morning left me with three pounds of apples, and a few ideas. But first off, let’s talk about this:

Eastern Apples: crispier, juicier, tastier

I mean, I love a local apple as much as the next Virginian, but dagg on, if this bag isn’t just trying to slap Washington in the face . . .

Anyways, I had been reading my November issue of Martha Stewart Living that morning, and had noticed in the back, without much regale, a little recipe for apple brownies. And brownies are like baking for idiots. Perfect. I had everything I needed on hand, now that I had apple poundage, so I got started. Here’s the recipe, taken directly and without edit, from the MSL website.

Apple Brownies

Ingredients

  • 1 stick salted butter, melted and cooled, plus more for dish
  • 1 cup all-purpose flour
  • 1 teaspoon ground cinnamon
  • 1/2 teaspoon baking powder
  • 1/2 teaspoon salt
  • 1/4 teaspoon baking soda
  • 1 cup sugar
  • 1 large egg
  • 1/2 cup chopped walnuts
  • 2 large firm-sweet apples (about 1 pound total), peeled, cored, and cut into 1/2-inch cubes (2 3/4 cups)

Directions

  1. Preheat oven to 350 degrees with rack in center position. Generously butter an 8-by-11-inch baking dish.
  2. Whisk together flour, cinnamon, baking powder, salt, and baking soda in a medium bowl. In a separate bowl, beat together butter, sugar, and egg with a mixer until pale, about 2 minutes. Add walnuts and apples, and stir by hand until combined. Add flour mixture, and stir until combined, about 30 seconds more.
  3. Spread batter in pan, and bake until golden brown and slightly firm, about 40 minutes. Let cool on a wire rack 30 minutes, then cut into 12 bars.

Cook’s Note

Bars can be stored in an airtight container up to 5 days.

I used one Gala apple and one Johnagold, just to mix it up. I also used half stevia and half raw, organic sugar to reduce some calories, as if it mattered at that point. And if you’re not into eating brownies (because you’re an inhuman, soul-less, communist serial killer? I mean, really, who doesn’t like brownies?) then make this recipe purely for the way it makes your house smell for several hours.

You have to wait until they cool to cut them up. You can do it.

I served them with homemade caramel sauce (also super easy to make), and vanilla ice cream, or frozen yogurt – we’re not sure. The labeling on the carton was very confusing. I also whipped up some spiked hot apple ciders with a splash of the caramel sauce to go with the brownies. Home run.

The one thing I will note, if you make this recipe, the batter looks like nothing but apples, and if you’re a baking amateur, like me, then you may freak out that they are going to be no brownie and all apple, but somehow it works itself out.

How DO you like them apples??

What are your favorite fall-inspired apple recipes? Do you go apple picking? What’s your favorite kind of apple (mine’s the sun!)?

Local Beef Three Ways

I’m excited to share with you all three different ways to approach one ingredient: local, pasture-raised beef. This will be the first time I’ve featured beef on the blog, so hold on to your steak knives! Actually, don’t. I’m not going to be discussing steaks. Sorry, you’re on your own there. The beef used in all of these recipes came from Windhaven Farm in Windsor, VA. They raise “Natural, Angus Beef” and here is how they describe it (from their website):

“Natural beef is a healthy and safe choice of quality beef.  The cattle are birthed on our farm.  We do not receive feed stock from unknown sources.  Our farm does not mass produce cattle.  The cattle are antibiotic free and do not receive growth hormones. The cattle are fed 100% grass, hay, and grain.  Therefore the cattle are healthier and leaner resulting in lean, healthy beef. Natural means: No antibiotics, hormones, ionophores, or medicated feeds No feeding of animal by-products. Grass fed, grain finished – grain is used to help “finish” and marble the beef. All natural from birth. Parasiticides are not used within 30 days of slaughter date.”

You can also purchase completely grass-fed beef from them in 1/4, 1/2 or whole packages. Yes, that means 1/4, 1/2 or a WHOLE COW. I know lots of cross-fitters (paleo dieters) that go in on entire cows together, and it actually works out to be a great deal, if you have the room to store even a small portion of an entire cow. I do not. So I usually order their beef in completely reasonable increments, like you know, a pound of ground beef. Their beef is available for pick up at their farm, or through Coastal Farms Co-op and at a few retail stores in Hampton Roads like Heritage Natural Market.  They also do occasional deliveries around the area.

The weather is really cooling down around here and a lot of the farmers markets have stopped for the season and while there is still lots of produce to be found if you’re willing to look for it, it is definitely starting to feel like hearty-food weather. So here are three great options to satisfy your cool-weather cravings:

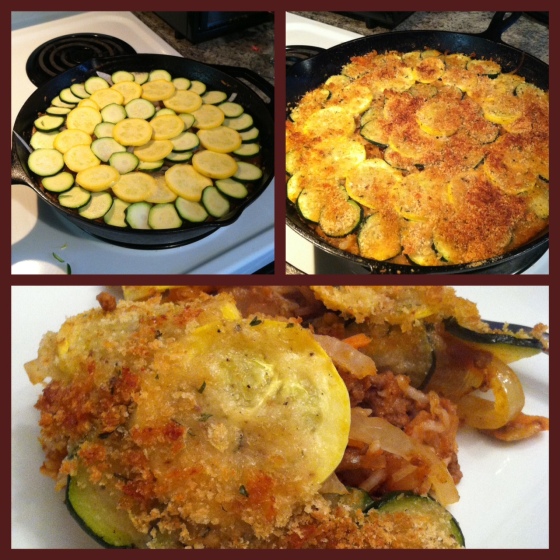
Beef and rice skillet with late-summer veggies

Meat Sauce:

Ingredients:

  • 1 1/2 tsp. olive oil
  • 1 pound ground beef
  • 1/2 medium yellow onion, diced small
  • 2 carrots, shredded
  • 2 cloves garlic, roughly chopped
  • Salt and pepper
  • 1 can (28 oz) whole peeled tomatoes, pureed in a blender

Directions:

  1. In a large heavy pot, heat oil over high. Add meat and cook, breaking it up with a wooden spoon, until it begins to brown, about 5 minutes. Add onion, carrots, and garlic and cook until meat is browned and onion is soft, about 5 minutes. Season with salt and pepper, add tomato puree, and bring to a rapid simmer. Cook, stirring occasionally, until liquid is slightly reduced, about 15 minutes. Season with salt and pepper.

Casserole:

Ingredients:

  • 1/2 cup fresh breadcrumbs
  • 1/4 cup grated Parmesan (1 oz)
  • 2 tbsp Olive Oil, divided
  • meat sauce (recipe above)
  • 1/2 cup long-grain white rice
  • 1/2 medium yellow onion, thinly sliced lengthwise
  • 2 zucchini or yellow squash, very thinly sliced
  • salt and pepper

Directions:

  1. Preheat oven to 475 (Fahrenheit). Combine breadcrumbs, Parmesan and 1 tblsp olive oil.
  2. In a large cast-iron skillet, bring meat sauce to a rapid simmer over high. Stir in rice and remove from heat.
  3. Top with onion, then carefully arrange zucchini/squash in a single, slightly overlapping layer. Season with salt and pepper, drizzle with remaining tbs. olive oil and top with breadcrumb mixture. Return to heat and bring to simmer.
  4. Cover with foil and bake 10 minutes. Remove foil and bake until rice is cooked through and breadcrumbs are golden, about 10 minutes more. Let cool 5 minutes before serving.

*This recipe is adapted from Everyday Food

The meat sauce part of this recipe can be adapted and used for anything – on top of pasta, as sloppy-Joe filling, mixed with cheese and stuffed into pasta shells – whatever you want! This is a really perfect recipe for right now because squash and zucchini are still available locally, but it’s still hearty and warm and filling for fall.

Slow Cooker Beef Ragu

Ingredients:

  • 1 medium yellow onion, diced small
  • 3 cloves of garlic, minced
  • 1 small can of tomato paste
  • 3 tbs chopped fresh oregano
  • 1 beef chuck roast (2-4 lbs is fine)
  • coarse salt and pepper
  • 1 tbs red-wine vinegar
  • 1 tbs balsamic vinegar

Directions:

  1. In a 5-6 quart slow cooker, combine onion, garlic, tomato paste, oregano, salt and pepper to taste. Season roast with salt and pepper and place on top of onion mixture.
  2. Add 2 cups of water, cover and cook on high until meat is tender and can easily be pulled apart with a fork, 4 1/2 hours (or 9 hours on low).
  3. Let cool 10 minutes, then shred meat in slow cooker with 2 forks and stir in vinegar to taste.

This recipe was also adapted from Everyday Food

You could serve the ragu over whatever you liked – rice, pasta, polenta, mashed potatoes. I had originally planned on serving it over spiced and grilled polenta, but then the grocery store by our house decided stocking polenta (and anything else I’m ever specifically looking for) is stupid. So for whatever reason I opted for no-yolk egg noodles instead. Big mistake. I’ve never liked these things and I still don’t. There’s not enough salt in the Dead Sea to make them taste like anything at all, and the texture is slippery and slimy. The ragu was great, but my suggestion is to go to a better grocery store than mine and find some good polenta, or make your own, or make some stiff grits or something besides egg noodles. Seriously, maybe even some wood shavings from the pet store might work better. Just go with your gut.

Taco Bowls

Ingredients:

  • Burrito-sized soft tortillas
  • Olive oil spray
  • 1 lb ground beef
  • Taco seasoning
  • Refried Beans
  • Taco toppings of choice

Directions:

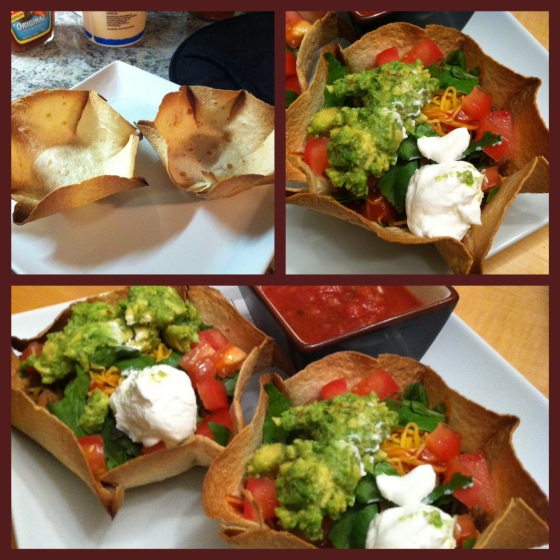
  1. Preheat oven to 425. Place a cooling rack inside a baking sheet and turn 4 ramekins upside down on the rack. Microwave your tortillas for 15 seconds to make them soft. spray each ramekin with olive oil. Mold tortillas over each ramekin, making them into the shape of a wide bowl. Spray outside of tortillas with additional olive oil.
  2. Place baking sheet with tortillas into the pre-heated oven very carefully (the ramekins will want to slide around on the rack). Bake for 10 minutes or until golden and crispy. Remove from oven and let cool on the ramekins. Wait until they have cooled to the touch to remove them from their molds. This will ensure they keep their shape.
  3. Meanwhile, brown your ground beef in a large skillet over medium heat. Drain off fat. Return meat to the burner and add 1/4 cup of water and taco seasoning to taste. Keep on low until tortillas are finished baking.
  4. In a small saucepan, warm your refried beans until smooth and heated through.
  5. Once the tortillas have cooled to touch, fill them with your taco accouterments: I like to make the base with refried beans, topped with the beef, then topped with shredded jack or cheddar cheese, taco sauce, diced tomatoes, lettuce, some mashed and seasoned avocado and a dollop of plain, nonfat Greek  yogurt (I use this in place of sour cream in everything. The taste is exactly the same, but without the fat and it’s easier on my stomach).

You can make more than 4 bowls at a time, if you need them. I just only needed four and conveniently I only have 4 ramekins. Jeremy and I each ate two bowls (they are smaller than the ones you get at Mexican restaurants, so put your judgey face away). And we had chips and salsa on the side. This is a fun update on taco night.

Taco salads are great until you decide to start eating the shell. The idea seems great and starts out totally civilized. Something like this:

Oh yes, I’ll just take this one little bite of the shell.

Then all of a sudden all hell breaks loose, a tornado sweeps through your taco salad and you’re left with this tragedy:

The horror! The horrooooorrr!

Which is fine, really – it all tastes the same anyways. But if aesthetics is your thing, then just eat the salad portion with tortilla chips or something and save your bowl for decoration or to hold your keys or a hat for a small child or large dog – your call.

So there you have it – local beef three ways. Certainly you could do all of these recipes with beef you buy at the grocery store, that came from a CAFO (Concentrated Animal Feeding Operation), where cows are fed nothing but grain, which makes them sick, which requires them to take antibiotics, which remains in the meat, which over-dosed the entire population with antibiotics so that we all have reduced good bacteria in our bodies so that we are all more prone to sickness so that we all end up having to take more antibiotics like the poor cows before us, which in the long run makes us even more sick, needing more medication and so on and so forth. Again – your call.
Besides that, grass-fed beef has higher omega-3’s, is leaner, often has more protein, and is generally ethically raised. There’s no doubt red meat is not the most healthy thing we can all eat, but if you’re going to eat it (and we all are – the average American eats 110 lbs of red meat every year), then make it the healthiest, most environmentally friendly, ethical meat that you can eat. Cost? Please. Let’s not get into that – just eat your taco bowl and enjoy the grass-fed goodness.