Bison stuffed cabbage

Stuffed cabbage was not a part of my childhood growing up – it’s something I sometimes heard other people talk about or maybe even tried once or twice, but it wasn’t until I married my half-Polish husband and had “Galumpkis” at his family’s house in Ohio that I realized what I’d been missing out on. A few years ago I made the traditional Polish Galumpkis recipe and swore I’d never take it on again – it was a three page long recipe that downright exhausted me. But I found myself with an abundance of cabbage recently and decided to give it a go again in my own simplified version and with bison rather than ground beef or pork.

Pastured bison (which is really the only kind of bison you can buy) is leaner and healthier than beef or pork. Pastured animals are free-range, they eat grass and graze on open pasture, which means they move around, develop healthy muscles and fat and because they’re eating what nature intended for them to eat (instead of corn and antibiotics like mass produced beef), their meat is actually healthier and contains WAY more Omega-3’s and less bad (saturated) fats.

I also substituted quinoa for rice. We generally don’t eat rice – I don’t really like it unless there’s raw fish on top of it and there’s just not a lot of nutritional value. Quinoa is a whole grain with a higher fiber content and other nutritional benefits like a particularly high dose of antioxidant phytonutrients…..and other scientific sounding things that I will refrain from diving into.

And cabbage is good for you. Obviously. If it wasn’t, nobody would eat it.

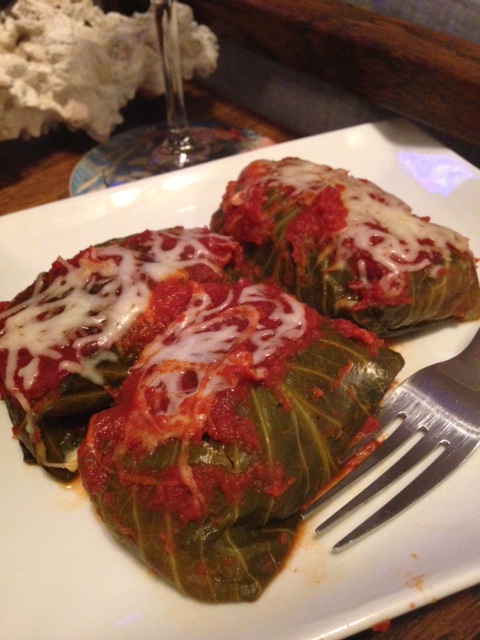
Bison and Quinoa Stuffed Cabbage

rolls

Ingredients:

  • 1 lb ground bison
  • 1/2 a medium onion, chopped
  • 1 can stewed tomatoes, roughly chopped with juice
  • 1/3 cup water
  • 1/3 cup quinoa
  • 1/2 tsp oregano (dried)
  • 8 medium to large cabbage leaves
  • 1 15oz can of tomato sauce
  • 1 tsp maple syrup
  • 1/2 tsp oregano
  • 1/8 tsp cinnamon
  • Parmesan, shredded Swiss or Jack cheese (optional)

Method:

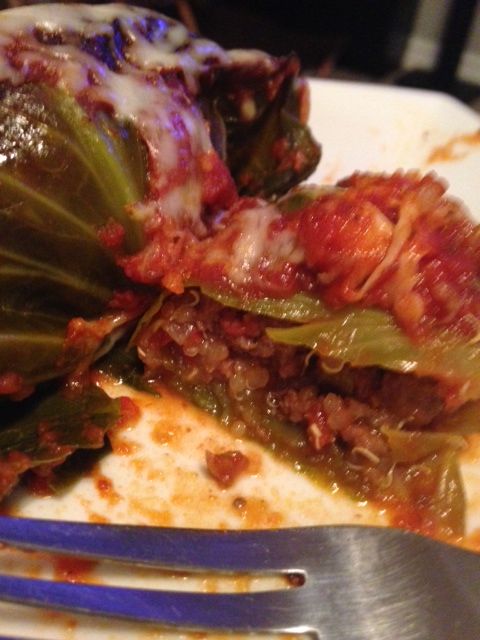
  1. In a large skillet, brown the meat and cook the onions – drain off any fat (there won’t be a lot – remember, this is a very lean meat), then stir in the tomatoes with their juice, the water, quinoa, 1/2 tsp oregano, and 1/4 tsp ground black pepper. Bring this up to a boil, then reduce, cover and let simmer about 20 minutes, until the quinoa is cooked (when quinoa is done, the grain sort of “pops” open).
  2. Meanwhile, trim the large veins from the back of the cabbage leaves so they rib is flush with the leaf. Use a small paring knife to do this. Drop the leaves, three or four at a time into a bot of boiling water for just 2-3 minutes or until they are just limp – then quickly drop into a bowl of ice water as you continue with the others. This is “blanching” and it retains texture and color:

    blanched cabbage

    Blanched Cabbage

  3. After all the leaves have been blanched, pull them out of the water and dry them off with a towel. Scoop about 1/3 cup of the meat mixture into the center of the leaf, fold in the sides of the leaf, then start rolling at one of the unfolded ends until its all rolled up nice and neatly and no meat is exposed. Do this to all of the leaves and set to the side.
  4. To make the sauce, combine the tomato sauce, maple syrup*, oregano, cinnamon and salt and pepper to taste in a small mixing bowl. Pour half of the sauce into a 2-quart baking dish. Arrange stuffed leaves on top, then pour the remaining sauce over the rolls. Cover the baking dish and bake at 350 for 35-40 minutes. If you want cheese on top (I did a tiny bit of shredded Jack – it honestly made no difference), then top with cheese and bake for a few more minutes until melted, then remove from oven and serve!

rolls with fork

*I use a Virginia made maple syrup that is, without exaggeration, the best maple syrup in the world. It is made by two very special people, Pat and Valerie. If you can’t name the people making your syrup, then get on it (and Aunt Jemima doesn’t count). Now you can. You can purchase it through their Back Creek Farms website – they even did the work for me and tell you all about why maple syrup is actually good for you! While you’re there – check out their adorable cabin, which I have stayed in and can vouch for the fact that it’s one of the most adorable places on the planet.

maple syrup


I’m still eating

I’m still alive, I’m still cooking and please believe I’m still eating. We are currently in between houses – we sold our townhouse but have yet to move into our new house. So we are living it up at my parents! It’s actually much better than you’re imagining but while I’m here and paying no rent I’m making my payments in food. Both of my parents and Jeremy work long hours on top of an hour long commute, each way, which means I’m eating alone a lot, which is not my favorite but gives me an excuse to eat nothing but lettuce, heirloom tomatoes, feta and wine. Can’t wait to start posting from my new, amazing kitchen!

20130626-193012.jpg

the other green

I was reading a story in Edible Piedmont this morning about a kale recipe, which could also be made with collards. The author made this substitution because she said she knew how popular collards are in eastern North Carolina, so much so that the region has been referred to as “The Collard Belt.” I’ll take it. But I’ll also take kale. Any day of the week. I think it’s actually a bit more palatable to the general population than collards and is usually cooked in more various ways.

I know it’s sort of cliche to have a food blog and regale the benefits of kale. Everyone gets it, I know. Kale is great, it’s good for you, it’s a super food, put it in your smoothies, bake it into cookies, blah blah blah. But seriously. It’s great. So great that I highlighted one of my favorite kale recipes in my January column in Tidewater WomenThe column this month is about resolving to “Live Locally” and what that means, how it benefits not only you personally, but your community as a whole. I also put it in there to remind people that local food isn’t in hibernation during the winter months. It’s readily available, if you’re willing to look for it, and to try something you might not otherwise try (ie – kale. or chard. or other things that are green and look like dinosaur food.) Not wanting to be a hypocrite, I went out yesterday, tracked down some kale and made this recipe, which I share with you below. It really is a great recipe, especially for the new year, if (like me) you are trying to drop a few “party pounds” from the holidays….this meal is so packed with protein that after only half a bowl you’ll feel completely full. It’s also so lo-cal and healthy that even if you down all four servings in one night, there’s really nothing to feel guilty about. Except for the amount of flatulence you will inevitably plague your family with if you decide to do that. ANYWAYS.

I found this kale at a little roadside stand out in front of somebody’s house. These are my favorite places to shop because it’s fresh, you’re helping support someone’s backyard gardening habit, and the produce is usually dirt cheap. I got a pound of kale and a dozen fresh, free-range eggs for $4. I could also have scored 4 lbs of sweet potatoes for a dollar if I’d liked. Keep an eye out for these stands in your neighborhood or town. And don’t feel shy or weird about driving up to them. The people who set them out are usually so nice and happy to have a customer. The chicken came from a Crock Pot Chicken I’d made earlier in the week. This was one of three meals I got out of one five pound chicken. The only change I make in this recipe is that I use dried lentils that I cook and season myself. I’ve never been able to find canned lentils in my grocery stores, but if your store has them – more power to you. If you go this route, use half the bag (1/2 lb) – not two whole cups of dried beans, as they will expand as they cook. 1/2 lb will give you just over two cups once cooked.

Shredded Chicken with Kale and Lentils

kale cooking

CAST IRON LOVE.

Ingredients:

  • 2 tablespoons extra-virgin olive oil
  • 1 small onion, finely chopped
  • 1 teaspoon fresh thyme leaves
  • Coarse salt and ground pepper
  • 2 bunches kale, tough stems removed, torn into bite-size pieces
  • 2 cups lentils (from a 15.5-ounce can), drained and rinsed
  • 2 cups shredded cooked skinless chicken breasts
  • Lemon wedges, for serving

Method:

  1. In a large skillet, heat 1 tablespoon oil over medium heat. Add onion and thyme; season with salt and pepper. Cook, stirring occasionally, until onion is softened, about 5 minutes.
  2. Add kale and cook, stirring occasionally, until kale is wilted and tender, 4 to 6 minutes. Transfer to a medium bowl.
  3. Add 1 tablespoon oil and lentils to skillet; season with salt and pepper. Cook, stirring, until warmed through, about 20 seconds. Transfer to bowl with kale, toss to combine, and divide among four bowls. Top with chicken and squeeze lemon over top. Serves 4.
Shredded chicken with kale and lentils

Shredded chicken with kale and lentils

I agree with what you’re thinking – this looks like a recipe you see in those magazines all about getting fit with advertisements for muscle milk supplements. But honestly, it doesn’t taste like that. It tastes yummy AND healthy, which is possible, I promise. Jeremy even got seconds. Flatulence be damned!


The root of it all

I just gave myself an award for the most clever blog title ever.

i ❤ beets

It is a shame, I realized, that this blog’s namesake has never really been examined thoroughly. I think in my very first blog post I may have posted a picture of a beet dish I had done, but I’ve never really delved into this amazing little root that inspired me to make this blog. There are a few reasons that beets are the thing I happen to heart. They are available locally, they are available at several times throughout the year and many people don’t like them. Why is that a reason to make beets the central theme of a blog? Because I think I can change people’s minds. I think a lot of foods out there that deserve our attention but suffer general distaste have just been presented wrong all this time. Like the poor Brussels sprout, which I will post about later . . .

Take, for instance, my husband who insisted he hated beets. So I asked in what format he had experienced beets in the past and he said either canned, pickled or boiled to death. Well, no wonder. He also hated Brussels sprouts for similar reasons. But there is a simple answer to both of these food fears and it is this: roasting. Roasting, which uses dry, indirect and diffused heat (such as an oven) increases flavor by caramelization and the Maillard browning reaction. Essentially, roasting enhances the sugars in foods through a process called pyrolysis, which I will not get into, because I barely passed chemistry. But here is what I do know: it makes food delicious. Especially foods like beets, which already have a high natural sugar content, just waiting to be released.

Beets are also so nutritious. Here are some facts from Nutrition and You about beets:

  • Beets are a rich source of phytochemical compound, glycine betaine. Betaine has the  property of lowering homocysteine levels within the blood. Homocysteine, a highly toxic metabolite, promotes platelet clot as well as atherosclerotic-plaque formation, which, otherwise, can be harmful to blood vessels. High levels of homocysteine in the blood result in the development of coronary heart disease (CHD), stroke and peripheral vascular diseases.
  • They are also a rich source of B-complex vitamins such as niacin (B-3), pantothenic acid (B-5), pyridoxine (B-6) and minerals such as iron, manganese, copper, and magnesium.
  • The root has very good levels of potassium. 100 g fresh root has 325 mg of potassium or 7% of daily requirements. Potassium lowers heart rate and regulates metabolism inside the cells by countering detrimental effects of sodium.

And while us die-hard beet fans can eat a beet canned, pickled, boiled, grilled or anything else, for those skeptics out here, this is my GO-TO beet recipe. I’m not sure where it originated from…I think a friend may have suggested this method and I’ve just sort of made it my own over time, I’m not really sure. My hope is that you will love it enough to make it your own, adding, subtracting and substituting to your liking.

Roasted Beet Salad with Vinaigrette

Ingredients: Beets in vinaigrette

  • One bunch beets (as seen above)
  • 3 tbs olive oil
  • 1 tbs vinegar of your choice (balsamiq, red wine, champagne, whatever you like)
  • 1 shallot, finely diced
  • 1 tbs dried herbs (Italian, Herbs de Provence, fresh or powdered garlic or whatever else you’d like)
  • Salt and Pepper to taste
  • 1 cup crumbled feta cheese

Method:

  1. Pre-heat oven to 375 Fahrenheit. Cut the beets off their stems and trim off the tops and the “tails” of each beet. Clean each beet so they are free of dirt. Wrap each beet in individually in tin foil and place in the pre-heated oven, directly on the center rack. Roast for 30-40 minutes, or until each beet is easily pierced with a knife. 
  2. While the beets are roasting, create your vinaigrette. The most important thing to remember here is the a vinaigrette dressing always 3 parts oil to 1 part vinegar. You can use any combination or any measurement (tsp, tbs, cup, etc), as long as you keep that ratio the same. Pour your oil, vinegar, shallots, herbs, salt and pepper into a medium sized bowl and whisk until they are emulsified. Set aside until beets have finished roasting.
  3. When beets are easily pierced with a knife, unwrap from tinfoil and allow to cool. Take an old dishtowel and peel the beet’s skin off with the towel – if it’s roasted to completion, the skin should slide off easily. Do this with each beet.
  4. Cut each beet in half or in quarters, if large, and cut into thin slices. Re-whisk your vinaigrette so it is well blended, then add your beets to the bowl and toss to coat. Plate, then top each serving with a spoonful of feta cheese.
Trim and wash beets

Trim and wash beets

A well emulsified vinaigrette

A well emulsified vinaigrette

Beets

After roasting, remove skin with a dish towel

Served with Greek salad, crusty French bread a Pinot Grigio.

Served with Greek salad, crusty French bread a Pinot Grigio.

If you don’t like beets like this, then I grant you the right to dislike beets. But before you file them away in things that are gross and that you refuse to eat, please try this recipe. Please. Give beets a chance.

Note: these beets were purchased from Westside Produce and Provisions where they were sourced from New Earth Farms in the Pungo area of Virginia Beach, where they use sustainable and organic growing methods. 

The one day of the year that everyone does what I want them to do

Thanksgiving gets the shaft and we all know it. Here is how the second half of the year’s calendar works:

September – Labor Day, back to school
October – Halloween
November, December, Most of January – out of control consumerism in the guise of a religious holiday we all know as CHRISTMAS

It doesn’t leave much room for a little altruistic holiday like Thanksgiving that focuses on being grateful for what we have instead of insistent that we get all the things the TV told us we need. Which is why I try my best to be a Thanksgiving cheerleader. It is, after all, the one day of the year that everyone collectively does this thing that I am constantly trying to convince people to do: get into your kitchen, cook a meal for people you love that is inspired by seasonal produce, then sit down at a table together and eat it slowly. Then, of course, the next day is the one day of the year where everyone does the one thing that actually makes me want to not be a part of the human race. The contrast between Thanksgiving and Black Friday could have been the socioeconomic topics of one of  George Orwell’s books had he lived long enough to see the monstrosity that is the biggest retail holiday of the year. Don’t get me wrong, I’m a free-market capitalist as much as the next gun-toting Libertarian, but there’s a right way and a wrong way to support the economy and we all vote with our dollars whether we vote for massive corporations who export jobs and manufacturing to China or whether we vote for small, locally-owned companies whose owners create jobs and reinvest those dollars back into our community . . . . but I digress.

THANKSGIVING!!

An Edible Arrangement, indeed.

Whether or not the traditional Thanksgiving story is true, and whether or not the things we eat each year really represent a traditional early-American harvest, the bottom line is that the meal is still a celebration of bounty, inspired by the local, the seasonal, the gracious things in life. And I love it. My personal family traditions have changed over the years. As a kid, our entire 30+ person extended family would all come to my parents’ house for Thanksgiving, so it was always a really big deal. We would get up early in the morning to help my mom set the house up for the influx of people, and then as the sun went down, people would start pouring in, and the whole evening was just complete bliss for me. I love my family so much and even though most of us lived next door to each other on the same dirt road, it was somewhat rare that we are all in one place at one time, so for me, it was like this amazing Thanksgiving miracle. And everyone could cook so damn good. There were usually at least 20 dishes spread out around the kitchen, everything from corn pudding to collards to stewed tomatoes (this is the south, after all) and of course the traditional turkey, ham, green bean casserole, mashed potatoes, etc.

As we’ve all grown up, the grandkids have gotten married and it’s harder to get everyone together at the same time, and so traditions have changed, and Jeremy and I usually spend every other Thanksgiving with his family in Ohio, which I also love and which includes a very different list of dishes like Galumpkis, Kielbasa and Pierogies (are you sensing that someone is Polish?) But the day itself and the meal is always the same: full of love and tradition and thankfulness and I am a complete sucker for that.

So in the spirit of Thanksgiving and with those big family dinners playing out in my mind, I share with you a recipe for genuine southern collard-greens (pronounced ‘collargreens’, no d, all one word). Please understand, though, that cooking up a mess of greens requires a tiny bit of know how and personal preference. This recipe is more of a guide. As you cook them more and more, you’ll figure out exactly how you like them.

Simply Southern Collard Greens

Serves 10, approximately

Ingredients:

  • 2 large bunch of collards, fresh and local if possible and cut directly at the base of the stem (pictures at right)

    If possible, get collards from the market or farm cut right at the base of the plant.

  • 1lb of bacon, fat back, ham, jowls, ham hock or any other kind of seasoning meat
  • 1/2 of a medium onion, diced
  • 2 garlic cloves, minced
  • 1/2 c. apple cider vinegar, plus more for serving
  • 1/2 tsp. baking soda
  • salt and pepper to taste
  • jalapenos (fresh or pickled) – *optional and to taste – no more than one whole jalapeno *
  • water, on hand

Method:

  1. Thoroughly rinse each individual leaf off the collard plant and then tear the thick rib/stem off each leaf.
  2. Roll leaves together like a cigar, then cut crosswise into strips. Do this with all the collard leaves.
  3. If you’re using any uncooked meat (such as bacon) but it in the bottom of a large, heavy stock pot and cook it over medium heat. Once it starts to release its fat, throw in the onions and garlic and saute it all together until cooked through
  4. Pour in the apple cider and use this to deglaze the bottom of your pot – scraping up the bacon and onion bits with a wooden spoon, let this reduce together for a few minutes
  5. Begin adding your strips of collards, one large handful at a time, to the vinegar/pork fat glaze (that sounds awesome, right?) and stir them in, letting them wilt before adding another handful
  6. Stir in the baking soda and pepper to taste (and jalapenos if you’ve chosen to do that) and begin adding water as needed (This is where the know-how and experience comes in. You don’t want them too soggy, but you don’t want them to burn. They’re just sort of stewing in the water bath, so add it as you need, but not too much). Really taste the collards before adding salt – the meat you’ve used generally makes them salty enough.
  7. At this point, you can continue to let them simmer and cook on low on the stove top, or you can transfer them to a crock pot and leave them on low for a few hours, or you could even just continue to cook the water down in small amounts in your pot , doing a braising method that would results in less “soggy” greens. It’s totally up to you, I’ve done it every which way, depending on what I want and how much time I have. If you’re braising them, just keep stirring in water every 10 minutes or so and stirring the greens until they are done to your liking (30 minutes or so?). Otherwise, simmer or slow cook for 3-4 hours on low, for very Southern style greens.
  8. Serve warm with more cider vinegar or pepper vinegar, salt and pepper.

Collardy Goodness

What are your favorite Thanksgiving dishes? What can you not live without eating on the big day?

Saucy

Remember how I mentioned that I’m not exactly into measuring and precision? Principles that are important in things like baking, rocket science and canning. Can something without following all the right steps and BAM, everyone has botulism. That is why when I want to preserve something, I usually freeze it. I wish I could can, I really do. But I know how that science experiment would end up and it is with a trip to the hospital.

So every year, near the end of the summer (*weep*) I freeze a big batch of tomato sauce that I make from local tomatoes. This year a large basket of tomatoes was donated to me via my great uncle and aunt, Joe and Carol, who are pretty amazing gardeners. Free food is the best food, just ask the freegans! (I’m kidding. That movement is gross. Talk about botulism. . .)

Making tomato sauce is kind of an ordeal, but worth it in the long run. I usually have to block out several hours of my day to get this done. This tomato sauce is a little looser than pasta sauce and can be used in place of canned tomato sauce. Basically, it can become the building blocks of spaghetti, marinara, pizza sauce, tomato soups – whatever you want.

So let’s get started. First, you wash and dry your tomatoes. I was working with 3 1/2 lbs here. I usually do a batch twice this large, but this is what I had to work with in this case. On the bottom of each tomato, cut a small ‘x’ with a paring knife.

cut a small ‘x’ into the bottom of each tomato

Then get a large pot of boiling water going. You are going to blanch the tomatoes, which means they will bathe in boiling water for just 2 minutes or so, until you start to see the skin around the X peel back. When you see that start to happen, get the tomatoes out of the water with a slotted spoon and deposit into a colander where they can drain and cool. There is a serious system to this and you need to get your “mise en place!” (A fancy French term meaning ‘get your $h*t together before you start working’)

Mise en place!!


blanch and peel the tomatoes

Once you’ve done this in small batches to all of your tomatoes (don’t put more than 4 or 5 small tomatoes into your water at once), and once they’ve cooled to the touch, peel the tomatoes starting at the X in the bottom, pulling the skin away up to the top. Do this to all of your tomatoes. Once they are all peeled, start chopping and you’ll want to remove the hard area of the tomato where the stem was. Everything else gets chopped and thrown into your pot.

dump chopped tomatoes into your pot

Then you add your other ingredients (these measurements are based on using 3 1/2lbs of tomatoes):

  • 1/4 cup of olive oil
  • 3/4 tbs black pepper
  • 1/2 tsp chili powder
  • 1/2 tsp salt
  • 1/2 tbs minced onion
  • 1/2 tbs dried oregano
  • 1/2 tbs garlic powder
  • 1/2 tsp dried parsley
  • 1/2 tsp sugar
  • 2 tbs tomato paste
  • a few dashes of crushed red pepper flakes

You can use fresh herbs rather than dried herbs, but you don’t need too much. Remember, this is tomato sauce – a base, not your finished product that goes on your spaghetti. Also, if you don’t care for spice AT ALL, omit the chili powder and red pepper, but those two ingredients don’t really make this that spicy, so if you’re OK with a little spice, no worries.

Then the fun part. You probably don’t want your tomato sauce this chunky. If you do, awesome, move on to the next step, but if you’re like most people, you want a smooth sauce and you can accomplish this one of two ways: with a stick blender right in the pot, or with a regular blender in batches. I use a stick blender, because I feel bad ass when I open this thing up.

The 007 theme music starts playing

Seriously, it looks like a weapon custom designed for James Bond. But if you don’t have one of these, then just use your standard blender, blending in batches and returning the mixture to your pot. Do this before the sauce gets hot so nobody gets hurt.

After it’s been blended, simmer your sauce for at least an hour, or longer. It should look something like this:

droooool

If you’re using it right away, then do whatever you need to do, but if you’re freezing it, let it cool, off the heat for 15 minutes or so. Then dole out 1 cup portions into tupperware containers that are freezer-safe. Make sure you leave enough head room in each container – this stuff will expand, according to the laws of science. I buy tupperwares that have measurements right on the side of the container so I don’t actually have to measure, because we all know how I feel about that. I just ladle it in until it hits the mark.

Ready to chill out

Stash them in your freezer and pull them out whenever needed. To thaw, either put in the fridge overnight or let them float around in some cool water in the sink for an hour or so. Or if you’re super impatient like me, just dump the frozen sauce right into your pan and heat it up until it’s thawed. Look guys, I just need my tomato sauce RIGHT NOW.

You may be thinking that this is a lot of work, and so be it. It is. But the taste is amazing, you’re preserving a little piece of summer and perhaps you are not aware of the health implications of most canned food? Did you know that Bisphenol A (BPA) is widely used as a lining for cans holding canned food? BPA is thought to be harmful because it mimics human hormones and has been classified as an endocrine disruptor. BPA has been associated with a variety of health problems in laboratory animals, including cancers, early puberty, and developmental problems. Canned products are also laden with sodium (hello high blood pressure, blood clots, heart disease, etc etc etc) and other preservation chemicals. So avoiding canned products could be a life saver. There are a few small organic companies making canned beans and some veggies that are in BPA-free cans, but they are difficult to find and can be expensive. In the meantime, spend a little extra time to know and make what you’re eating. And if you’re NOT like me, and you are capable of following intense directions, start thinking about canning – which of course, is actually “jarring” and so avoids the BPA, sodium and chemicals in store-bought products. The Ball Jar website has great recipes and tutorials on how to do this. If I can ever get my brain to function on a linear plane, I may just try it myself.

Salmon: not just a horrible beach-house color

I try my hardest to eat salmon every week. Not because it’s my favorite fish, or because I think the Alaskan fishing industry needs my patronage (even though they do – do you hear me, Alaska? You NEED me!), but because it is super super super good for your brain. Alzheimer’s runs in my family, so we are all always looking for ways to prevent it. Recently, the link between omega-3 fatty acids and Alzheimer’s prevention has become clear. According to the Rush University Medical Center, people who eat fish one or more times a week are approximately 60 percent less likely to experience Alzheimer’s disease than those who rarely eat fish. The important thing about fish here being the omega-3’s, which salmon has a particularly high amount of. And omega-3’s in fish are of a particular kind called DHA and EPA, which appear to have the strongest health benefits. So what is it exactly that omega-3’s in fish oil are doing that are so beneficial besides making you smell like fish all the time? What, you don’t think of that as a benefit? Trust me, if you ever want to get out of a conversation, or need to rid yourself of a “close talker,” or are trying to attract stray cats, or just generally need the public to leave you alone, fish oil is a HUGE benefit. But in addition to that, these fatty acids reduce inflammation in the body. Inflammation is one of those things that can lead to myriad diseases including high blood pressure, heart disease, blood clots, stroke, dementia (Alzheimer’s), arthritis and much more. Another interesting potential benefit of omega-3’s? They may help fight depression. Although the studies are mixed, it is clear that in countries with higher levels of omega-3 in the typical diet have lower levels of depression. Eat fish; be happy.

Our bodies do not naturally produce omega-3’s – we must consume them through our diets. And while you can do this through a supplement, why wouldn’t you just do it through delicious food? Enter: salmon. Enter: my long speech about the right kind of salmon to buy at the fish counter. If you would like to skip this wild vs. farmed fish debate, skip to the last sentence of this paragraph. At just about any fish counter of any grocery store you will see 2-3 different varieties of Salmon. Some will say “wild caught” some will say “farmed” some will even say “organic”, but here are a few differences: farmed fish are raised in feedlots and at feedlots fish are doused with antibiotics and exposed to more concentrated pesticides than their wild kin. Additionally, farmed salmon are given a salmon-colored dye in their feed, without which, their flesh would be an unappetizing grey color. And regarding the all-important omega3’s? FDA statistics on the nutritional content (protein and fat-ratios) of farm versus wild salmon show that the fat content of farmed salmon is excessively high–30-35% by weight, wild salmon have a 20% higher protein content and a 20% lower fat content than farm-raised salmon, farm-raised fish contain much higher amounts of pro-inflammatory omega 6 fats than wild fish. IE – the opposite of what omega-3’s do for you. In studies by the FDA wild fish were not only much lower in overall fat content, but also were found to have 33% more omega-3 fatty acids than their farm-raised counterparts. Omega-3s accounted for 29% of the fats in wild coho versus 19% of the fats in cultivated coho. Bottom line: buy wild-caught fish.

I’m so sorry. Here are some pictures of food.


This was one of those recipes that came to me during this thing that happens in my mind where whatever fresh produce I picked up at the farmers market that week inserts itself into some recipe I’ve been drooling over on Pinterest. In this case, it was a tomato pasta recipe from Martha Stewart. But because I had zucchini and squash on hand and because I needed my weekly salmon, I mixed it up a little. I pan sauteed two small tomatoes, a small squash and small zucchini in olive oil with a teaspoon of minced garlic and some Italian seasoning. In the meantime, I rubbed the salmon down with lemon infused olive oil, salt, pepper and a little garlic. I heated some oil in a pan and laid several slices of lemon down into the oil, then placed the salmon on top, covered with a lid and let cook over medium-high heat while the pasta was boiling (about 8 minutes, or until it can be flaked with a fork). I have started using this Ronzini brand “Garden Delights” vegetable spaghetti – it is much more palatable to me than whole wheat pasta and still better for you than regular pasta, but you can use any kind you’d like. (Disclaimer: I did not get paid to promote Ronzini brand “Garden Delights” vegetable spaghetti, but I totally would if they offered. That goes for you too, Pacific Salmon Fishers of America, Sunkist lemon farms, and the people who make the ridiculously expensive lemon infused olive oil I use. )

I saved about a half a cup of the pasta water and made a sauce from the vegetables with some additional olive oil, Parmesan cheese, some freshly chopped basil from my garden, and a bit of the starchy pasta water, then mixed the pasta into it and topped with the salmon, a sprinkle of cheese and basil and a squirt of fresh lemon juice.

feed your brain!

And before you go off thinking I’m Martha Stewart, or Barefoot Contessa or something (although I think we can all agree that Jeffrey would just ADORE this meal), let me quickly correct you. I’m more like Julia Child’s slow second cousin. If Julia was forever dropping chickens or spilling this or that in some hilariously charming way, all the while making the most delicious French food you’ve ever seen, I am the slow second cousin who is nearly cutting off a finger or giving herself third degree burns while she tries to make toast. Case in point:

I need adult supervision.

I don’t know how well it comes through in that picture – but my middle finger has a pretty significant burn/blister right under the knuckle. This is because, as it turns out, metal skillets that have just come out of 400 degree ovens are HOT! This is my primary mistake in the kitchen – forgetting that things are hot and grabbing them with my bare hands. Also, over-salting things. So, Food Network, if you are looking for a new cooking show that appeals to those S&M loving, 50 Shades of Grey reading freaks, I am your girl. Get in line behind Ronzini and those stinky fishermen.