the other green

I was reading a story in Edible Piedmont this morning about a kale recipe, which could also be made with collards. The author made this substitution because she said she knew how popular collards are in eastern North Carolina, so much so that the region has been referred to as “The Collard Belt.” I’ll take it. But I’ll also take kale. Any day of the week. I think it’s actually a bit more palatable to the general population than collards and is usually cooked in more various ways.

I know it’s sort of cliche to have a food blog and regale the benefits of kale. Everyone gets it, I know. Kale is great, it’s good for you, it’s a super food, put it in your smoothies, bake it into cookies, blah blah blah. But seriously. It’s great. So great that I highlighted one of my favorite kale recipes in my January column in Tidewater WomenThe column this month is about resolving to “Live Locally” and what that means, how it benefits not only you personally, but your community as a whole. I also put it in there to remind people that local food isn’t in hibernation during the winter months. It’s readily available, if you’re willing to look for it, and to try something you might not otherwise try (ie – kale. or chard. or other things that are green and look like dinosaur food.) Not wanting to be a hypocrite, I went out yesterday, tracked down some kale and made this recipe, which I share with you below. It really is a great recipe, especially for the new year, if (like me) you are trying to drop a few “party pounds” from the holidays….this meal is so packed with protein that after only half a bowl you’ll feel completely full. It’s also so lo-cal and healthy that even if you down all four servings in one night, there’s really nothing to feel guilty about. Except for the amount of flatulence you will inevitably plague your family with if you decide to do that. ANYWAYS.

I found this kale at a little roadside stand out in front of somebody’s house. These are my favorite places to shop because it’s fresh, you’re helping support someone’s backyard gardening habit, and the produce is usually dirt cheap. I got a pound of kale and a dozen fresh, free-range eggs for $4. I could also have scored 4 lbs of sweet potatoes for a dollar if I’d liked. Keep an eye out for these stands in your neighborhood or town. And don’t feel shy or weird about driving up to them. The people who set them out are usually so nice and happy to have a customer. The chicken came from a Crock Pot Chicken I’d made earlier in the week. This was one of three meals I got out of one five pound chicken. The only change I make in this recipe is that I use dried lentils that I cook and season myself. I’ve never been able to find canned lentils in my grocery stores, but if your store has them – more power to you. If you go this route, use half the bag (1/2 lb) – not two whole cups of dried beans, as they will expand as they cook. 1/2 lb will give you just over two cups once cooked.

Shredded Chicken with Kale and Lentils

kale cooking

CAST IRON LOVE.

Ingredients:

  • 2 tablespoons extra-virgin olive oil
  • 1 small onion, finely chopped
  • 1 teaspoon fresh thyme leaves
  • Coarse salt and ground pepper
  • 2 bunches kale, tough stems removed, torn into bite-size pieces
  • 2 cups lentils (from a 15.5-ounce can), drained and rinsed
  • 2 cups shredded cooked skinless chicken breasts
  • Lemon wedges, for serving

Method:

  1. In a large skillet, heat 1 tablespoon oil over medium heat. Add onion and thyme; season with salt and pepper. Cook, stirring occasionally, until onion is softened, about 5 minutes.
  2. Add kale and cook, stirring occasionally, until kale is wilted and tender, 4 to 6 minutes. Transfer to a medium bowl.
  3. Add 1 tablespoon oil and lentils to skillet; season with salt and pepper. Cook, stirring, until warmed through, about 20 seconds. Transfer to bowl with kale, toss to combine, and divide among four bowls. Top with chicken and squeeze lemon over top. Serves 4.
Shredded chicken with kale and lentils

Shredded chicken with kale and lentils

I agree with what you’re thinking – this looks like a recipe you see in those magazines all about getting fit with advertisements for muscle milk supplements. But honestly, it doesn’t taste like that. It tastes yummy AND healthy, which is possible, I promise. Jeremy even got seconds. Flatulence be damned!


Pinterest Perfection

I’m sure many, if not most, of you have heard of Pinterest. I first heard about this little site where you could “curate” your own visual boards over two years ago when the site was still in Beta testing. I did some quick researchpinterest-logo on the trusty interwebs and lo and behold, I was able to track down the Pinterest CEO to his person twitter page, where I began a barrage of direct messages begging for a beta tester invite. I got it. His name is Ben, by the way, and he’s super nice. I was one of the first few thousand people to use the site, and use it I did. I currently have over 30 boards, 981 pins and 125 followers. When Pinterest first started it was much more of an art and design crowd. The cool kids who were developing the site had no doubt invited their other cool kid friends who I’m sure were all interior designers, graphic artists, and web developers in San Francisco (that’s where the company is based, not the valley, which is why the site and its people are so cool) to give it a whirl. As Beta opened up to user invites, and the site became a real, live thing, it became much, much, much more crafty, crock potty and crap to do with your kidsy. But you know what? I still love it. Despite the fact that I have to sift through hundreds of pins of maternity photo sessions to get to the thing I’m looking for, despite the fact that when I search the food category I have to ignore a million recipes that suggest throwing four different kinds of canned Campbell’s crap into your slow cooker and feeding it to your family of 10 for less than .30  cents a serving, I still think it is an awesome, amazing thing. And every once in awhile, you run across some real gems.

On Wednesday of this past week, I made THREE recipes for one meal that I found on Pinterest: A Roasted Garlic salad dressing, a rosemary and Parmesan overnight bread, and an Italian style beef and butternut squash stew. They were all the kind of things that keep me obsessed with the site. Diamonds in the rough.

The Roasted Garlic Vinaigrette is a MUST try to anyone who loves garlic on the level that I do. Two heads of garlic go into this dressing. And while you do have to roast the garlic for a good half hour, the dressing itself is really easy to make, and you probably have most of the ingredients on hand. I’m currently obsessed with making my own salad dressings and have tried several I’ve found on Pinterest, but this one is my favorite.

From Fat Girl Trapped in a Skinny Body:

Roasted Garlic Vinaigrette

pinterest meal salad dressing

Ingredients:

  • 2 heads of garlic, roasted and peeled
  • 1/2 cup extra virgin olive oil
  • 1/4 cup apple cider vinegar
  • 2 tbsp lemon juice
  • 1/2 tsp kosher salt
  • 1 tsp black pepper
  • 1 tbsp honey

Method:

  1. Cut the pointy top off of the garlic. Brush them with olive oil and roast them in a pan in the oven at 400 degrees for about 25 minutes, until it is starting to turn golden brown and soft. Remove from the oven, allow to cool. Once the garlic is cool, peel the skin off. Discard the skins, save the garlic. *Skin peels off really easily after they are roasted.
  2. Add all the ingredients to the food processor and process until smooth. Refrigerate until ready to serve.*If some of the skin get processed with the rest of the dressing, no big deal, it won’t change the flavor.

The salad dressing can be vegan if you sub the honey for agave. And it is dairy free, with no substitutions!

This dressing is tangy, but has that deep, rich caramelized taste from the roasted garlic. It’s a vinaigrette, but it’s creamy because of the garlic being processed right into it. Keep this for a week or so in your fridge in a covered container.

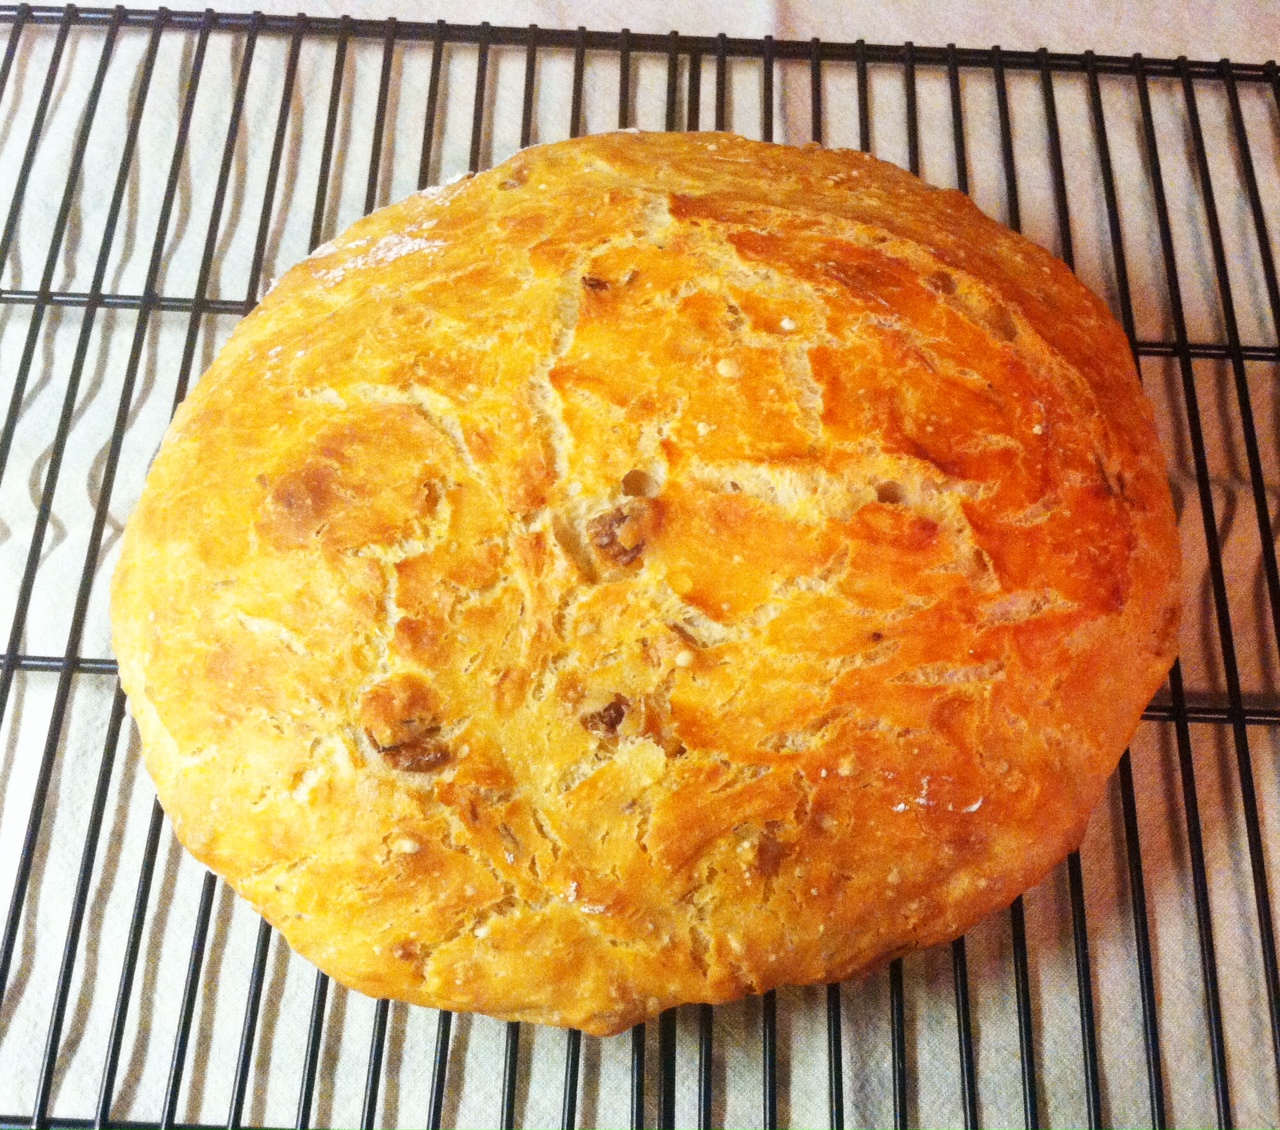
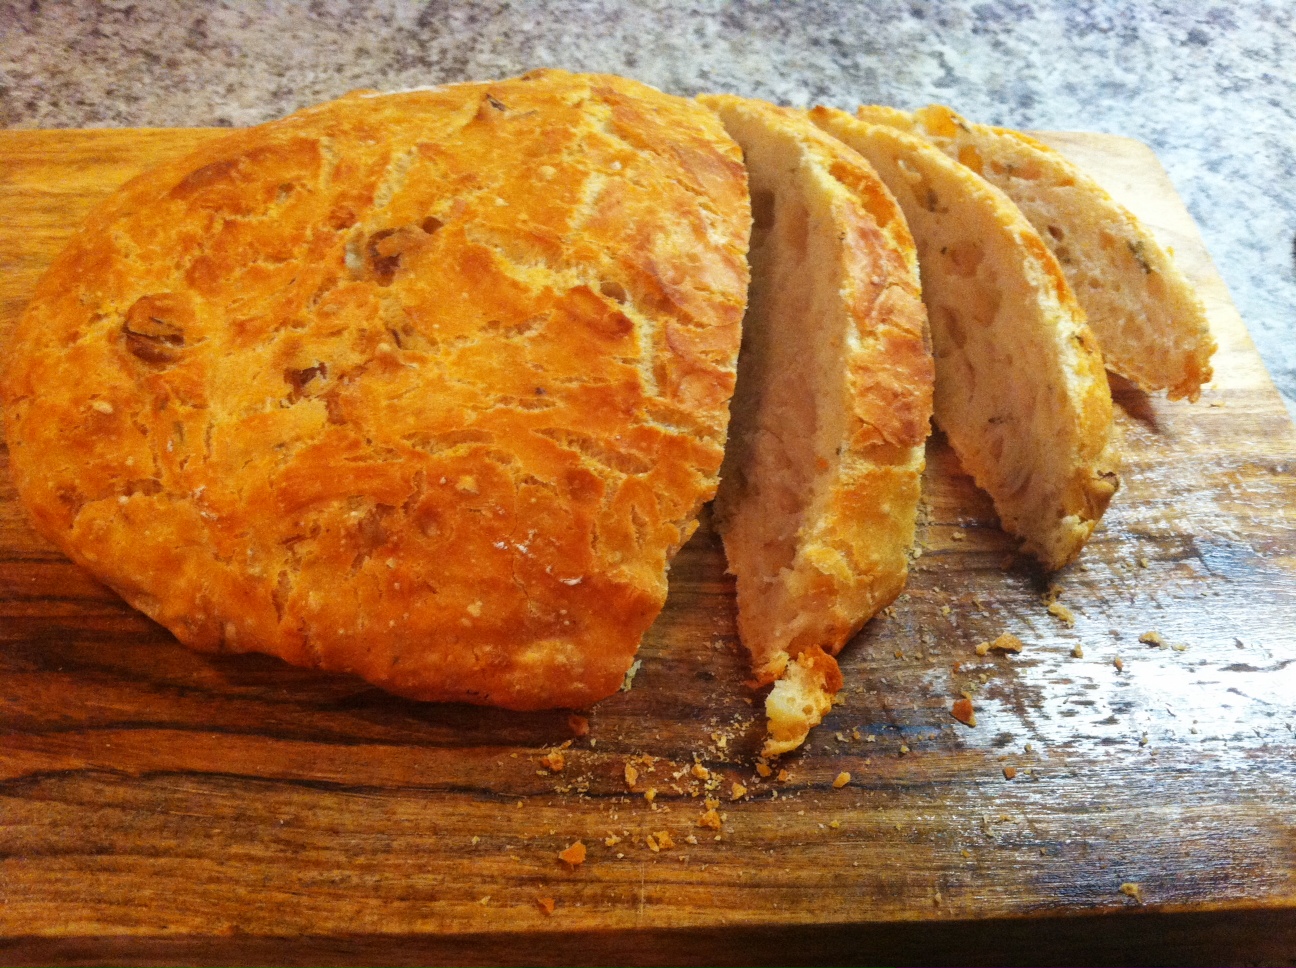
The bread recipe I comes from Simply So Good. I used her basic bread recipe, and put in my own additions. This bread is baked in your cast-iron enameled Dutch Oven (you have one of those, right??). I have a big, blue Le Creuset that is the Pride and Joy of my kitchen. Jeremy gave it to me for Christmas a few years ago. They are usually in the $300-$400 range, but sometimes you can score them at T.J. Maxx for half the price, which I believe is what he did (smartly). Other cast-iron enameled pots are fine for this recipe also, but when you have a Le Creuset, you tend to brag about it. Here is a view down on mine to give you an idea of the size of the vessel you might want to use:

I ❤ Le Creuset

OK, enough about my awesome piece of iron. Here’s the recipe.

Crusty Bread

Crusty Overnight Bread

Crusty Overnight Bread

Ingredients:

  • 3 cups unbleached all purpose flour
  • 1 3/4 teaspoons salt
  • 1/2 teaspoon yeast
  • 1 1/2 cups water

 Method:

  1. In a large mixing bowl, whisk together flour, salt and yeast.  Add water and mix until a shaggy mixture forms.  Cover bowl with plastic wrap and set aside for 12 – 18 hours.  Overnight works great.
  2. Heat oven to 450 degrees.  When the oven has reached 450 degrees place a cast iron pot with a lid in the oven and heat the pot for 30 minutes.  Meanwhile, pour dough onto a heavily floured surface and shape into a ball.  Cover with plastic wrap and let set while the pot is heating.
  3. Remove hot pot from the oven and drop in the dough.  Cover and return to oven for 30 minutes.  After 30 minutes remove the lid and bake an additional 15 minutes.  Remove bread from oven and place on a cooling rack to cool.

To this recipe, I added 1/4 cup of fresh grated Parmesan Cheese, 1/8 cup of fresh rosemary (from my garden), and several cloves of smashed and roughly chopped garlic. I added that in to the dough at the very beginning and then proceeded as normal through the recipe.

pinterest meal bread cut

This thing turned out beautiful. There is nothing quite like making your own bread from scratch and this is really a pretty easy way to do it.

Finally, the main course – Beef and Butternut Squash Stew from Closet Cooking. I’ll be honest and say there are a few things wrong with the way this original recipe is written, so the recipe below has a few very minor changes from myself, just to make things more clear.

Italian Style Beef and Butternut Squash Stew

pinterest meal stew 2


Ingredients:

  • 2 ounces pancetta (diced)
  • 1 pound beef (cut into 1 inch cubes) (My Note: he doesn’t specify what kind of beef to use here. My suggestion is to get a sirloin roast, if you can find one – that’s what I used. Otherwise a small round roast is fine or chuck if nothing else is available)
  • 1 onion (chopped)
  • 3 cloves garlic (chopped)
  • 1/2 teaspoon red pepper flakes (optional, to taste)
  • 1 tablespoon rosemary (chopped)
  • 1 tablespoon thyme (chopped)
  • 1 cup Italian red wine (My Note: I used a Zinfandel. It doesn’t have to be Italian, don’t stress out, just use a decent red wine that’s not sweet)
  • 3 cups beef broth
  • 1 splash balsamic vinegar
  • 1/4 cup sundried tomatoes (chopped)
  • 1 (28 ounce) can diced tomatoes (My Note: He doesn’t specify drained vs. undrained. Because he does not, I put them in without draining them. It gave my stew a more “soupy” consistency, which I was OK with. If you want this to be more like a traditional stew, then drain the tomatoes before adding).
  • * parmigiano reggiano rind (optional)
  • 1 teaspoon oregano
  • salt and pepper to taste
  • 1 pound butternut squash (peeled, seeded and cut into 1 inch cubes)
  • parsley (chopped) (My Note: optional for garnish. I used a bit of grated Parmesan instead).

Method:

  1. Cook the pancetta in a large pan on medium heat. (My Note: or Dutch Oven. Again, with my Creuset)
  2. Add the beef and brown on all sides in the grease from the pancetta and set aside. (My Note: I coated the beef cubes in flour first. I’ve always done this when searing beef that is basically going to be braised later. It also helps to thicken the sauce a bit, but it’s up to you).
  3. Add the onion and saute in the pancetta grease until tender, about 5-7 minutes.
  4. Add the garlic, red pepper flakes, rosemary and thyme and saute until fragrant, about a minute.
  5. Add the wine and deglaze the pan. (My Note: deglazing means you add a liquid to absorb the browned bits from the pancetta, beef and aromatics. When you add the wine to the hot pan, it will steam up. Take a wooden spoon and use that moment to scrape up all the bits in the bottom of the pan, stirring them into the liquid to create a flavorful base).
  6. Add the beef, broth, balsamic vinegar, sun-dried tomatoes, diced tomatoes, parmigiano reggiano rind, oregano, salt and pepper and bring to a boil.
  7. Reduce the heat, cover and simmer until the beef is nice and tender, about 1-2 hours.
  8. Add the squash and simmer until it is tender, about 15-20 minutes. (My Note: more like half an hour, at best).

This stew was filling, hearty and really quite healthy. Serve it with a glass of the same wine you used in the soup – superb! Always cook with wine that is good enough to drink. When you cook with wine, you are cooking off the alcohol, but intensifying the flavor. If you intensify a crappy wine, you will just get really intense crap. No Bueno.

Pinterest Perfection

Pinterest Perfection

The dressing, served over a bed of Organic romaine lettuce, the garlic, rosemary and Parmesan bread and this stew altogether? Perfection. Pinterest Perfection.


The root of it all

I just gave myself an award for the most clever blog title ever.

i ❤ beets

It is a shame, I realized, that this blog’s namesake has never really been examined thoroughly. I think in my very first blog post I may have posted a picture of a beet dish I had done, but I’ve never really delved into this amazing little root that inspired me to make this blog. There are a few reasons that beets are the thing I happen to heart. They are available locally, they are available at several times throughout the year and many people don’t like them. Why is that a reason to make beets the central theme of a blog? Because I think I can change people’s minds. I think a lot of foods out there that deserve our attention but suffer general distaste have just been presented wrong all this time. Like the poor Brussels sprout, which I will post about later . . .

Take, for instance, my husband who insisted he hated beets. So I asked in what format he had experienced beets in the past and he said either canned, pickled or boiled to death. Well, no wonder. He also hated Brussels sprouts for similar reasons. But there is a simple answer to both of these food fears and it is this: roasting. Roasting, which uses dry, indirect and diffused heat (such as an oven) increases flavor by caramelization and the Maillard browning reaction. Essentially, roasting enhances the sugars in foods through a process called pyrolysis, which I will not get into, because I barely passed chemistry. But here is what I do know: it makes food delicious. Especially foods like beets, which already have a high natural sugar content, just waiting to be released.

Beets are also so nutritious. Here are some facts from Nutrition and You about beets:

  • Beets are a rich source of phytochemical compound, glycine betaine. Betaine has the  property of lowering homocysteine levels within the blood. Homocysteine, a highly toxic metabolite, promotes platelet clot as well as atherosclerotic-plaque formation, which, otherwise, can be harmful to blood vessels. High levels of homocysteine in the blood result in the development of coronary heart disease (CHD), stroke and peripheral vascular diseases.
  • They are also a rich source of B-complex vitamins such as niacin (B-3), pantothenic acid (B-5), pyridoxine (B-6) and minerals such as iron, manganese, copper, and magnesium.
  • The root has very good levels of potassium. 100 g fresh root has 325 mg of potassium or 7% of daily requirements. Potassium lowers heart rate and regulates metabolism inside the cells by countering detrimental effects of sodium.

And while us die-hard beet fans can eat a beet canned, pickled, boiled, grilled or anything else, for those skeptics out here, this is my GO-TO beet recipe. I’m not sure where it originated from…I think a friend may have suggested this method and I’ve just sort of made it my own over time, I’m not really sure. My hope is that you will love it enough to make it your own, adding, subtracting and substituting to your liking.

Roasted Beet Salad with Vinaigrette

Ingredients: Beets in vinaigrette

  • One bunch beets (as seen above)
  • 3 tbs olive oil
  • 1 tbs vinegar of your choice (balsamiq, red wine, champagne, whatever you like)
  • 1 shallot, finely diced
  • 1 tbs dried herbs (Italian, Herbs de Provence, fresh or powdered garlic or whatever else you’d like)
  • Salt and Pepper to taste
  • 1 cup crumbled feta cheese

Method:

  1. Pre-heat oven to 375 Fahrenheit. Cut the beets off their stems and trim off the tops and the “tails” of each beet. Clean each beet so they are free of dirt. Wrap each beet in individually in tin foil and place in the pre-heated oven, directly on the center rack. Roast for 30-40 minutes, or until each beet is easily pierced with a knife. 
  2. While the beets are roasting, create your vinaigrette. The most important thing to remember here is the a vinaigrette dressing always 3 parts oil to 1 part vinegar. You can use any combination or any measurement (tsp, tbs, cup, etc), as long as you keep that ratio the same. Pour your oil, vinegar, shallots, herbs, salt and pepper into a medium sized bowl and whisk until they are emulsified. Set aside until beets have finished roasting.
  3. When beets are easily pierced with a knife, unwrap from tinfoil and allow to cool. Take an old dishtowel and peel the beet’s skin off with the towel – if it’s roasted to completion, the skin should slide off easily. Do this with each beet.
  4. Cut each beet in half or in quarters, if large, and cut into thin slices. Re-whisk your vinaigrette so it is well blended, then add your beets to the bowl and toss to coat. Plate, then top each serving with a spoonful of feta cheese.
Trim and wash beets

Trim and wash beets

A well emulsified vinaigrette

A well emulsified vinaigrette

Beets

After roasting, remove skin with a dish towel

Served with Greek salad, crusty French bread a Pinot Grigio.

Served with Greek salad, crusty French bread a Pinot Grigio.

If you don’t like beets like this, then I grant you the right to dislike beets. But before you file them away in things that are gross and that you refuse to eat, please try this recipe. Please. Give beets a chance.

Note: these beets were purchased from Westside Produce and Provisions where they were sourced from New Earth Farms in the Pungo area of Virginia Beach, where they use sustainable and organic growing methods. 

midnight snack

What does a midnight snack look like for someone with OCD and a food fetish? Like this:

A midnight snack for maniacs.

I literally went to the store at 11:45 for this stuff and was eating it during the last 30 minutes of Saturday Night Live. Let’s break it down: fresh, local Knotts Island peaches, wrapped in prosciutto and broiled for about 4 minutes, then topped with Blue d’Auvergne and drizzled with local honey and fresh cracked red and black peppercorns. I don’t really have to get into details about how good this was, I don’t think. You get the picture.

What is your favorite midnight snack? What’s the craziest thing you ever went out at midnight to eat? 

To meat or not to meat

I realize that all my posts so far have probably given the impression that I am a vegetarian, which I’m not.  I was for several years in college and then I got married and this is how that story goes: We got back from our honeymoon and the next morning Jeremy fried bacon in our newly-shared apartment. End of story. If you can resist the smell of bacon after 7 days of eating Jamaican food, you should probably see a doctor, cause something is wrong with your olfactory system.

Although I do eat meat now, I still try to reduce my meat consumption as much as possible for several reasons including health, cost and the impact meat has on the environment. This is nothing new – there’s a whole “Meatless Monday” movement, in fact.
Most of the meat we do eat is locally raised – Hampton Roads has several wonderful farms producing high-quality, ethically-raised, pastured and free-range, hormone and antibiotic-free meats including beef, pork, chicken, lamb, goat, rabbit, and turkeys. Seriously. Although none of that matters much for this post, which is yet another vegetarian meal. One day, I promise, I will share a meat recipe.

This recipe came from a Rachael Ray inspiration. I don’t generally watch her show (or any daytime television) and I have a huge grudge against her for making the whole world think that ALL RACHELS spell their name RACHAEL – which just isn’t true. But I was at the dentist one day, confined to a chair with a TV in front of it and her show was on. She was making a pasta dish where instead of a traditional sauce, she roasted an eggplant and used the eggplant-meat as a sauce. Then she slapped some real meat on top of it, but that seemed unnecessary, so a few nights ago with an over-abundance of vegetables from my co-op, including a beautiful eggplant, I decided to riff on this idea.

eggplant Rotini

roasted vegetable rotini with eggplant sauce

There is one thing I share in common with Rachael Ray, and that is a tendency to not really have a “recipe” but instead to use kind of general directions and measurements. I once saw her instruct in a recipe to use a “palm-full” of something, and that is definitely how I cook. Measuring and following directions takes precision and patience – two things that I do not possess. It’s why you’ll never see a baking recipe on this blog.
So below is my best re-construction of what I did here.

Eggplant Rotini with Roasted Vegetables

Serves: 2 hungry people. Double for your fam.

Ingredients:

  • 1 Medium Eggplant
  • 1 small/medium zucchini
  • 1 smell/medium yellow squash
  • 1 large portobello cap
  • 1 small onion – red, yellow or white is fine
  • a handful of snap beans
  • 2 large cloves of garlic, minced
  • a handful of fresh basil
  • olive oil
  • 8 oz (half a box) of whole wheat rotini or other curly pasta
  • Parmesan cheese

Directions:

  1. Cut the eggplant in half, lengthwise, brush the cut sides with olive oil, then sprinkle with salt and pepper. Lay, cut side down, on a rimmed baking sheet and put in the oven at 375 F for about 30 mins.
  2. Take all of your veggies that you are putting in the pasta (I listed what I used above, but feel free to improvise or substitute here with whatever you have on hand), cut into pieces, mince one clove of garlic and dump it all into a bowl and coat with olive oil, salt, pepper and a little Italian seasoning, if you’d like. Pour onto a rimmed baking sheet. Stick in the oven with the eggplant for 25-30 mins of until they are done to your liking (I like mine to still have some bite, without tasting raw)
  3. When the veggies only have a few minutes left, start the pasta – cook according to package directions. Save half a cup of pasta water before draining.
  4. Take the eggplant out of the oven and let cool for a few minutes. The halves should look “deflated” and the inside should be runny and almost liquefied. Once they are cool enough to handle, scrape the insides of the eggplants out into a medium sized bowl and with the flat end of a wooden spoon, mash the eggplant. Stir in the other minced garlic clove, salt and pepper to taste, and Parmesan (a palm-full??), then stir in freshly torn or cut basil, stir until you have a nice paste going. (You can see a picture of this in the collage above, upper left-hand corner).
  5. Add the drained pasta to your eggplant paste and stir – adding in the reserved pasta water until the noodles are coated in a starchy sauce (you probably won’t need the whole half cup). Take the roasted veggies out of the oven and toss them into the pasta as well. Grate in some more Parmesan and mix. Top with fresh basil and little extra Parmesan.

We had this with some locally made hummus and whole wheat pita chips. This roasting and mixing method really takes the bitterness out of the eggplant that keeps a lot of people from eating this super-nutritious veggie. Eggplants are low in Saturated Fat and Cholesterol; they’re also a good source of Vitamin K, Thiamin, Vitamin B6, Folate, Potassium and Manganese, and a very good source of Dietary Fiber. The fiber in the eggplant, the other veggies and also in the whole-wheat pasta (about 6 grams per cup) make this a super filling meal. Fiber is known for keeping you full for longer, so you don’t have to eat as much of it in the first place, and then you’ll be less tempted to have a midnight snack later.

So don’t get me wrong – meat is great. But when it’s mid-July and I’m looking at all those beautiful vegetables, I can’t help but go back to those pre-bacon days and let the produce steal the show.

What is your favorite meatless meal? Are you reducing your meat consumption or are you a vegetarian? If so, what are your tricks for making filling meatless meals? 

Going once, going twice . . .

I’m not sure if I’ve mentioned this yet, but I pretty much have the best job ever. Case in point, yesterday for my “job” I met with two women who have just started a Food Truck business called Wrap-N-Roll and are interested in sourcing some of their ingredients for their healthy-but-yummy wraps from local producers. Let me re-cap: 1. Food Truck 2. Healthy but yummy 3. Local ingredients. FTW!
Here’s their food truck, which is actually a re-vamped RV from the 80’s, which I LOVE:

Wrap-N-Roll Food Truck

This beast has been given a second life!

I met them at the Virginia Beach Farmers Market, which hosts a produce auction every Wednesday night. This was my first time at a produce auction, but I thought it would be a good place to take them so they could purchase local product in bulk, meet the farmers, get a feel for local food pricing, etc etc. The whole thing is a little daunting and the auctioneer is seriously talking a mile a minute. For a southern girl like me who is used to hearing people talk …. uh…. slooowwweeerrr….it was a little hard to keep up with. Halfway through the auction the market manager and my former boss showed up and suggested I only try to catch every 10th word or so. He was right, but fortunately I wasn’t bidding, although it was incredibly tempting – everything looked so good!

Produce Auction

Peaches, cabbage, watermelon and a mixed box of corn, egglplant, tomatoes and peppers.

Yeaaaaa….THAT good. My food truck ladies bought what they needed and the whole thing worked out great. Maybe next week I’ll go back and do a little bidding . . .
Produce auctions are great for restaurants, retail outlets and just ordinary people wanting to buy in bulk for canning, jams or jellies, or other preservation methods. The prices are a steal and the product is incredibly fresh. Most of farmers who grow the product are actually there at the market. In fact, two of my very favorite farmers were there yesterday – Jim and Anne Bright.

Jim and Anne Bright

Anne and Jim are long-time family friends and Anne was even the mistress of ceremonies at my wedding. I love anything where I get to talk to farmers about what they’re growing – they are the most knowledgeable and helpful people. In fact, one of the ladies I was there with wanted to purchase a box from them, but along with other products she needed, it also included beets, which she had no idea what to do with (for shame!). Before she could even finish bemoaning this fact, Anne had given her an easy, but no doubt delicious, recipe for them. Which brings me to my next point:

New Local Food Program with USDA

Click on the image to go to the USDA food compass

If you can talk to the person who grew your food, then you don’t have to worry about things like “what country did this come from? What are their safety and food standards? Was it sustainably grown? Were herbicides or pesticides used? How fresh is this? What do I do with it? How do I store it?” All the answers to those questions are standing right in front of you! And then when you support restaurants (like Wrap-n-Roll) and other outlets who are also sourcing local product, you don’t have to worry about the same things when you’re eating out. Yay for food safety! And sustainability! And supporting your local economy! You get to eat fresh, local, delicious food and as a bonus – you’re a superhero! FTW!