The resourceful cook

Jeremy once told me that I was the most resourceful cook he knows. This is because I never start a meal plan for the week by deciding what I want to make, then writing down ingredients. Instead, I go to the pantry, freezer or fridge, see what random left overs or items we have, then plan our meals around that. Because most of what I cook is done without recipes, this works for me. And that’s the beauty of learning techniques versus recipes. If you know how to make a basic cream sauce, or the components of a risotto or the technique of braising meats, then you don’t need recipes. What I find to be most important is the concept of ratio. So if you know that a basic risotto calls for 1 part rice to 4 parts liquid, then you’re fine, and you can experiment to your hearts’ content without worrying about if the rice is going to dry up or if it’s going to be too soupy.

So this past week we had some kind of random things sitting around. First off, my sage plant has exploded this fall, so I wanted to use some fresh sage. I also had a huge bag of pistachios left over from camping and a half of a container of Parmesan….some of you know where this is going already: pesto! Pistachio-Sage pesto. Because, once again, if you know the basic components of pesto (basil, Parmesan, pine nuts, olive oil) you can swap each of those ingredients out for something similar (sage, Parmesan, pistachios, olive oil). I also had a huge FIVE POUND bag of quinoa that I got at Costco the other day, as well as a side of salmon that I had cut down into fillets and frozen. Finally there was a random butternut squash that I had picked up at a farm and sort of neglected.

fall dinner

I wanted to experiment with the idea of quinoa risotto. Normally risotto is made with Arborio rice, a super short-grain rice that cooks almost like a pasta. It’s cooked slowly, adding small amounts of liquid, which are then absorbed before adding more, and of course – stirring the entire time. Quinoa is also a grain and is …. not “short” but small, let’s say. I wasn’t sure if it would cream up like Arborio, which slowly releases its starch as it cooks, creating its own creamy sauce when combined with water, broth, wine, etc. But I figured it was worth a try.

The whole meal came together like this:

Step 1: fall dinner squash
Pre-head the oven to 375 F. Peel and cut the butternut squash into 1/2″ thick slices, brush with olive oil, salt, pepper and thyme, then lay out on a baking sheet and roast while putting together the rest of the meal. I only used about 1/4 of the squash (I made the rest of it into soup – resourceful!)

Step 2: 
Make the pesto by combining 1/4 cup of pistachios (shelled) with a palm full of Parmesan, a hearty bunch of sage (chopped), the juice of half a lemon, salt and pepper in a food processor. Pulse the ingredients while drizzing olive oil through the top until a nice thick paste forms.

Step 3:
Make the risotto. Start with a tablespoon of olive oil in a large skillet. Add a few cloves of minced garlic and half of an onion, diced small; cook until soft. Add one cup of diced mushrooms and a

fall dinner quinoalittle lemon zest and saute until soft. Add in one cup of quinoa (or Arborio rice) and toast the quinoa until it starts to brown. Pour in half a cup of chicken broth and use this to deglaze the pan, and stir until it is absorbed. Continue to add half a cup of broth at a time, stirring until absorbed until you’ve reached the consistency you want. You’ll likely use less liquid than you would with a true risotto. I used about two cups of broth to one cup of quinoa. It will take about 15-20 minutes to get the quinoa cooked through. You know when quinoa is cooked because the grain sort of pops open. It’s impossible to describe, but immediately obvious when it happens. When the risotto is close to being done, within the last few minutes, add the juice of half a lemon and a large spoonful of the pesto and stir in.

Step 4:
About 10 minutes before the risotto is done, coat some salmon fillets with your pesto and put on a baking sheet in the oven with your squash. Bake the salmon for 10 minutes of until it flakes easily with a fork.

Step 5:
Serve it up! Top the risotto with a little more Parmesan and top your salmon with a bit more pesto. Your squash should be a little crispy on the outside and cooked through on the inside from roasting. Serve with a lemon wedge to brighten up the salmon and risotto.
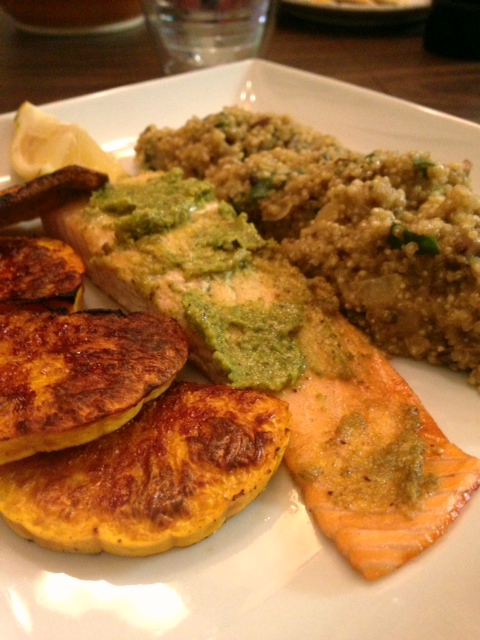
fall dinner plate

Step 6:
Enjoy. And use these steps to make something completely different – based on whatever you have on hand.

fall dinner fork

Chili my way

We broke a record low overnight last night in Hampton Roads – 58 degrees. That is COLD for August in southeastern Virginia and when I woke up this morning and stepped out on the back porch, the instant the sub-60 degree temperate hit me, I knew we had to have chili for dinner. Does anyone else have these instantaneous food triggers? Jeremy will vouch for the fact that I CANNOT listen to mariachi music without immediately needing a taco. Like, if I hear it on TV or out in public I will literally stick my fingers in my ears and go “lalalalalala” if I think there’s any chance I can’t immediately acquire a taco. This is how I am with chili. I can go months and months without thinking about it and then a cool breeze will come out of somewhere or maybe someone is burning yard debris or ANYTHING that seems like fall and I cannot rest until there is chili.

As we all know there are about a billion ways to make and eat chili and everyone from every part of the country will swear that their way is the right/legitimate/original/best way to make it. Fine, sure. It is. But the truth is, MY WAY IS THE BEST WAY SO SHUT UP.

Rachel’s Chili

(eat it or get out)

chili bowl - rlb

Ingredients:

  • 1 lb of ground turkey
  • olive oil
  • one onion
  • two cloves of garlic, minced
  • one 15oz can of kidney beans, drained
  • one 15 oz can of chili beans, drained
  • one 14 oz can of tomato sauce (or home made)
  • one 14oz can of crushed tomatoes
  • one can of beer (minus two swigs for yourself)(actually, take three swigs)(just put in whatever is left)
  • 1/8 cup of chili powder
  • 1/2 tbs cumin
  • 1 tsp coriander, crushed
  • 1/2 tsp cayenne or hot sauce or more if you like it spicy

Optional Toppings:

  • diced onions
  • chopped cilantro
  • shredded cheese
  • lime wedges
  • sour cream or plan Greek yogurt
  • avocado slices
  • crushed tortilla chips
  • crushed saltines

Method:

  1. In a large skillet heat the oil, sautee the onion and the garlic until soft
  2. Add the turkey and cook until browned. Drain any excess fat.
  3. Put the turkey mixture and remaining ingredients into a slow cooker and cook on low for 8 hours OR put all ingredients into a Dutch oven and cook over low heat on the stovetop for 3 hours.

I prefer using a slow cooker with chili because chili is just one of those things that gets better the longer it sits. I would even recommend making this the day before you’re going to serve it (The Saturday before game day, maybe?) but for me it’s too hard to make it and not eat it the same day, but do whatever your internal fortitude allows you to do. You can see by my beer recommendations, that mine is incredibly low.

chili toppings

And of course there are the chili toppings! I like to lay them all out and let everyone decide what they want. My must haves are plain Greek yogurt and shredded cheese with a squeeze of lime. This is the one part I’ll let you decide for yourself what is best.


Pimento Cheese

Only in the south would someone throw together shredded cheddar cheese, mayonnaise and some pimentos and call it fancy. But that is, in fact, what we have done. Southerners have a way of doing this – cutting up cucumbers, mixing some dill with some mayonnaise and putting them on white bread and suddenly everything is elevated.

A week ago I was headed to a committee meeting that I chair that is putting together an amazing local food event called Farm to Fork. I wanted to bring something for people to snack on, so I dropped into local gourmet retailer, Taste, and picked up the biggest container of their homemade pimento cheese they had. Upon arriving at the meeting location, I found out that our host had made her own homemade pimento cheese (of course!) and that mine was not necessary, so home with me it went.

Now, what to do with a giant, half-pound container of pimento cheese? Traditionally this delightfully spicy, rich treat is spread on crackers for hors d’oeuvres or on white bread for sandwiches that are perfect at the beach or for a picnic, but there’s only so much of that you can do before you’re over it, so I started brainstorming and the answer came to me that weekend as Jeremy and I put together our traditional Sunday breakfast of eggs, bacon, grits, toast, jam, coffee coffee coffee. PIMENTO CHEESE GRITS. Duh. I mean, seriously.

Oh the beauty of Sunday breakfast

Oh the beauty of Sunday breakfast

I’d like to think I invented this, however a brief googling of such shows that I am actually a little late to the game. But nonetheless, it was new to us and totally amazing.

All you do is make your grits as usual, then at the end, add in the amount of pimento cheese you like and add a little milk to cream it in. I like to serve my grits with a farm-fresh, over-easy egg on top, so that when you crack your egg open, this happens:

*drooooool*

*drooooool*

and you have to keep yourself from just sticking your face right into the bowl.

With a few crispy pieces of bacon, some whole wheat bread slathered with homemade jam from Jeremy’s Aunt Liz and all the coffee you can drink. I just…I can’t…it’s too much.

SO let’s say you don’t live near one of the six Taste locations (poor you, you should really move to Hampton Roads), and you want to make your own Pimento Cheese? Well, my friends, you’re in luck because it’s literally the easiest thing you’ll ever make:

Pimento Cheese

pimento cheese up close

Ingredients

  • 1 (8-ounce) package shredded sharp Cheddar
  • 1 (8-ounce) package shredded extra-sharp Cheddar
  • 1 (4-ounce) jar pimientos, with juice
  • 1/4 cup mayonnaise
  • Salt and pepper

Directions

  1. Mix the shredded cheeses together with the pimientos and their juice. Stir in the mayonnaise until well blended. Add salt and pepper, to taste, and stir. Keep covered in the refrigerator until ready to use. It is easier to spread if left on the counter for 30 minutes before serving. Great on bread, celery sticks, or crackers.

Recipe credit to the Food Network

Yes, this is a Paula Deen recipe. Look, for better or worse statements, love her or hate her, if anyone is going to tell you how to make Pimento Cheese, it’s that lady. Period. Because in the south, “fancy” is sometimes just a spoonful of mayonnaise (or a stick of butter) away.

I’m still eating

I’m still alive, I’m still cooking and please believe I’m still eating. We are currently in between houses – we sold our townhouse but have yet to move into our new house. So we are living it up at my parents! It’s actually much better than you’re imagining but while I’m here and paying no rent I’m making my payments in food. Both of my parents and Jeremy work long hours on top of an hour long commute, each way, which means I’m eating alone a lot, which is not my favorite but gives me an excuse to eat nothing but lettuce, heirloom tomatoes, feta and wine. Can’t wait to start posting from my new, amazing kitchen!

20130626-193012.jpg

Dried strawberries

It’s strawberry season in Hampton Roads, and that is major. We love our strawberries around here. Every city in the region that has farms has pick-your-own strawberry fields and it’s a tradition for kids and adults alike to pick strawberries on field trips or on Mother’s Day or Memorial Day weekend when Virginia Beach hosts the Strawberry Festival.

Last week I got an email from a farm saying that they had so many berries in their field that they were going to be offering pick your own berries for $1.25/lb. That is unheard of. You would never ever find berries that cheap in the grocery store. So after sharing it with the Buy Fresh Buy Local Facebook fans, I got in the car and headed to the farm, which thankfully, is only about 10 minutes from my house. Yeah, it was a week day. Yeah, I had a lot of work to do, but sometimes you just have to get up and go pick strawberries. All that work will be there for you when you get back, I promise.

If you’ve never picked strawberries, it’s very easy – they are literally low hanging fruit. When they’re ripe, they get so heavy they just sort of dangle below the leaves and pretty white flowers of their plant. And they pop right off their stems and get tossed right into your strawberry carrying device. The only issue is that if you have a bad back like I do, you may be in a bit of pain the next day (like I was), but that’s why you bring your kids – to do the hard work of bending over and finding the ripest strawberries. When picking, look for deep, red berries. Before plucking them off the plant, lift them up and make sure the underside isn’t white or green (unripe) or that it hasn’t been noshed on by any bugs.

Sometimes you just have to leave your desk and go pick strawberries.

Sometimes you just have to leave your desk and go pick strawberries.

So what to do with 10 lbs of berries once you get them home? Most people I know make strawberry bread, pie, muffins, etc etc. We all know how I feel about baking, so I do one of (or all of) three different thing:

1. Eat them. Duh.

2. Freeze them. Rinse and dry the berries, cut off the caps and then halve each berry and lay in a single layer on a baking sheet. Place the sheet in the freezer for several hours, then put the berries into a freezer ziploc bag. Pull out what you need, when you need it. I freeze pounds and pounds of berries like this every year to use in my smoothies all year long.

3. Dry them. Dried berries are sort of like craisins – tart, but still a little sweet. Perfect in salads, on yogurt or oatmeal, granola, etc. Wash and dry the berries, cut off the caps and halve each berry. Lay in a single layer on a baking sheet and bake at 210 degrees for 3 hours. Let them cool completely, then store in an airtight container in the fridge OR you could freeze these also and just thaw them as you need them. I’m not sure exactly how long they’ll keep in the fridge….you’ve probably got about a week?

Dried Strawberries

Dried Strawberries

Strawberries are pretty amazing little fruits. One cup of berries has only 49 calories and almost 150% of your daily Vitamin C. They also have fiber and protein and good amounts of folates and potassium as well as manganese.

So get out there and pick some today. Or, make your kids do it. Also, can I borrow your kids for an afternoon?

Kefir

A few weeks ago I saw an interesting item come up on my online local food co-op, Coastal Farms. Jen Vaughan, of Vaughan Farms Produce, had posted that she had some extra kefir grains, and was selling them, along with a mason jar and some instructions on what to do with them.  I was intrigued, so I did a little research and it turns out that kefir grains are not actually grains, but rather a symbiotic culture of yeast and bacteria. Yummy! When brewed, they ferment (just like beer or wine) and create an active probiotic culture (just like yogurt). Kefir is probably most well known as a yogurt type of product or kefir milk, but it turns out you can also brew kefir into “kefir water” which is sort of a sparkling-like fermented beverage. The fizziness of it comes from the fermentation and can be adjusted based on how much air is allowed in during the process. The whole process and product is very similar to Kombucha, which is probably a little more well recognized.

Kefir grains and my first kefir water batch

Kefir grains and my first kefir water batch

I ordered my first batch and got to brewing! Jen had a few great suggestions for recipes to give the water flavor. Plain kefir water isn’t exactly delicious, so it’s recommended that you mix it with flavorings, which can range from green tea to juice to vanilla extract, depending on how you want it to taste. For my first batch I did a green tea flavoring, then I followed that with a cream soda style flavor and now I am on to a citrusy grapefruit juice. The process is simple:

1. Dissolve 1/4 cup of raw, brown sugar (I’m using raw demerara sugar) in 1 quart of distilled water (or spring or mineral water, according to the interwebs) in a container with a lid (I used the 1 quart mason jar Jen provided). Make sure the water is room temp and not hot – that will kill the grains. Drop in a raisin or two (they will be your ‘tell’) and a lemon slice if you have one (helps with the Ph). Put in three tablespoons of kefir grains. Put the container with the lid just set on top – not screwed on, in a warm place out of direct sunlight. For me, this was on top of my fridge.

2. When the raisins have floated to the top of the water, usually 2-3 days, the water is done “brewing.” Remove the lemon slice and raisins, then strain the water through a fine sieve. Here’s the trick – kefir doesn’t like metal – you have to use glass or plastic or in my case, I just put a paper towel on my metal sieve and strain it that way. Cheesecloth would also work, if I could find it anywhere, ever. Put your kefir grains back into your mason jar or container and start again with 1 quart of water and 1/4 cup of sugar, raisins, lemon, etc – the grains can pretty much be brewed indefinitely.

I strain the kefir through a paper towel lined sieve since metal can kill the grains

I strain the kefir through a paper towel lined sieve since metal can kill the grains


3. Take your strained kefir water and add your preferred flavorings. Here is what I’ve tried:

  • 1 part very strongly brewed green tea to 1 part kefir water.
  • 1 tbs vanilla extract and an extra 1/4 cup raw sugar (creates a cream soda style water)
  • 1 part grapefruit juice to 1 part kefir water, one sliced lemon, one sliced lime

Once you’ve added your flavors, put it through a second fermentation – so put it back in another container with a lid just resting on top in a warm place out of sunlight for about 2 more days. At this point, if you’ve added things (like lemon and lime slices) strain it again and then bottle it up and put it in the fridge. The water will last as long as whatever you’ve brewed it with would. So however long you’d leave a pitcher of brewed tea in your fridge is how long you can leave the kefir water brew in there and it will be fine. Keep repeating the process with your other fermenting batch and you can have indefinite kefir water!

my first taste!

my first taste!

There are innumerable ways to prepare and brew your kefir water and also tons of sites online where you can purchase the grains. I found this site particularly helpful: http://www.culturesforhealth.com/water-kefir-frequently-asked-questions-faq

I have noticed that since I’ve been drinking the water every day, my stomach issues have decreased some. It’s like I’m drinking my probiotic pills (which I also continue to take) and it certainly can’t hurt to get as much good bacteria going as possible. If you suffer from any kind of intestinal issues, or even if you don’t – I would really recommend giving this a try. The fizziness is nice without being too much (I hate soda and carbonated beverages, but this is the perfect amount of fizz for me), and the flexibility of flavorings is really nice. And because the grains basically feed on the sugar in the brewing process, the overall sugar content of kefir water is much, much lower than you would imagine based on how much you put in at the beginning. According to CulturesforHealth.com “approximately 20% of the sugar you start with will remain following a 48- hour culturing process and almost all that sugar will have been converted to fructose from its original glucose-fructose state.  Therefore if you use our recommend ratio of 1/4 cup sugar to 1 quart water, the finished kefir will contain approximately 1.4% fructose.” That’s pretty low – much lower than fruit juice, juice cocktails and certainly less than soda.

So give something different a try! Love the good bacteria!

strained kefir grains

strained kefir grains

Shrimp Ceviche Saturday

I’m on my own this Saturday night and whenever that happens I like to make myself something special. Usually that means a giant wheel of Brie and a bottle of wine but since I’m cutting back on the cheese I decided to do something a little more “clean.” I accidentally bought pre-cooked shrimp at the grocery store the other day (instead of raw) – this is my problem with the grocery store. I want to get out of there so bad that I just blindly grab things that look right. I’m the worst grocery shopper ever. I usually only come home with half of what I need because I hate it so bad. It’s a conundrum to love to cook but to hate to shop for food. Oh well. Crosses to bear and all that. Anyways! Shrimp ceviche it is! It just sounded perfect. And it is. And easy. And there’s really no “cooking” involved. Cheers!

20130316-202832.jpg

Shrimp ceviche

Ingredients:

  • 1 red onion, diced small
  • 1 tsp olive oil
  • the juice of two limes
  • 1 avocado, diced
  • 1 jalapeno, seeded and diced small
  • 1 cucumber, peeled and diced
  • 1/2 pint cherry tomatoes, each tomato quartered
  • 1 lb large, cooked, deveined shrimp
  • 1/4 cup chopped cilantro
  • salt and pepper to taste

Method:

  1. Dice red onion and put into a bowl with the lime juice, season lightly with salt and pepper and let marinate at least 5 minutes 
  2. Dice the avocado, jalapeno, cucumber, tomatoes and add to bowl with onions
  3. Peel the shrimp and cut into three pieces per each shrimp – add to the bowl with the rest of the ingredients, mix well. Stir in the cilantro. Serve in martini glasses at room temperature or chilled.
Shrimp Ceviche

Shrimp Ceviche

Ceviche is a general term for any seafood dish, where the seafood is “cooked” by curing in an acidic  marinade, usually primarily made of lime juice or tomato juice. I can’t recommend to you that you use raw shrimp in ceviche unless you are getting it fresh off the boat, straight from the water and are curing it within half on hour of picking  it up. Fish is a little different, but with shrimp, just be careful.

This dish is so light and delicious and pairs perfectly with a New Zealand Sauvignon Blanc. So light and delicious, in fact, that before you know it, you’ve eaten an entire bowl of Ceviche and 3/4 a bottle of wine . . . although, to be fair, I only made half of this recipe. And to be perfectly honest, I drank the entire bottle of wine. What? It’s St. Patrick’s day weekend, give me break. Ceviche, take me away!